Spooky Halloween Dirt Cake Recipe – No Bake & Ready in 20 Minutes
Discover our delicious Halloween dirt cake recipe! This easy recipe offers tips for perfectly creamy pudding with a crushed cookie “dirt” topping.
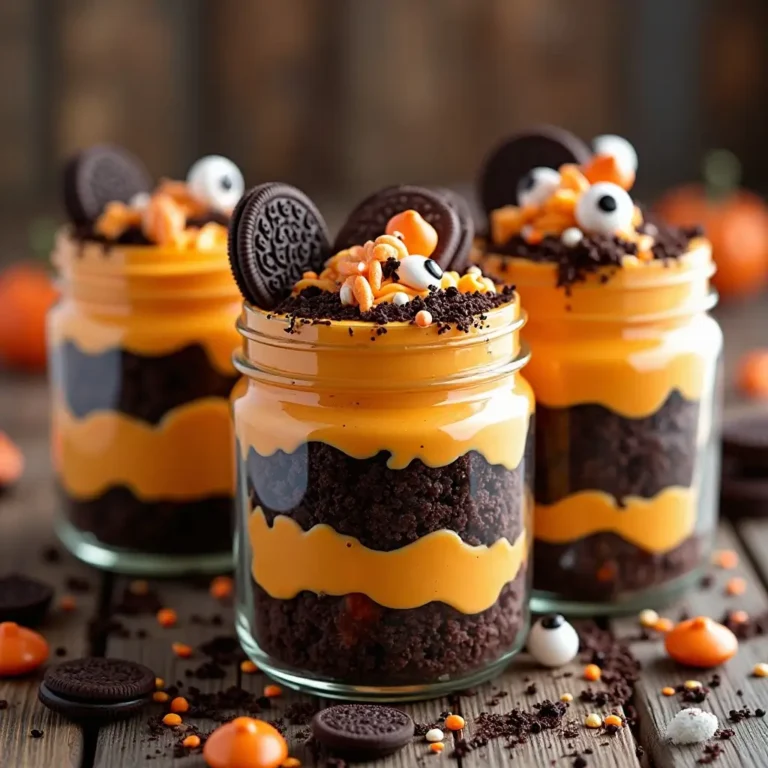
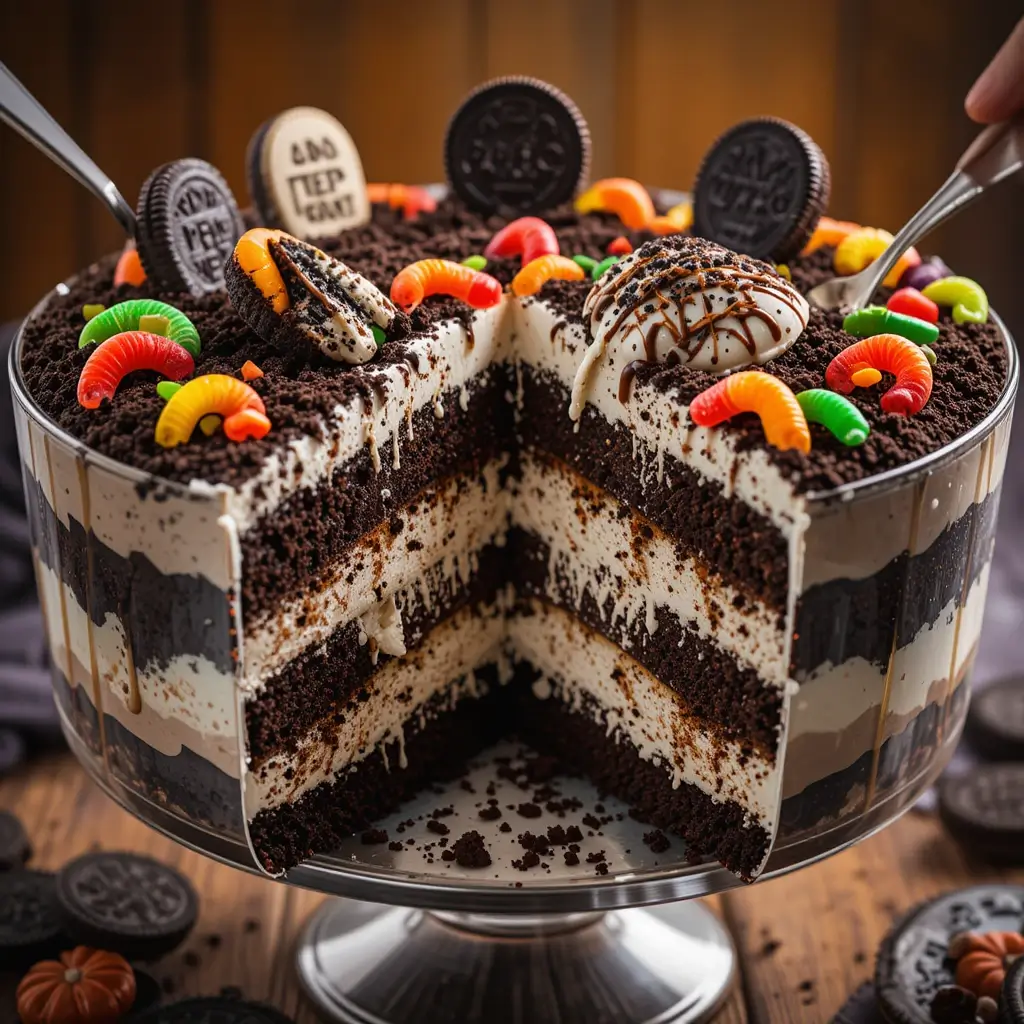
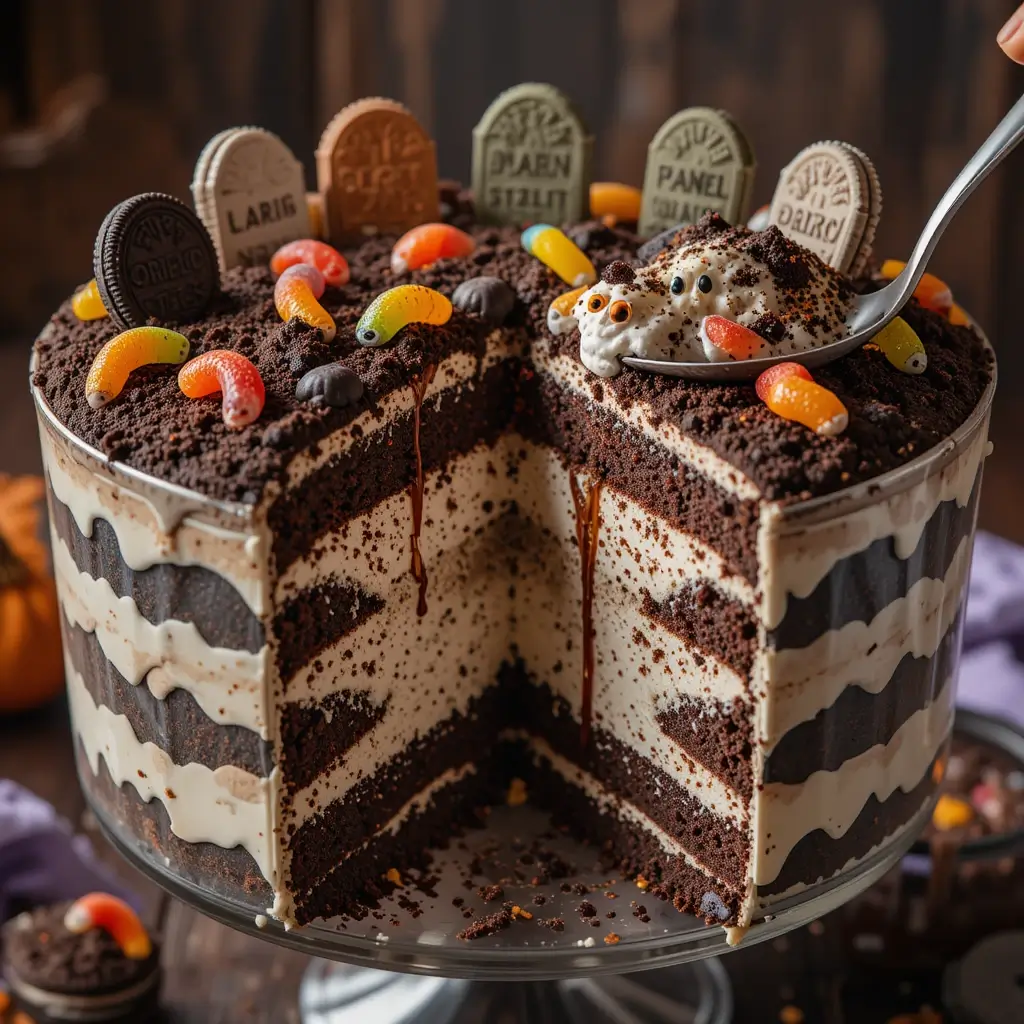
Get ready to dig into the most delightfully spooky Halloween dirt cake that looks exactly like a graveyard but tastes like pure heaven! This no-bake dessert combines rich chocolate pudding, creamy whipped topping, and crushed Oreos to create an eerily realistic “dirt” cake that’s perfect for Halloween parties.
What makes this recipe absolutely magical is how incredibly easy it is to make – no oven required, just 20 minutes of prep time, and you’ll have a show-stopping dessert that will have your guests screaming for more.
Much like our popular pumpkin spice cheesecake bars, this Halloween dirt cake proves that the most impressive desserts are often the simplest to create.
What is Halloween Dirt Cake?
Ever wondered why we call this spooky treat “dirt cake”? Well, it’s not made with actual dirt (thankfully!), but it looks so convincingly muddy that you might fool a few trick-or-treaters! This playful dessert gets its name from the crushed chocolate cookies that mimic the appearance of rich, dark soil.
Legend has it that the first dirt cake was created by a clever baker who wanted to make gardening-themed desserts, but we’ve given it a ghostly Halloween twist. As they say, “the way to a man’s heart is through his stomach,” and this dirt cake will definitely capture hearts with its perfect blend of creamy and crunchy textures. Ready to get your hands dirty?
Why You’ll Love This Halloween Dirt Cake
Spook-tacularly Simple to Make
This Halloween dirt cake is the ultimate crowd-pleaser that requires zero baking skills but delivers maximum wow factor. The combination of velvety chocolate pudding, fluffy whipped cream, and crunchy Oreo “dirt” creates a textural paradise that melts in your mouth. Your taste buds will dance with joy as they experience the rich chocolate flavors layered throughout this ghostly creation.
Budget-Friendly Boo-tiful Dessert
Making this spooky treat at home saves you a frightening amount of money compared to buying expensive bakery desserts. With just a handful of affordable ingredients from your local grocery store, you can create a dessert that serves 12-15 people for under $15. That’s less than a dollar per serving for a dessert that looks like it came from a professional haunted bakery!
Customizable Halloween Magic
The beauty of this dirt cake lies in its versatility – you can top it with gummy worms, candy tombstones, plastic spiders, or zombie hands to match your Halloween theme perfectly. The crushed Oreo “soil” provides the perfect base for any spooky decorations your imagination can conjure. Similar to our monster cookie bars, this recipe encourages creativity and personalization to match your Halloween party’s vibe.
Ready to create some deliciously spooky memories? Let’s dig into this hauntingly simple recipe that will make you the star of any Halloween gathering!
How to Make Halloween Dirt Cake
Quick Overview
This Halloween dirt cake is a no-bake wonder that combines the rich flavors of chocolate pudding, cream cheese, and whipped topping with the satisfying crunch of crushed Oreos. The result is a dessert that’s:
- Incredibly easy to make with no baking required
- Rich and creamy with perfect chocolate flavor
- Visually stunning with realistic “dirt” appearance
- Ready in just 20 minutes of prep time
- Chills in 2-4 hours before serving
Total Time: 20 minutes prep + 2-4 hours chilling
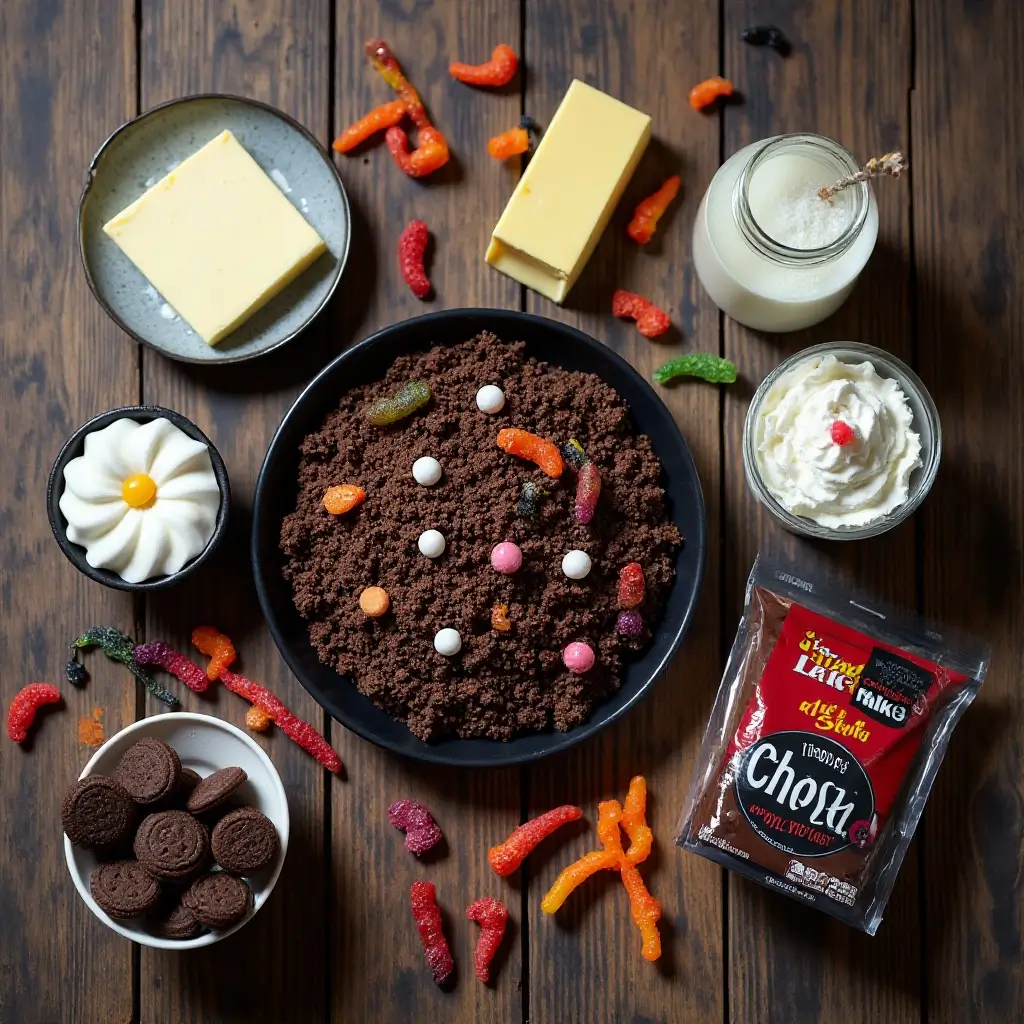
Key Ingredients for Halloween Dirt Cake
For the Creamy Base:
- 1 package (8 oz) cream cheese, softened
- 1/2 cup butter, softened
- 1 cup powdered sugar
- 2 packages (3.4 oz each) instant chocolate pudding mix
- 3 cups cold milk
- 1 container (12 oz) whipped topping, thawed
For the “Dirt” and Decorations:
- 1 package (14.3 oz) chocolate sandwich cookies (like Oreos)
- Gummy worms
- Halloween candy decorations
- Plastic spiders or tombstones (optional)
Step-by-Step Instructions
How to Make the Creamy Layer
Step 1: In a large mixing bowl, beat the softened cream cheese and butter together using an electric mixer until the mixture is light and fluffy, about 2-3 minutes. Make sure there are no lumps remaining for the smoothest texture.
Step 2: Gradually add the powdered sugar to the cream cheese mixture, beating continuously until completely combined. This creates the sweet, creamy base that makes this dirt cake irresistibly delicious.
Step 3: In a separate bowl, whisk together the instant chocolate pudding mix and cold milk for exactly 2 minutes. Let it stand for 5 minutes to thicken completely. The pudding should have a smooth, rich consistency.
Step 4: Gently fold the thickened chocolate pudding into the cream cheese mixture until evenly combined. Be careful not to overmix, as this can make the mixture too thin.
Step 5: Fold in half of the whipped topping until just combined, saving the rest for layering. This creates the perfect creamy, mousse-like texture that makes every bite heavenly.
How to Assemble Your Halloween Dirt Cake
Step 6: Place the chocolate sandwich cookies in a large zip-top bag and crush them using a rolling pin or meat mallet. You want a mixture of fine crumbs and small chunks to create realistic “dirt” texture.
Step 7: In a large clear glass bowl or trifle dish, spread half of the creamy chocolate mixture as your first layer. This creates the foundation for your spooky masterpiece.
Step 8: Sprinkle half of the crushed cookies over the creamy layer, covering it completely. This is where the magic happens – your dessert starts looking like real dirt!
Step 9: Spread the remaining creamy mixture over the cookie crumbs, smoothing it gently with a spatula. Try to keep the layers distinct for the best visual impact.
Step 10: Top with the remaining crushed cookies, creating your final “dirt” layer. Press the crumbs down slightly to help them adhere to the creamy layer below.
How to Add Spooky Decorations
Step 11: Insert gummy worms throughout the “dirt,” allowing some to peek out as if they’re crawling through the soil. This adds the perfect creepy-crawly touch to your Halloween dessert.
Step 12: Add your chosen Halloween decorations like plastic tombstones, spiders, or candy bones. Get creative and make it as spooky or fun as your party calls for!
Step 13: Refrigerate the assembled dirt cake for at least 2-4 hours before serving. This chilling time allows all the flavors to meld together and creates the perfect sliceable consistency.
What to Serve Halloween Dirt Cake With
This spooky dirt cake pairs beautifully with several complementary treats and beverages:
Hot Beverages: Serve alongside hot chocolate with marshmallows, spiced apple cider, or pumpkin spice lattes to warm up your guests on chilly Halloween nights.
Cold Drinks: Orange punch, “witch’s brew” (purple grape juice), or classic milk create perfect flavor combinations with the rich chocolate dessert.
Light Snacks: Balance the richness with salty treats like Halloween-themed popcorn, pretzel sticks, or cheese and crackers for guests who want to cleanse their palate.
Other Desserts: Create a dessert table by pairing with lighter options like candy corn cookies, pumpkin mousse cups, or caramel apples for variety.
Top Tips for Perfecting Halloween Dirt Cake
How to Achieve the Perfect Texture
Make sure your cream cheese is completely softened before mixing to avoid lumps in your creamy base. Let it sit at room temperature for at least 30 minutes, or microwave it for 15-20 seconds if you’re short on time.
How to Make the Best “Dirt” Effect
Don’t crush your cookies too finely – you want a mixture of different sized pieces to create the most realistic dirt appearance. Some larger chunks mixed with fine crumbs work perfectly.
How to Prevent Soggy Layers
Assemble your dirt cake no more than 24 hours before serving to prevent the cookies from becoming too soft. If making ahead, add the final cookie layer just before serving for maximum crunch.
How to Customize for Different Themes
Swap regular Oreos for Halloween-colored cookies, or add orange food coloring to the whipped topping for a more festive look. You can also use different pudding flavors like vanilla or butterscotch for variety.
How to Make Individual Portions
Create personal-sized dirt cakes in clear plastic cups for easy serving at parties. This also makes it easier for guests to grab and go during busy Halloween events.
Storing and Reheating Tips
How to Store Halloween Dirt Cake
Store your Halloween dirt cake covered in the refrigerator for up to 3 days. Use plastic wrap or a tight-fitting lid to prevent the dessert from absorbing other refrigerator odors and to maintain optimal freshness.
The creamy layers will stay perfectly smooth and delicious when properly stored, though the cookie “dirt” may soften slightly over time.
How to Freeze for Later
This dirt cake freezes beautifully for up to 2 months! Wrap individual portions in plastic wrap and place in freezer-safe containers. Thaw in the refrigerator for 4-6 hours before serving.
For best results, add fresh crushed cookies on top after thawing to restore that perfect crunchy “dirt” texture.
How to Refresh Before Serving
If your dirt cake has been stored for a day or two, refresh the top layer by adding some newly crushed cookies just before serving. This ensures every bite has that satisfying crunch that makes this dessert so special.
Frequently Asked Questions
Can I make Halloween dirt cake without cream cheese?
Yes! You can substitute the cream cheese with an additional 8 oz of whipped topping mixed with 1/4 cup of powdered sugar. The texture will be lighter and fluffier, though slightly less rich than the traditional version.
How far in advance can I make this dirt cake?
You can make Halloween dirt cake up to 2 days ahead of time. However, for the best texture, add the final layer of crushed cookies just before serving to maintain maximum crunchiness.
What’s the best way to crush Oreos for dirt cake?
Place cookies in a sealed zip-top bag and use a rolling pin or meat mallet to crush them. Aim for a mixture of fine crumbs and small chunks rather than powder – this creates the most realistic “dirt” appearance.
Can I use sugar-free ingredients for this recipe?
Absolutely! Use sugar-free pudding mix, sugar-free cookies, and sugar-free whipped topping. Replace powdered sugar with powdered erythritol or your preferred sugar substitute. The taste will be slightly different but still delicious.
How do I transport dirt cake to a party?
Use a dish with a tight-fitting lid and keep it refrigerated until the last possible moment. If traveling far, pack it in a cooler with ice packs. Consider making individual portions in cups for easier transport and serving.
Can I make this recipe gluten-free?
Yes! Simply substitute the chocolate sandwich cookies with your favorite gluten-free chocolate cookies. Crush them the same way, and the rest of the recipe remains unchanged.
What other decorations work well besides gummy worms?
Try candy tombstones, plastic spiders, chocolate rocks, candy corn, Halloween sprinkles, or even small Halloween figurines. Just make sure any non-edible decorations are clearly marked or removed before eating.
How do I prevent my layers from mixing together?
Chill each layer for 30 minutes before adding the next one, and be gentle when spreading. Use a large spoon to dollop the mixture in several spots, then carefully spread rather than dumping it all in one place.
Nutritional Information
| Nutrient | Per Serving (1/12 of cake) |
|---|---|
| Calories | 420 |
| Total Fat | 18g |
| Saturated Fat | 12g |
| Cholesterol | 35mg |
| Sodium | 380mg |
| Total Carbs | 65g |
| Dietary Fiber | 2g |
| Sugars | 55g |
| Protein | 6g |
Nutritional values are approximate and may vary based on specific brands used
Final Spooky Thoughts
This Halloween dirt cake is more than just a dessert – it’s an experience that brings families together and creates lasting memories. The combination of rich, creamy textures with the fun, interactive element of “digging” for gummy worms makes it perfect for Halloween parties, school events, or any time you want to add a little spooky fun to your day.
The best part about this recipe is how it encourages creativity and personalization. Every time you make it, you can try different decorations, experiment with new “creepy crawly” additions, or even create themed variations for different occasions.
Whether you’re a seasoned baker or someone who typically avoids the kitchen, this no-bake Halloween dirt cake will make you feel like a dessert wizard. So gather your ingredients, embrace the mess, and get ready to create some deliciously spooky magic that will have everyone asking for your secret recipe!
Happy haunting, and enjoy every creamy, crunchy, spooktacular bite!