
15 Minute Cherry Cake Filling Recipe – Only 6 Ingredients
Love cherry pie but want something new? Cherry cake filling lets you enjoy that classic flavor in cakes, pastries, and more. Try it today
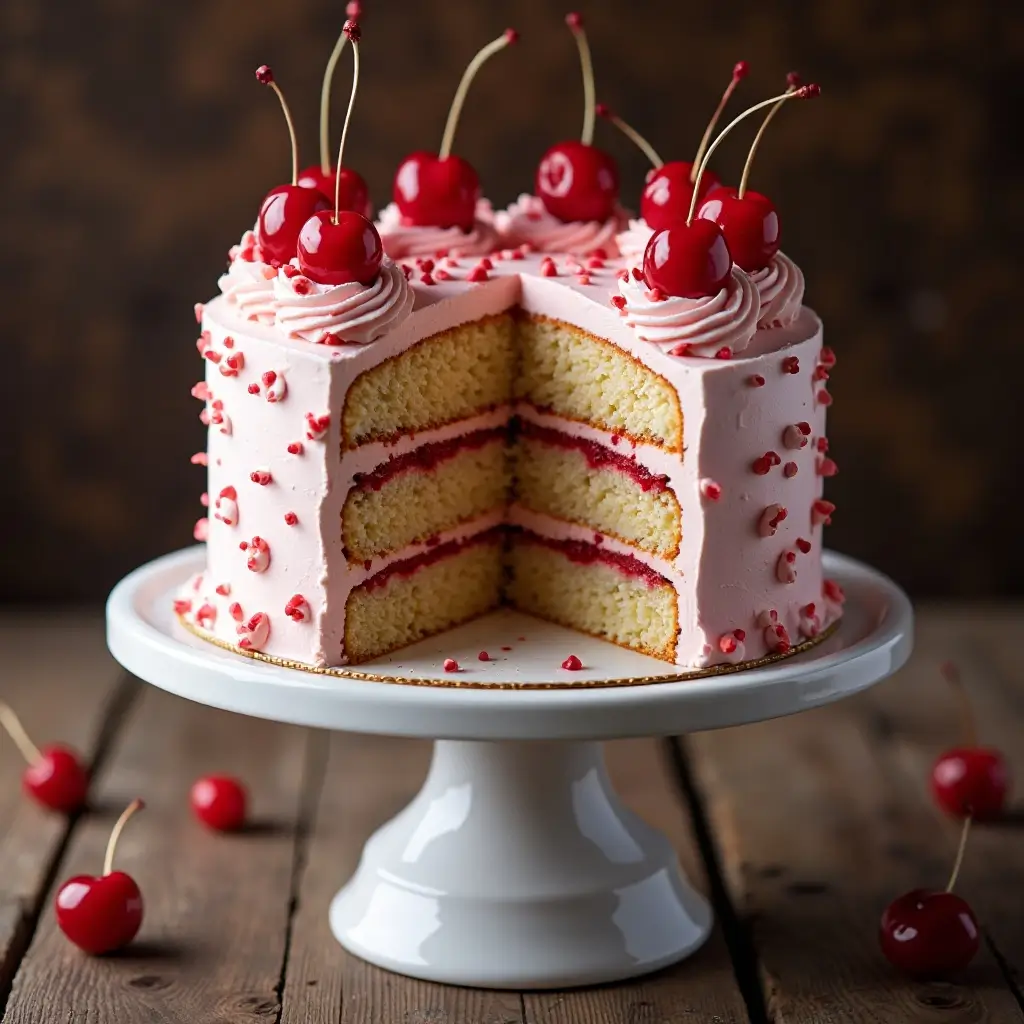
Picture this: you’re slicing into a beautiful layer cake, and gorgeous ruby-red cherry filling cascades down the sides like liquid jewels. This homemade cherry cake filling transforms any ordinary cake into a bakery-worthy masterpiece that’ll have your family begging for seconds
Unlike store-bought versions packed with artificial flavors, this recipe uses real cherries to create a perfectly balanced sweet-tart filling that’s surprisingly simple to make.
Just like our popular strawberry cake filling, this cherry version requires only basic pantry staples and delivers restaurant-quality results every single time!
Table of Contents
What is Cherry Cake Filling?
Ever wondered why we call it “filling” when it’s clearly the star of the show? This luscious cherry cake filling is basically summer captured in a spoon – bursts of juicy cherries swimming in a glossy, jewel-toned sauce that’s neither too sweet nor too tart.
Some say it originated from German Black Forest traditions, while others claim it’s an American diner classic. Either way, they say the way to a man’s heart is through his stomach, and this filling definitely paves that delicious path! Ready to create some kitchen magic?
Why You’ll Love This Cherry Cake Filling:
Fresh, Vibrant Flavor That Beats Store-Bought Every Time
This homemade cherry cake filling bursts with authentic cherry flavor that makes your taste buds dance. The natural sweetness of ripe cherries combined with just the right amount of tartness creates a complex flavor profile that store-bought versions simply can’t match. Each spoonful delivers chunks of real fruit surrounded by a glossy, ruby-red sauce that looks as stunning as it tastes.
Budget-Friendly Alternative to Expensive Bakery Cakes
Making this cherry cake filling at home costs a fraction of what you’d pay for a bakery cake. A single batch can fill multiple layer cakes or provide enough topping for dozens of cupcakes. You’ll save money while controlling every ingredient that goes into your dessert – no artificial colors, preservatives, or mystery additives.
Versatile and Customizable for Any Occasion
This filling works beautifully in layer cakes, as a topping for cheesecakes, or even spooned over vanilla ice cream. You can adjust the sweetness, add spices like cinnamon or almond extract, or mix in other fruits for unique flavor combinations.
Just like our apple pie filling recipe, this cherry version adapts to your preferences and dietary needs. Why not give it a try and discover your new favorite dessert component?
How to Make Cherry Cake Filling:
Quick Overview
This cherry cake filling comes together in just 15 minutes using simple stovetop techniques. The key is balancing the natural tartness of cherries with just enough sweetness and thickening the mixture to the perfect consistency.
Prep Time: 5 minutes
Cook Time: 10 minutes
Total Time: 15 minutes
Servings: Fills one 9-inch layer cake
Key Ingredients for Cherry Cake Filling:
- 2 pounds fresh or frozen pitted cherries (sweet or tart varieties work well)
- 3/4 cup granulated sugar (adjust based on cherry sweetness)
- 1/4 cup cornstarch (for thickening)
- 1/4 cup cold water (to dissolve cornstarch)
- 2 tablespoons fresh lemon juice (enhances flavor and color)
- 1 teaspoon vanilla extract (adds depth)
- 1/4 teaspoon almond extract (optional, for enhanced cherry flavor)
- Pinch of salt (balances sweetness)

Step-by-Step Instructions:
Step 1: Prepare Your Cherries
If using fresh cherries, wash and pit them thoroughly. Frozen cherries can be used directly from the freezer – no need to thaw. Place cherries in a large, heavy-bottomed saucepan and set aside.
Step 2: Create the Cornstarch Slurry
In a small bowl, whisk together cornstarch and cold water until completely smooth. This slurry prevents lumps from forming in your filling. Set aside until needed.
Step 3: Start Cooking the Cherries
Add sugar and lemon juice to the cherries in your saucepan. Cook over medium heat, stirring gently, for 3-4 minutes until cherries begin to release their juices and sugar dissolves.
Step 4: Thicken the Filling
Give your cornstarch slurry a quick stir, then slowly pour it into the cherry mixture while stirring constantly. Continue cooking for 3-4 more minutes until the filling thickens to a glossy, spoonable consistency.
Step 5: Add Final Flavorings
Remove from heat and stir in vanilla extract, almond extract (if using), and a pinch of salt. Taste and adjust sweetness or tartness as needed with additional sugar or lemon juice.
Step 6: Cool Completely
Let the filling cool to room temperature before using. It will thicken slightly more as it cools. The filling can be used immediately or stored for later use.
What to Serve Cherry Cake Filling With:
This versatile cherry cake filling pairs beautifully with vanilla or chocolate layer cakes, creating classic combinations that never go out of style. Try it between layers of fluffy white cake for a traditional cherry cake, or use it to top cheesecake for an elegant dessert. The filling also works wonderfully with:
- Pound cake slices for an easy weeknight dessert
- Angel food cake for a lighter option
- Vanilla ice cream or frozen yogurt as a sundae topping
- Pancakes or waffles for a special breakfast treat
- Cream cheese frosting as a swirled filling in cupcakes
Consider serving alongside fresh whipped cream, a scoop of vanilla bean ice cream, or even a dollop of mascarpone cheese for added richness.
Top Tips for Perfecting Cherry Cake Filling:
Choose the Right Cherry Variety
Sweet cherries like Bing or Rainier create a milder filling, while tart cherries like Montmorency provide more pucker power. Mix both varieties for the perfect balance, or adjust sugar accordingly based on your cherry choice.
Don’t Overcook the Filling
The filling should coat the back of a spoon but still flow easily. Overcooking creates a gummy texture that’s difficult to spread. Remove from heat as soon as it reaches the right consistency.
Strain for Smoothness (Optional)
For an ultra-smooth filling, strain the mixture through a fine-mesh sieve to remove cherry skins and any lumps. This creates a more refined texture perfect for elegant layer cakes.
Make It Your Own
Add 1/2 teaspoon cinnamon for warmth, a tablespoon of kirsch or cherry brandy for adult sophistication, or mix in chopped toasted almonds for texture contrast.
Storing and Reheating Tips:
Store your cherry cake filling in an airtight container in the refrigerator for up to one week. The filling may thicken further when chilled – simply stir in a tablespoon of warm water to restore the desired consistency.
For longer storage, freeze the filling in freezer-safe containers for up to six months. Thaw overnight in the refrigerator before using. Frozen filling may separate slightly after thawing, but a gentle stir usually brings it back together perfectly.
To reheat, warm gently in a saucepan over low heat, stirring frequently, or microwave in 30-second intervals until warmed through. Avoid high heat, which can cause the filling to break or become lumpy.
Nutrition Information
| Nutrient | Per 1/4 Cup Serving |
|---|---|
| Calories | 85 |
| Total Fat | 0.2g |
| Sodium | 15mg |
| Total Carbs | 22g |
| Dietary Fiber | 1.8g |
| Sugars | 19g |
| Protein | 1g |
| Vitamin C | 12% DV |
| Potassium | 180mg |
Note: Nutrition values are approximate and may vary based on specific ingredients used
Frequently Asked Questions
Can I use frozen cherries instead of fresh?
Absolutely! Frozen cherries work perfectly in this recipe and are often more economical. Use them straight from the freezer – no need to thaw first. You might need an extra minute or two of cooking time.
How do I know when the filling is thick enough?
The filling is ready when it coats the back of a spoon and holds its shape briefly when dropped from the spoon. It should be pourable but not runny, similar to the consistency of good maple syrup.
Can I reduce the sugar in this recipe?
Yes, start with 1/2 cup sugar and taste after cooking. Remember that cherries vary in natural sweetness, and the filling will taste less sweet once it cools. You can always add more sugar, but you can’t take it away.
Why is my filling runny even after adding cornstarch?
Make sure your cornstarch slurry is completely smooth before adding it to the hot cherries. The mixture needs to come to a gentle boil for the cornstarch to activate properly. If it’s still thin, make another small slurry and add it gradually.
How far in advance can I make this filling?
This filling actually improves with time! Make it up to 3 days ahead and store covered in the refrigerator. The flavors meld beautifully, and it’s one less thing to worry about on baking day.
Can I make this sugar-free?
Yes! Substitute the granulated sugar with an equal amount of sugar substitute designed for baking, such as erythritol or stevia baking blend. The texture may be slightly different, but the flavor will still be delicious.
Creative Variations to Try
Spiced Cherry Filling: Add 1/2 teaspoon cinnamon and 1/4 teaspoon nutmeg for warm, cozy flavors perfect for fall desserts.
Cherry-Chocolate Filling: Stir in 2 tablespoons cocoa powder with the cornstarch for a rich, chocolate-cherry combination that’s absolutely divine.
Adult Cherry Filling: Replace 2 tablespoons of the cooking liquid with cherry brandy, kirsch, or rum for a sophisticated twist on special occasions.
Mixed Berry Cherry: Replace half the cherries with blueberries or raspberries for a complex, multi-dimensional fruit filling.
Final Thoughts
This cherry cake filling recipe proves that the best dessert components come from your own kitchen. With its perfect balance of sweet and tart flavors, glossy appearance, and foolproof technique, you’ll wonder why you ever bought store-bought filling. The best part? You control every ingredient, ensuring a pure, delicious result that your family will treasure.
Whether you’re making a birthday cake, holiday dessert, or just want to elevate a simple pound cake, this cherry filling delivers consistent, beautiful results every single time. Save this recipe, share it with friends, and get ready to become everyone’s favorite baker!
Don’t forget to pin this recipe and share your beautiful cherry-filled creations on social media – we love seeing your delicious successes!