How to Make a Halloween Drip Cake
Master the art of the Halloween drip cake! Get our recipe for spooky and easy decorating ideas to create a frightfully fun dessert.
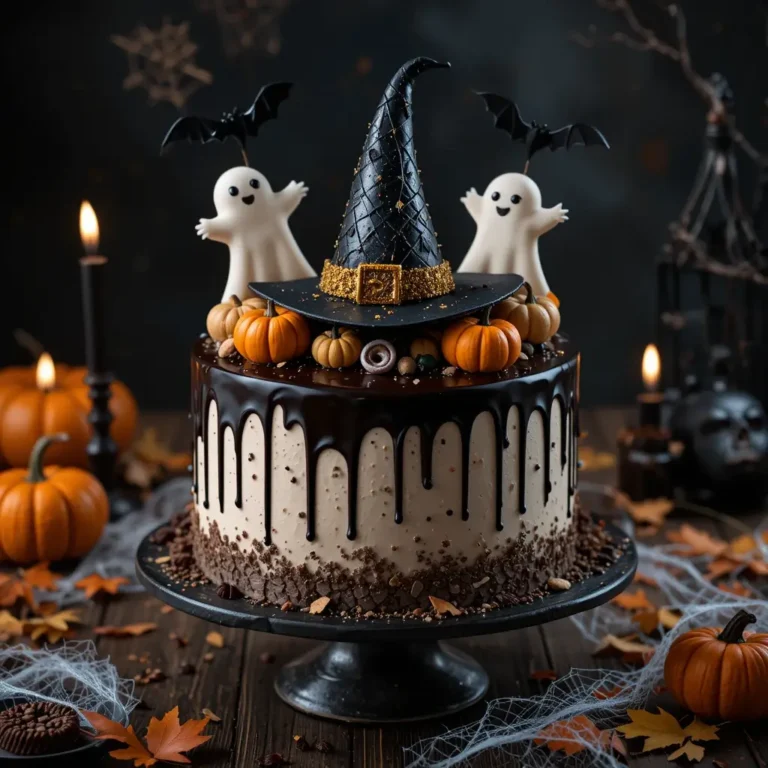
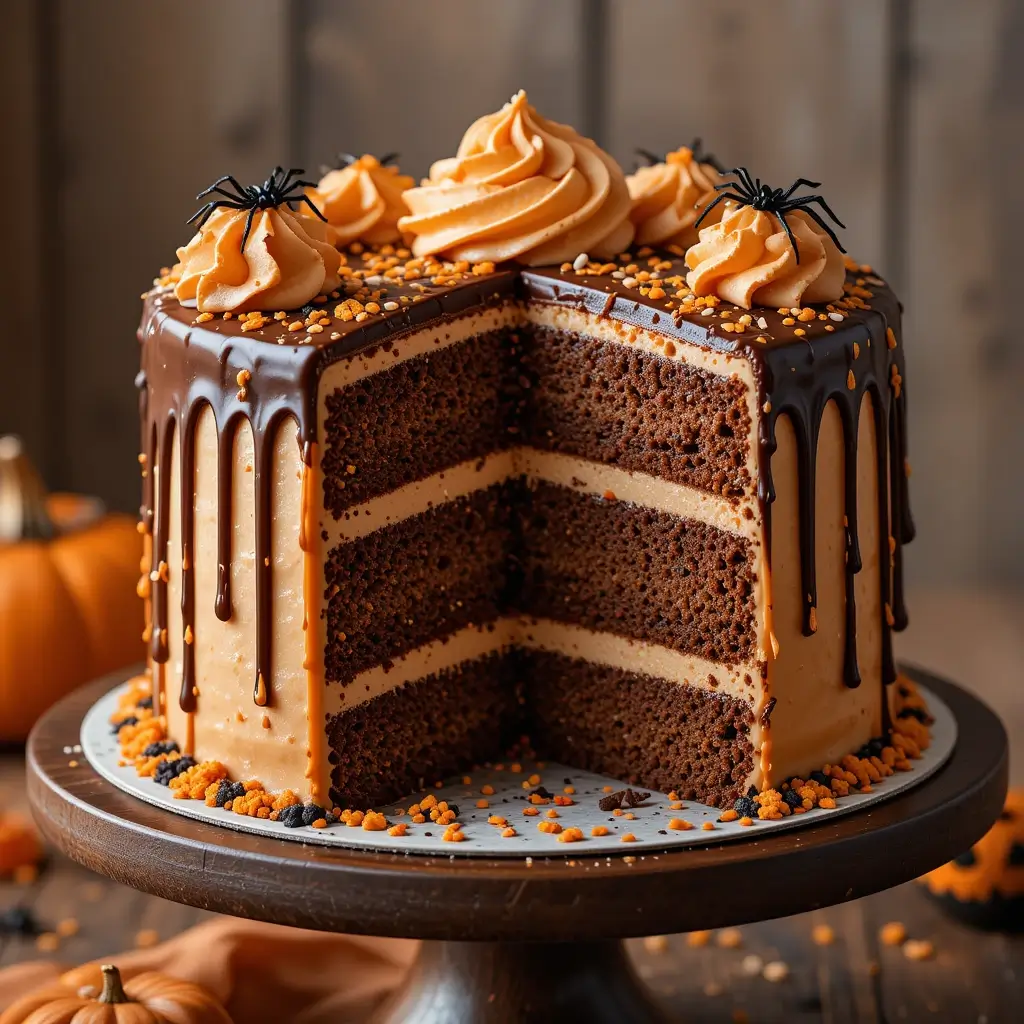
Get ready to create the most show-stopping Halloween drip cake that will have your guests screaming with delight! This wickedly delicious dessert combines moist chocolate cake layers with a dramatic orange and black chocolate drip that looks absolutely mesmerizing.
Fun fact: drip cakes became a social media sensation because they’re surprisingly easy to make yet look professionally crafted. This Halloween version is perfect for parties, family gatherings, or whenever you want to add some spooky magic to your dessert table.
Unlike our popular birthday drip cake, this Halloween version uses seasonal flavors and colors that capture the essence of the season. Your kitchen will smell like a bakery, and everyone will think you’re a baking wizard!
Table of Contents
What is a Halloween Drip Cake?
Ever wondered why it’s called a “drip” cake? Well, the name comes from the gorgeous chocolate ganache that literally drips down the sides like delicious edible art! Some say the way to a man’s heart is through his stomach, but I think the way to anyone’s heart is through a perfectly executed drip cake.
The technique might sound fancy, but it’s actually quite forgiving – even if your drips aren’t perfect, they still look intentionally spooky and fun. Ready to become the Halloween baking hero of your neighborhood?
Why You’ll Love This Halloween Drip Cake:
Stunning Visual Impact
This cake is an absolute showstopper that photographs beautifully and creates lasting memories. The contrasting orange and black drips create a dramatic effect that screams Halloween elegance. The smooth ganache drips cascade down perfectly, creating an almost hypnotic pattern that draws everyone’s attention.
Budget-Friendly Homemade Magic
Making this spectacular cake at home costs a fraction of what you’d pay at a bakery. Most ingredients are pantry staples, and the special Halloween decorations can be found affordably at any grocery store. You’ll save money while creating something truly special that tastes infinitely better than store-bought alternatives.
Irresistible Flavor Combination
The rich chocolate cake pairs beautifully with the smooth ganache drips and festive toppings. Each bite delivers the perfect balance of sweetness and chocolate intensity. Unlike our classic vanilla drip cake, this version incorporates subtle autumn spices that complement the Halloween theme perfectly. Why not give it a try and see how this becomes your new favorite holiday tradition?
How to Make Halloween Drip Cake:
Quick Overview
This Halloween drip cake is surprisingly simple to create and delivers maximum wow factor with minimal effort. The moist chocolate cake provides the perfect base for the dramatic ganache drips.
Prep Time: 45 minutes
Baking Time: 30 minutes
Cooling Time: 2 hours
Decorating Time: 45 minutes
Total Time: 4 hours
The secret to success lies in getting your ganache to the perfect consistency and temperature for those picture-perfect drips.
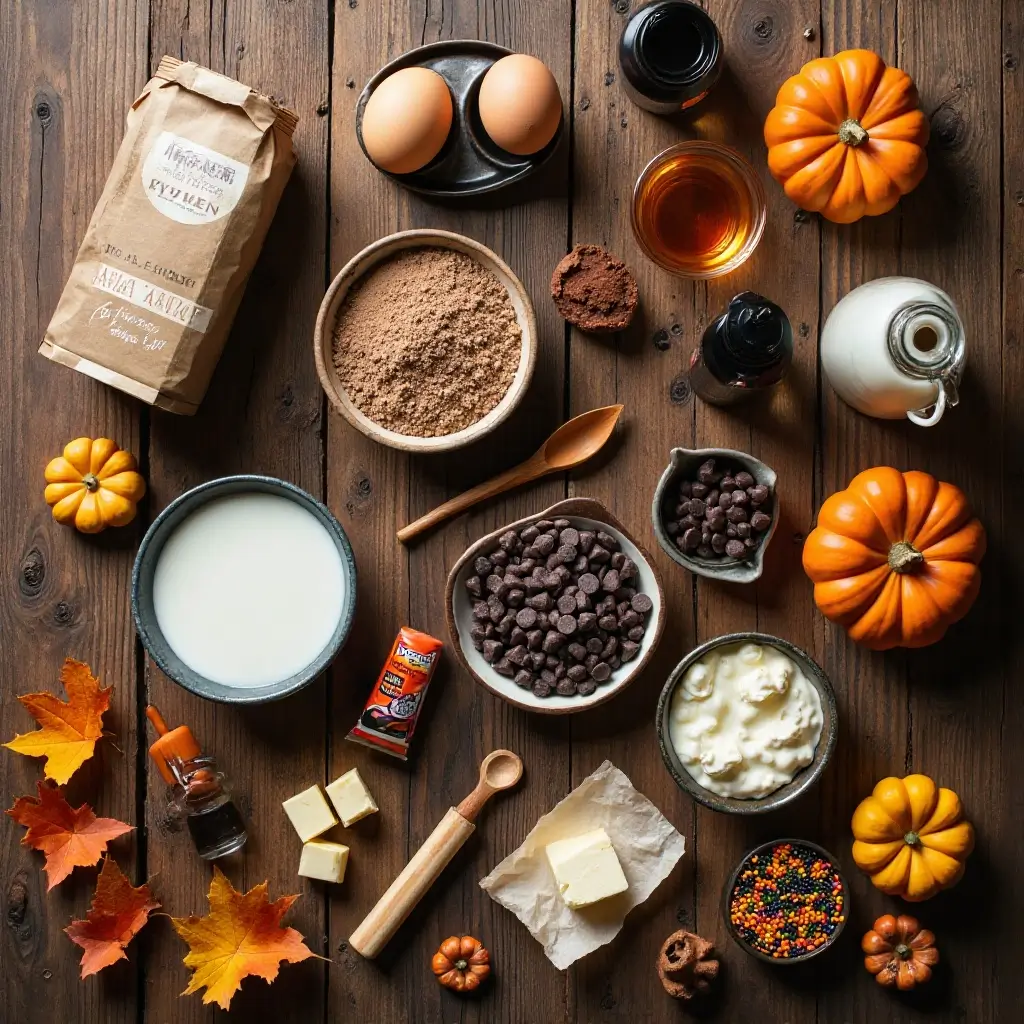
Key Ingredients for Halloween Drip Cake:
For the Chocolate Cake:
- 2 cups all-purpose flour
- 2 cups granulated sugar
- 3/4 cup unsweetened cocoa powder
- 2 teaspoons baking soda
- 1 teaspoon baking powder
- 1 teaspoon salt
- 2 large eggs
- 1 cup buttermilk
- 1 cup strong black coffee (cooled)
- 1/2 cup vegetable oil
- 1 teaspoon vanilla extract
For the Orange Drip:
- 1/2 cup heavy cream
- 6 oz white chocolate chips
- Orange gel food coloring
- 2 tablespoons butter
For the Black Drip:
- 1/2 cup heavy cream
- 6 oz dark chocolate chips
- 2 tablespoons butter
- Black gel food coloring (if needed)
For Assembly and Decoration:
- 4 cups vanilla buttercream frosting
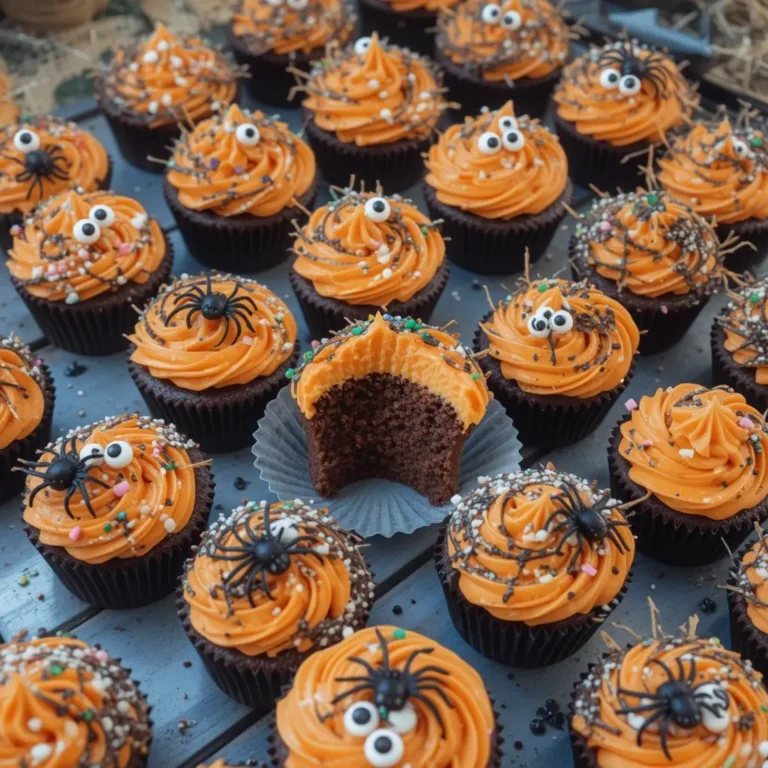
- Halloween sprinkles
- Plastic spiders or Halloween cake toppers
- Edible glitter (optional)
Step-by-Step Instructions:
Making the Cake Base
Preheat your oven to 350°F and grease two 9-inch round cake pans. In a large bowl, whisk together flour, sugar, cocoa powder, baking soda, baking powder, and salt. In another bowl, beat eggs, then add buttermilk, coffee, oil, and vanilla. Gradually combine wet and dry ingredients until smooth. Divide batter between prepared pans and bake for 28-32 minutes until a toothpick comes out clean.
Preparing the Ganache Drips
For orange drip, heat cream until just simmering, then pour over white chocolate chips. Let sit 2 minutes, then stir until smooth. Add orange coloring and butter, mixing until glossy. For black drip, repeat process with dark chocolate. Both ganaches should coat the back of a spoon but still drip easily.
Assembly Process
Level cake layers and place first layer on serving plate. Spread buttercream between layers and crumb coat the entire cake. Refrigerate 30 minutes until firm. Apply final smooth layer of buttercream and chill again for 15 minutes.
Creating Perfect Drips
Working quickly, use a squeeze bottle or spoon to create drips around the cake’s edge. Alternate between orange and black ganache, allowing some drips to be longer than others for natural variation. Fill in the top with remaining ganache, creating a smooth surface.
Final Decorating Touches
While ganache is still soft, add Halloween sprinkles and decorative elements. Place larger decorations like plastic spiders strategically around the cake. Finish with edible glitter for extra sparkle.
What to Serve Halloween Drip Cake With:
This rich chocolate cake pairs beautifully with vanilla ice cream or whipped cream to balance the intensity. Consider serving alongside spiced apple cider, hot chocolate, or even a bold coffee for adult gatherings. For themed parties, complement it with other Halloween treats like pumpkin cookies or candied apples. The cake also works wonderfully as part of a dessert buffet with lighter options like fruit salad or sherbet.
Top Tips for Perfecting Halloween Drip Cake:
Temperature is Everything
Your ganache must be at the perfect temperature – too hot and it will run off completely, too cool and it won’t drip properly. Test on the back of a spoon first. The ideal consistency coats the spoon but drips off slowly.
Practice Your Drip Pattern
Before committing to your final cake, practice your drip technique on an upside-down bowl. This helps you get comfortable with the motion and timing needed for consistent results.
Chill Between Steps
Don’t rush the chilling process between buttercream layers. A properly chilled cake gives you the best surface for smooth ganache application and prevents the drips from sliding too far.
Color Intensity Matters
Gel food coloring works much better than liquid for achieving vibrant colors without thinning your ganache. Start with less than you think you need – you can always add more.
Room Temperature Ingredients
Ensure all cake ingredients are at room temperature for optimal mixing and texture. Cold eggs and buttermilk can cause the batter to curdle or mix unevenly.
Storing and Reheating Tips:
Store your finished Halloween drip cake covered in the refrigerator for up to 5 days. The ganache drips will maintain their appearance and the cake will stay moist when properly wrapped. For longer storage, individual slices can be frozen for up to 3 months in airtight containers.
When serving refrigerated cake, let it come to room temperature for 30 minutes for the best flavor and texture. The ganache will soften slightly, making it easier to cut clean slices. Avoid microwaving, as this can cause the chocolate drips to become too soft and lose their shape.
For advance preparation, you can bake the cake layers up to 3 days ahead and freeze them wrapped in plastic wrap. The buttercream can be made a week in advance and stored in the refrigerator, then re-whipped before use.
Frequently Asked Questions
How far in advance can I make this cake?
You can make this Halloween drip cake up to 2 days in advance. Store it covered in the refrigerator and add any delicate decorations just before serving for the best appearance.
Why isn’t my ganache dripping properly?
Ganache that’s too thick won’t drip, while ganache that’s too thin will run off completely. The perfect consistency should coat a spoon but drip off slowly. Reheat gently if too thick, or let cool if too thin.
Can I use different colors for the drips?
Absolutely! Purple and green make great Halloween alternatives, or you could create a sunset effect with orange, red, and yellow. Just remember that gel food coloring works best for vibrant results.
What if I don’t have gel food coloring?
While gel coloring gives the best results, you can use liquid food coloring in small amounts. You may need to add a bit more chocolate or cream to maintain the proper consistency.
Can I make this cake gluten-free?
Yes! Substitute the all-purpose flour with a 1:1 gluten-free flour blend. The texture may be slightly different, but the flavor will still be delicious.
How do I get clean cake slices?
Use a warm, clean knife for each cut. Dip the knife in warm water and wipe clean between slices to prevent the ganache from dragging.
Nutrition Information
| Nutrient | Per Slice (12 servings) |
|---|---|
| Calories | 485 |
| Total Fat | 18g |
| Saturated Fat | 10g |
| Cholesterol | 65mg |
| Sodium | 425mg |
| Total Carbs | 78g |
| Dietary Fiber | 4g |
| Sugars | 68g |
| Protein | 7g |
Nutritional values are approximate and may vary based on specific ingredients used.
Pro Baker Secrets
The key to a truly professional-looking drip cake lies in the details. Professional bakers often add a tiny amount of corn syrup to their ganache for extra shine and smoothness. This small addition makes your drips look glossy and appetizing in photos.
Another insider tip is to create your own stencils for adding powdered sugar designs on the cake board around your cake. Simply cut Halloween shapes from cardboard, place around the finished cake, and dust with powdered sugar for an extra professional touch.
Consider making flavored buttercream by adding a teaspoon of vanilla bean paste or a tablespoon of espresso powder to complement your chocolate cake layers. These subtle flavor additions elevate the entire dessert experience.
For photography and presentation, place your finished cake on a dark surface to make the orange drips pop, or use a white surface to emphasize the dramatic black drips. Natural lighting near a window works best for capturing those perfect Instagram shots.
Remember, practice makes perfect, but even imperfect drips look intentionally rustic and charming on a Halloween cake. Embrace the spooky, slightly messy aesthetic that makes this dessert so appealing and approachable for home bakers of all skill levels.