Easy Red Velvet Cake Balls Recipe
Make delicious red velvet cake balls! Get our easy recipe for rich, bite-sized treats with cream cheese frosting, perfect for any occasion.
Get ready to fall head over heels for these decadent red velvet cake balls! These velvety, rich spheres of heaven melt in your mouth with every bite, delivering that classic red velvet flavor we all crave. What makes them extra special?
They’re surprisingly simple to make and require no fancy equipment. Just like our popular chocolate truffles recipe, these cake balls are perfect for parties, gift-giving, or satisfying your sweet tooth any day of the week.
Table of Contents
What Are Red Velvet Cake Balls?
Ever wondered why we call them “cake balls” when they’re clearly round? Well, it’s not rocket science – they’re literally balls made from cake! These little gems start as crumbled red velvet cake mixed with cream cheese frosting, then rolled into perfect spheres and dipped in chocolate.
You know what they say, “the way to a man’s heart is through his stomach,” and these beauties are your golden ticket there! Ready to become the dessert hero of your household?
Why You’ll Love This Red Velvet Cake Balls Recipe
Rich, Velvety Texture That Melts in Your Mouth These cake balls deliver the perfect balance of moist red velvet cake and creamy frosting, creating a texture that’s absolutely divine. Each bite releases layers of chocolatey goodness with that signature tangy cream cheese flavor that makes red velvet so irresistible.
Budget-Friendly Homemade Indulgence Making these at home costs a fraction of what you’d pay at fancy bakeries. With simple pantry ingredients, you can create dozens of professional-looking treats that taste better than store-bought versions. Plus, you control the quality of every ingredient!
Versatile Coating Options Whether you prefer classic white chocolate, rich dark chocolate, or fun colored coatings, these cake balls adapt to any occasion. Add sprinkles, crushed cookies, or chopped nuts for extra flair. Similar to our cake pop recipe, the decoration possibilities are endless, making them perfect for holidays, birthdays, or special celebrations.
Ready to transform your kitchen into a gourmet dessert shop? Let’s dive into this foolproof recipe that’ll have everyone begging for your secret!
How to Make Red Velvet Cake Balls
Quick Overview
These red velvet cake balls are surprisingly easy to make and incredibly satisfying to create. The process involves baking a moist red velvet cake, mixing it with cream cheese frosting, rolling into balls, and coating with chocolate.
Prep Time: 45 minutes
Chill Time: 2 hours
Coating Time: 30 minutes
Total Time: 3 hours 15 minutes
Yield: 36-40 cake balls
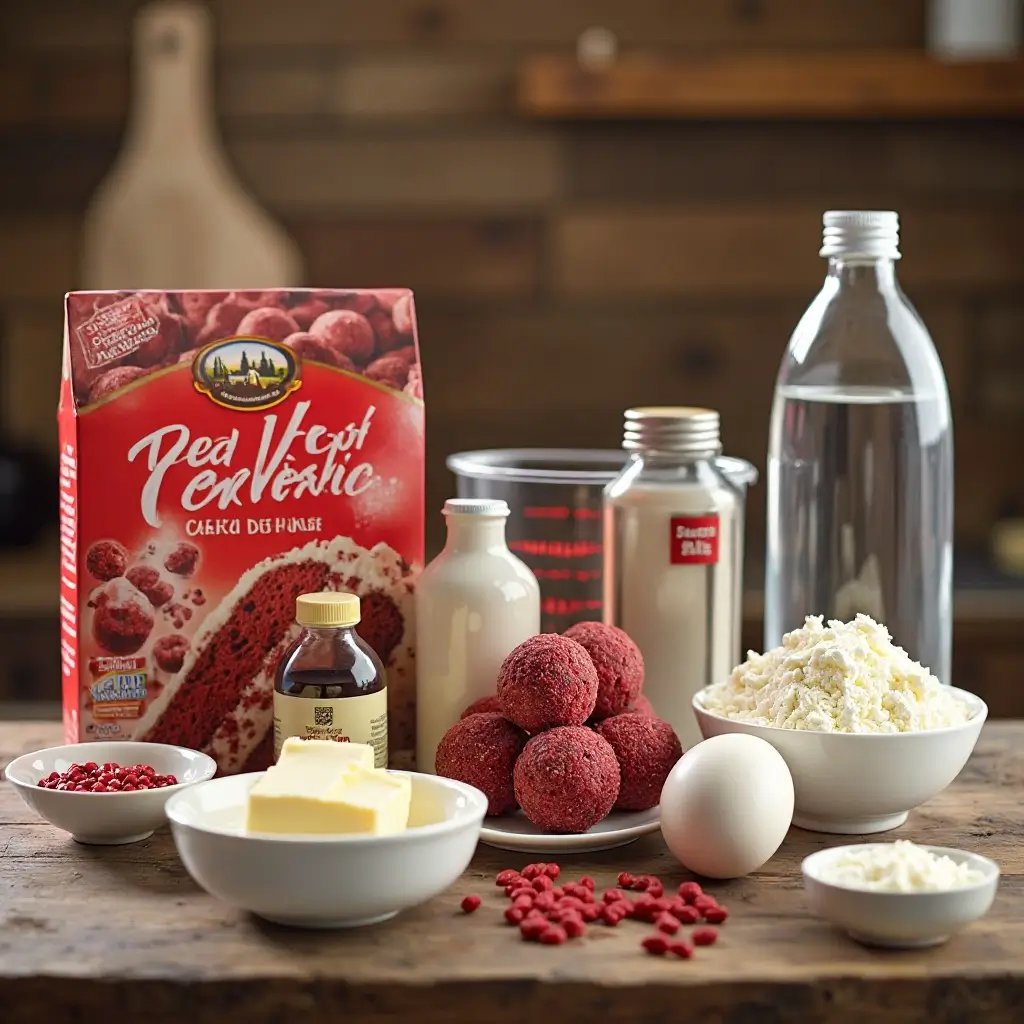
Key Ingredients for Red Velvet Cake Balls
For the Red Velvet Cake:
- 1 box red velvet cake mix (15.25 oz)
- 3 large eggs
- 1/3 cup vegetable oil
- 1 cup water
For the Cream Cheese Frosting:
- 4 oz cream cheese, softened
- 1/4 cup unsalted butter, softened
- 2 cups powdered sugar
- 1 teaspoon vanilla extract
For the Coating:
- 24 oz white chocolate melting wafers
- 2 tablespoons coconut oil or shortening
- Red food coloring (optional)
- Sprinkles or decorations (optional)
Step-by-Step Instructions
Step 1: Bake the Red Velvet Cake Preheat your oven to 350°F (175°C) and grease a 9×13 inch baking pan. In a large bowl, combine the cake mix, eggs, oil, and water according to package directions. Mix until smooth and pour into the prepared pan. Bake for 28-32 minutes or until a toothpick inserted in center comes out clean. Allow to cool completely.
Step 2: Make the Cream Cheese Frosting In a medium bowl, beat the softened cream cheese and butter until light and fluffy, about 3-4 minutes. Gradually add powdered sugar, beating until smooth. Mix in vanilla extract until well combined.
Step 3: Crumble and Mix Once the cake is completely cool, crumble it into fine crumbs using your hands or a food processor. Add the cream cheese frosting gradually, mixing until the mixture holds together when squeezed but isn’t too wet. You may not need all the frosting.
Step 4: Form the Balls Using your hands or a small cookie scoop, roll the mixture into 1-inch balls. Place on a parchment-lined baking sheet. Refrigerate for at least 2 hours or freeze for 30 minutes until firm.
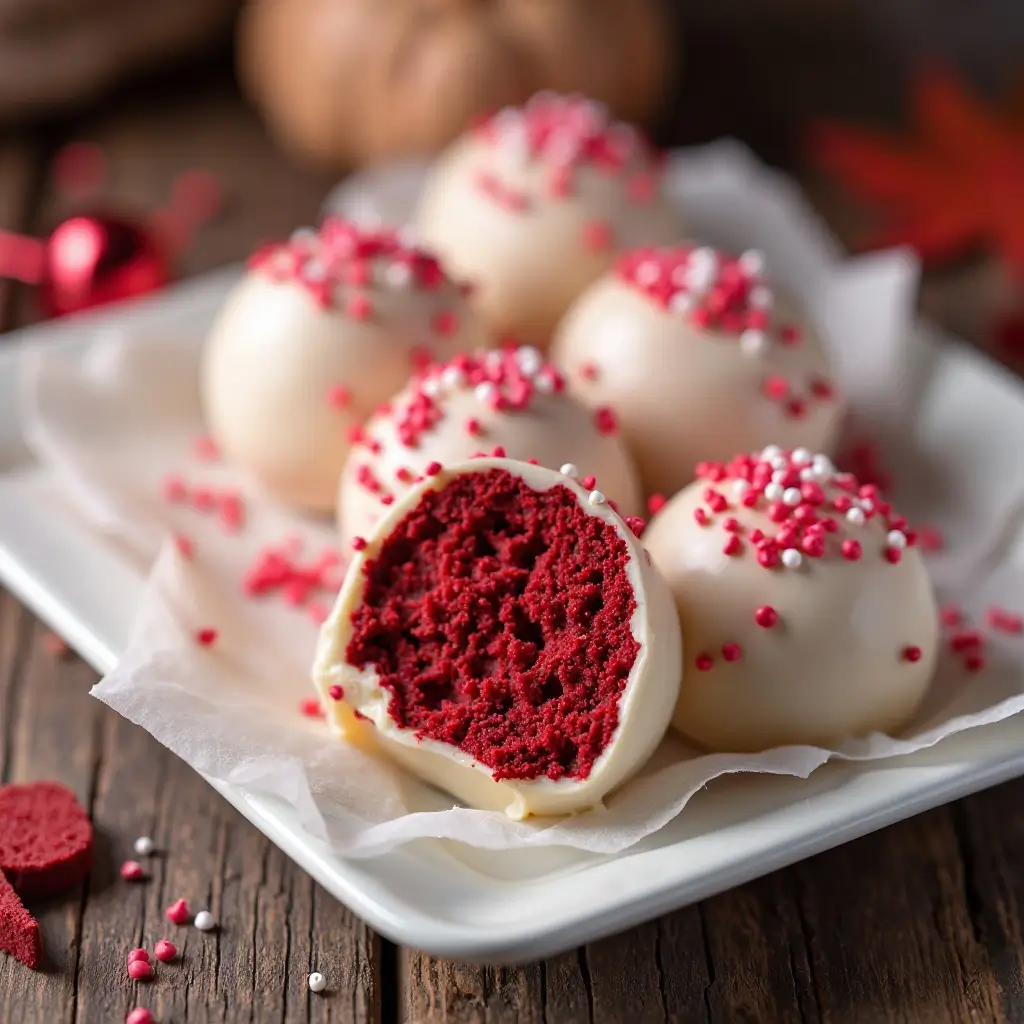
Step 5: Prepare the Chocolate Coating Melt the white chocolate and coconut oil in a microwave-safe bowl in 30-second intervals, stirring between each interval until smooth. Add a few drops of red food coloring if desired for a pink tint.
Step 6: Dip and Decorate Using a fork or dipping tool, dip each cake ball into the melted chocolate, allowing excess to drip off. Place on parchment paper and add sprinkles immediately if using. Refrigerate for 15 minutes to set the coating.
What to Serve Red Velvet Cake Balls With
These versatile treats pair beautifully with various beverages and complementary desserts. Serve alongside:
Hot Beverages: Rich coffee, hot chocolate, or chai tea latte create the perfect warm contrast to these cool, creamy treats.
Dessert Platters: Arrange with chocolate-covered strawberries, macarons, or mini cheesecakes for a stunning dessert spread.
Ice Cream: Crumble cake balls over vanilla ice cream or serve alongside for a delightful texture contrast.
Top Tips for Perfecting Red Velvet Cake Balls
Why Your Cake Balls Might Fall Apart
The most common issue is using too much or too little frosting. The mixture should hold together when squeezed but not be overly wet. Start with less frosting and add gradually.
Why Your Coating Cracks
This happens when the cake balls are too cold when dipped. Let them sit at room temperature for 10-15 minutes before coating, or warm the coating slightly if it’s too thick.
Why Your Cake Balls Aren’t Round
Wet hands make rolling difficult. Keep your hands slightly damp but not wet, and work quickly. Using a small cookie scoop ensures uniform sizes.
Why Your Coating Looks Streaky
Overheating chocolate causes it to seize. Always melt in short intervals and stir frequently. Adding coconut oil helps create a smooth, glossy finish.
Storing and Reheating Tips
Short-term Storage: Store finished cake balls in an airtight container in the refrigerator for up to one week. Layer between parchment paper to prevent sticking.
Freezing Instructions: Freeze uncoated cake balls for up to 3 months. Place on a baking sheet, freeze until solid, then transfer to freezer bags. Thaw in refrigerator before coating.
Coated Cake Balls: Once coated, these keep in the refrigerator for up to 2 weeks. Bring to room temperature 15-20 minutes before serving for best texture.
Make-Ahead Tips: Prepare cake balls up to coating stage and freeze. Coat when ready to serve for freshest results.
Nutrition Information
| Nutrient | Per Cake Ball |
|---|---|
| Calories | 145 |
| Total Fat | 6g |
| Saturated Fat | 3.5g |
| Cholesterol | 18mg |
| Sodium | 95mg |
| Total Carbs | 24g |
| Sugars | 21g |
| Protein | 2g |
Nutritional values are approximate and may vary based on specific ingredients used.
Frequently Asked Questions
Can I make red velvet cake balls without cream cheese frosting?
Yes! You can substitute with buttercream frosting, but cream cheese frosting provides the classic tangy flavor that complements red velvet perfectly.
How long do red velvet cake balls last?
Properly stored in the refrigerator, they last up to one week. For longer storage, freeze uncoated balls for up to 3 months.
Can I use homemade red velvet cake instead of box mix?
Absolutely! Any red velvet cake recipe will work. Just ensure it’s completely cooled and crumbled finely before mixing with frosting.
Why are my cake balls too soft to dip?
The mixture may be too warm or contain too much frosting. Chill longer or add more cake crumbs to firm up the texture.
Can I use different chocolate for coating?
Yes! Dark chocolate, milk chocolate, or colored melting wafers all work beautifully. Adjust melting times accordingly as different chocolates have varying melting points.
How do I fix cracked coating?
If coating cracks while drying, the cake balls were likely too cold. Next time, let them come closer to room temperature before dipping.
Can I make these gluten-free?
Yes! Simply substitute a gluten-free red velvet cake mix and ensure all other ingredients are gluten-free certified.
What’s the best way to drizzle chocolate on top?
Use a fork to drizzle melted chocolate in a zigzag pattern, or transfer melted chocolate to a piping bag with a small tip for more precise decoration.
Pro Tips for Social Media Success
Photography Tips: Natural lighting shows off the beautiful red color best. Arrange on white plates or marble surfaces for Instagram-worthy shots.
Gifting Ideas: Package in clear boxes with ribbon for perfect hostess gifts or holiday presents.
Flavor Variations: Try adding a tablespoon of cocoa powder to the mixture for deeper chocolate flavor, or mix in mini chocolate chips for extra texture.
Seasonal Adaptations: Use holiday-themed sprinkles, colored coatings, or edible glitter to match any celebration.
These red velvet cake balls combine the beloved flavors of traditional red velvet cake with the fun, portable format of cake pops. Whether you’re planning a party, looking for a special gift, or simply want to treat yourself, this recipe delivers bakery-quality results every time. The best part? Once you master the basic technique, you can experiment with different cake flavors and coatings to create your own signature variations!