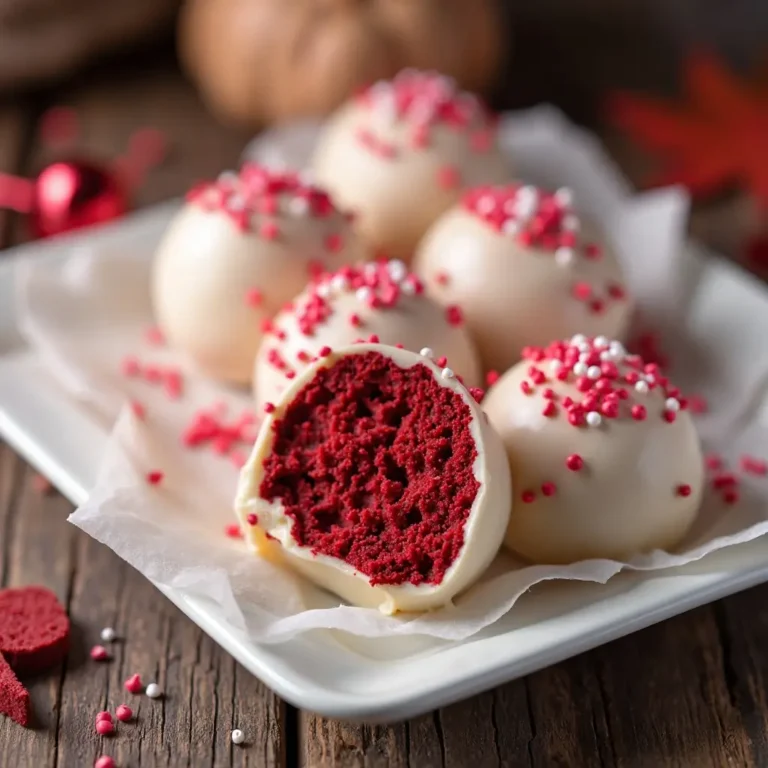
How to Make Red Velvet Cake Pops at Home
Make delicious red velvet cake pops! Get our easy recipe for rich, bite-sized treats perfect for parties or sweet cravings.
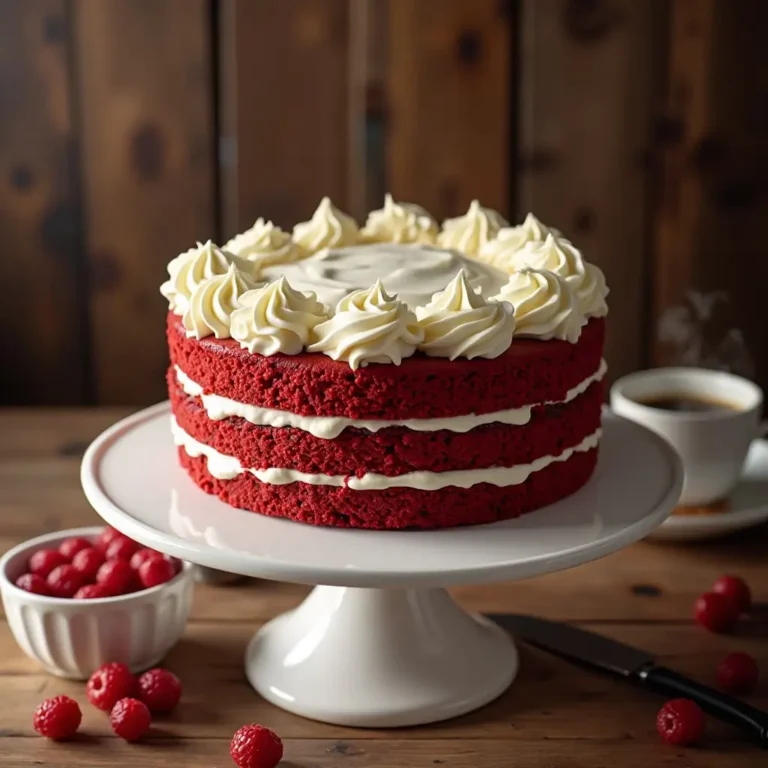
These irresistibly rich and velvety red velvet cake pops are the ultimate crowd-pleasing dessert that combines the classic flavors of red velvet cake with the fun, portable convenience of cake pops. With their stunning crimson color and creamy cream cheese frosting center, these delightful treats are surprisingly simple to make at home.
Much like our popular chocolate chip cookie bars, these cake pops offer that perfect balance of indulgence and simplicity that makes them ideal for parties, holidays, or whenever you need a sweet pick-me-up that’s guaranteed to impress.
Table of Contents
What Are Red Velvet Cake Pops?
Ever wondered why these crimson-colored confections have captured hearts worldwide? Red velvet cake pops are essentially bite-sized versions of the beloved Southern classic, transformed into adorable lollipop-style treats.
The name “red velvet” comes from the cake’s signature deep red color and incredibly smooth, velvety texture. As they say, “the way to a man’s heart is through his stomach,” and these pops certainly prove that theory right! Ready to create some magic in your kitchen?
Why You’ll Love This Red Velvet Cake Pops Recipe
Rich, Decadent Flavor Profile These cake pops deliver all the sophisticated flavors of traditional red velvet cake in one perfect bite. The subtle cocoa undertones blend beautifully with the tangy cream cheese frosting, creating a harmonious balance that’s neither too sweet nor too rich.
Budget-Friendly Home Creation Making red velvet cake pops at home costs a fraction of what you’d pay at specialty bakeries or coffee shops. With simple pantry ingredients and basic kitchen tools, you can create dozens of professional-looking treats for the price of just a few store-bought ones.
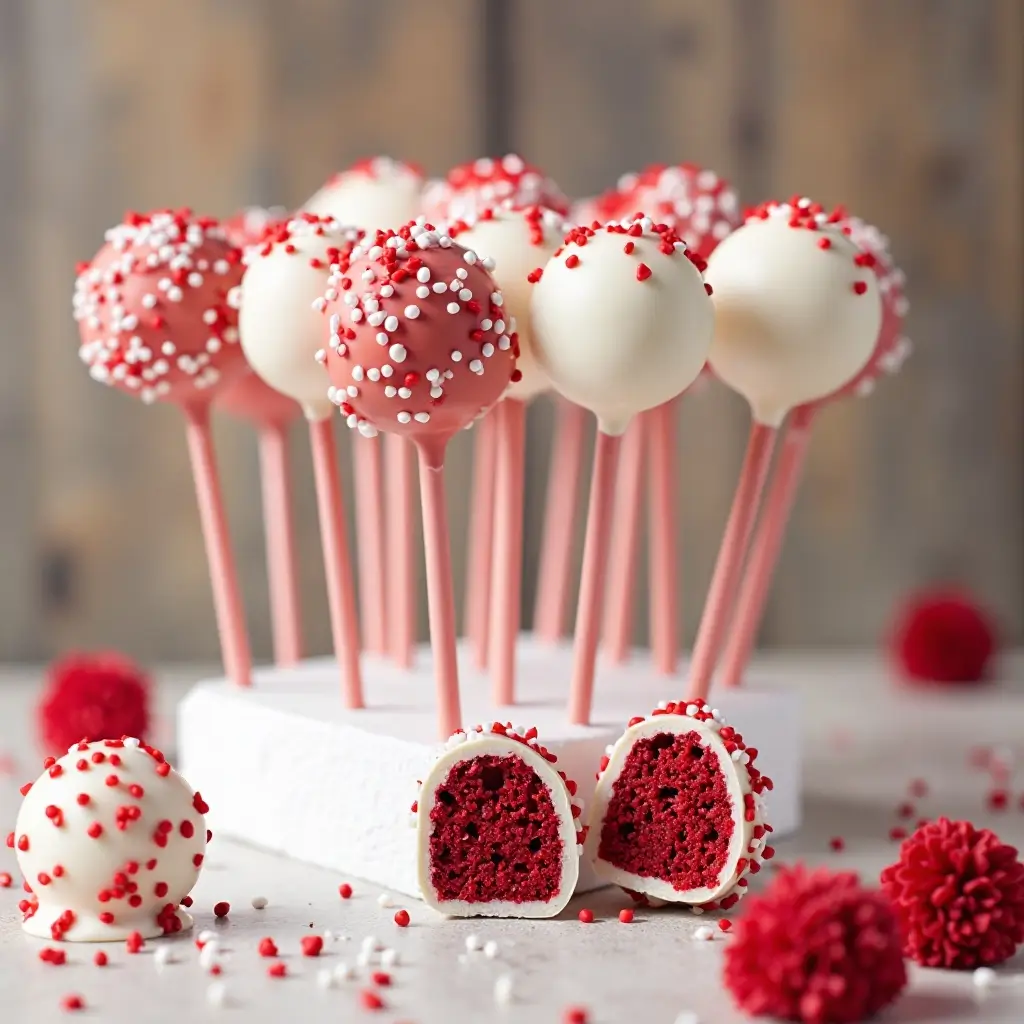
Customizable Coating Options The beauty lies in the endless decorating possibilities. From classic white chocolate coating to colorful candy melts, sprinkles, or drizzles, you can customize these pops to match any theme or occasion. Similar to our funfetti cupcakes, the decorating process is half the fun and allows for incredible creativity.
Ready to roll up your sleeves and create these show-stopping treats? Let’s dive into this foolproof recipe that’ll have you making bakery-quality cake pops in no time!
How to Make Red Velvet Cake Pops
Quick Overview
These red velvet cake pops are surprisingly easy to master, requiring just basic baking skills and a little patience. The process involves baking a moist red velvet cake, crumbling it with cream cheese frosting, forming balls, and coating them in chocolate.
Total Time: 3-4 hours (including chilling time)
- Prep Time: 45 minutes
- Baking Time: 25-30 minutes
- Assembly Time: 1 hour
- Chilling Time: 2 hours
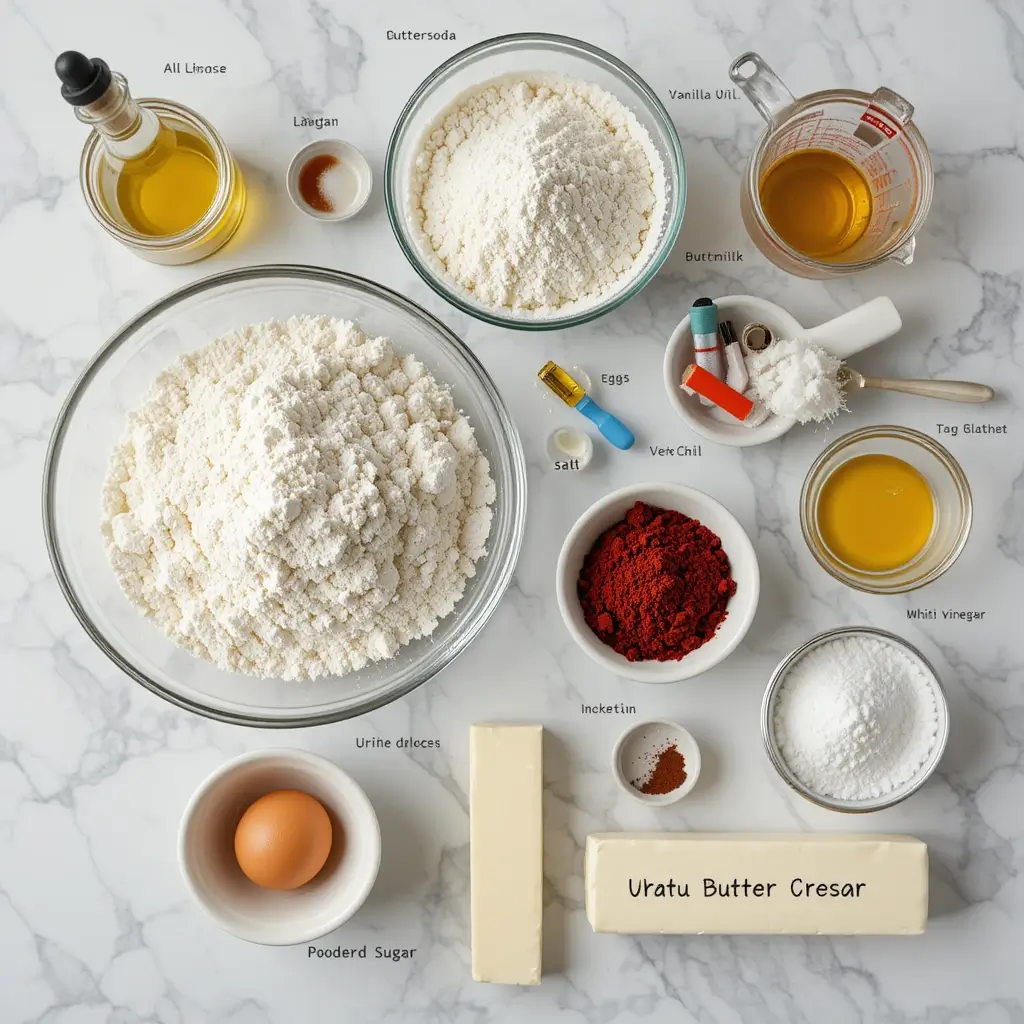
Key Ingredients for Red Velvet Cake Pops
For the Red Velvet Cake:
- 1¼ cups all-purpose flour
- 1 cup granulated sugar
- 3 tablespoons unsweetened cocoa powder
- 1 teaspoon baking soda
- 1 teaspoon salt
- 1 cup buttermilk
- ½ cup vegetable oil
- 1 large egg
- 1 tablespoon red food coloring
- 1 teaspoon vanilla extract
- 1 teaspoon white vinegar
For the Cream Cheese Frosting:
- 4 oz cream cheese, softened
- ¼ cup unsalted butter, softened
- 2 cups powdered sugar
- 1 teaspoon vanilla extract
For Assembly and Coating:
- 2 lbs white chocolate candy coating or candy melts
- 48 cake pop sticks
- Styrofoam block or cake pop stand
- Assorted sprinkles and decorations
Step-by-Step Instructions
Step 1: Prepare the Red Velvet Cake Preheat your oven to 350°F (175°C) and grease a 9×13 inch baking pan. In a large bowl, whisk together flour, sugar, cocoa powder, baking soda, and salt. In a separate bowl, combine buttermilk, oil, egg, food coloring, vanilla, and vinegar. Pour wet ingredients into dry ingredients and mix until just combined. Pour batter into prepared pan and bake for 25-30 minutes until a toothpick inserted in center comes out clean.
Step 2: Make the Cream Cheese Frosting While the cake cools completely, beat softened cream cheese and butter until light and fluffy. Gradually add powdered sugar and vanilla, beating until smooth and creamy. Set aside.
Step 3: Crumble and Mix Once cake is completely cool, crumble it into fine crumbs using your hands or a food processor. Add cream cheese frosting gradually, mixing until the mixture holds together when squeezed but isn’t too wet or sticky.
Step 4: Form the Cake Balls Using a small cookie scoop or tablespoon, portion the mixture into 1.5-inch balls. Roll each portion between your palms to create smooth, round balls. Place on a parchment-lined baking sheet.
Step 5: Initial Chill Refrigerate the cake balls for at least 2 hours or freeze for 15 minutes until firm. This step is crucial for preventing the pops from falling off the sticks.
Step 6: Prepare Coating and Sticks Melt about ¼ of the candy coating according to package directions. Dip each cake pop stick about ½ inch into the melted coating, then insert into a cake ball, pushing halfway through. Return to baking sheet and chill for 10 minutes.
Step 7: Final Coating Melt remaining candy coating in a deep, narrow container. Working one at a time, dip each cake pop completely into the coating, allowing excess to drip off. Gently tap the stick against the side of the container to remove excess coating.
Step 8: Decorate and Set While coating is still wet, add sprinkles or decorations as desired. Insert pops into styrofoam block or cake pop stand to dry completely, about 15-20 minutes.
What to Serve Red Velvet Cake Pops With
These versatile treats pair beautifully with various beverages and complementary desserts. Serve alongside rich coffee or espresso to balance their sweetness, or offer with champagne or sparkling cider for celebrations.
Create an elegant dessert table by pairing them with vanilla ice cream, fresh berries, or chocolate-covered strawberries. For casual gatherings, they’re perfect with milk, hot chocolate, or even a glass of cold brew coffee.
Consider serving them as part of a red velvet dessert spread with red velvet cupcakes, cream cheese cookies, and white chocolate truffles for a cohesive color scheme that’s Instagram-worthy.
Top Tips for Perfecting Red Velvet Cake Pops
Achieving the Perfect Texture
The cake-to-frosting ratio is crucial. Start with less frosting and add gradually until the mixture holds together without being soggy. The mixture should feel like moist sand that holds its shape when squeezed.
Temperature Control Success
Always work with chilled cake balls and properly tempered coating. If coating is too hot, it will cause the cake balls to crack. If too cool, it won’t coat smoothly. The ideal temperature is warm to touch but not hot.
Preventing Cracks and Breaks
Allow cake balls to come slightly closer to room temperature before dipping – about 5 minutes out of the refrigerator. This prevents dramatic temperature shock that causes cracking.
Coating Consistency Tips
Add a small amount of coconut oil or shortening to candy coating if it becomes too thick. This creates a smoother finish and makes dipping easier.
Decoration Timing
Apply sprinkles and decorations immediately after dipping while the coating is still wet. Work quickly but gently to avoid disturbing the smooth coating.
Storing and Reheating Tips
Room Temperature Storage: Properly coated cake pops can be stored at room temperature for up to one week in an airtight container. Place parchment paper between layers to prevent sticking.
Refrigerated Storage: For longer freshness, store in the refrigerator for up to two weeks. Allow them to come to room temperature before serving for the best texture and flavor.
Freezing Instructions: Uncoated cake balls freeze beautifully for up to three months. Freeze on a baking sheet, then transfer to freezer bags. Thaw in refrigerator before coating and decorating.
Coating Storage: Finished cake pops can be frozen for up to one month. Wrap individually in plastic wrap, then place in freezer containers. Thaw at room temperature for 30 minutes before serving.
Make-Ahead Tips: Prepare cake balls up to three days in advance and store in refrigerator. Coat and decorate the day of serving for best results.
Nutrition Information
| Nutrient | Per Cake Pop (1 pop) |
|---|---|
| Calories | 185 |
| Total Fat | 8g |
| Saturated Fat | 5g |
| Cholesterol | 15mg |
| Sodium | 95mg |
| Total Carbs | 28g |
| Dietary Fiber | 1g |
| Sugars | 25g |
| Protein | 2g |
Nutritional values are approximate and may vary based on specific ingredients used.
Frequently Asked Questions
Why are my cake pops falling off the sticks?
This usually happens when the cake balls aren’t chilled enough or when you skip dipping the stick in coating before inserting. Always chill cake balls for at least 2 hours and dip sticks in melted coating first.
Can I use box mix instead of homemade cake?
Absolutely! A standard box of red velvet cake mix works perfectly. Just follow package directions, bake, cool completely, and proceed with the crumbling and mixing steps.
How do I fix cracked cake pops?
Cracks typically occur from temperature shock. Ensure your coating isn’t too hot and let chilled cake balls sit at room temperature for 5 minutes before dipping. You can also use a small brush to smooth minor cracks.
What’s the best way to melt candy coating?
Microwave in 30-second intervals, stirring between each interval until smooth. Alternatively, use a double boiler for more controlled melting. Never let water touch the coating as it will seize.
Can I make these without food coloring?
Yes! The cake will be a light brown color instead of red, but the flavor remains delicious. You can also use natural alternatives like beet juice powder for coloring.
How far in advance can I make these?
Cake balls can be made 3 days ahead and stored in the refrigerator. For best appearance, coat and decorate them the day you plan to serve.
Why is my coating too thick?
Candy coating can thicken as it sits. Reheat gently in microwave for 15-20 seconds, or add a teaspoon of coconut oil to thin it out.
Can I use different flavors of coating?
Definitely! Milk chocolate, dark chocolate, or colored candy melts all work beautifully. Match the coating to your party theme or personal preference.
Additional Pro Tips for Success
Flavor Variations: Try adding a teaspoon of espresso powder to enhance the chocolate flavor, or incorporate a pinch of cinnamon for warmth. Almond extract can replace vanilla for a more sophisticated flavor profile.
Troubleshooting Common Issues: If your mixture is too dry and won’t hold together, add frosting one tablespoon at a time. If too wet and sticky, refrigerate for 30 minutes to firm up before rolling.
Professional Presentation: For gift-giving, wrap individual pops in clear cellophane bags tied with ribbon, or arrange them in a decorative box lined with tissue paper.
Seasonal Adaptations: During holidays, customize with themed sprinkles, colored coatings, or shaped decorations. Christmas versions can feature green and red sprinkles, while Easter pops look lovely with pastel coatings.
Equipment Investment: A cake pop maker can speed up the process significantly, though it’s not necessary. A good candy thermometer ensures perfect coating temperature every time.
These red velvet cake pops represent the perfect marriage of classic flavors and modern presentation. Whether you’re a beginner baker or seasoned pro, this recipe delivers consistent, impressive results that will have everyone asking for your secret. The key lies in patience during the chilling stages and attention to temperature when coating – two simple steps that separate good cake pops from absolutely magnificent ones!