Stunning Thanksgiving Cake Designs to Wow Your Guests
Picture this: your Thanksgiving table adorned with a show-stopping cake that captures the essence of fall. Thanksgiving cake designs have become the new centerpiece tradition, combining artistic flair with delicious flavors. These festive creations feature warm autumn colors, harvest motifs, and seasonal decorations that make your celebration unforgettable. Whether you’re a baking novice or a…
Picture this: your Thanksgiving table adorned with a show-stopping cake that captures the essence of fall. Thanksgiving cake designs have become the new centerpiece tradition, combining artistic flair with delicious flavors. These festive creations feature warm autumn colors, harvest motifs, and seasonal decorations that make your celebration unforgettable.
Whether you’re a baking novice or a seasoned pro, crafting a beautiful Thanksgiving cake is easier than you think and adds that special touch your holiday gathering deserves.
What is a Thanksgiving Cake Design?
Ever wonder why we’re suddenly obsessed with Thanksgiving cake designs? It’s simple—who says turkey should get all the attention? A Thanksgiving cake design is your edible masterpiece that celebrates fall’s bounty through creative decoration.
Think pumpkins, leaves, turkeys, and cornucopias transformed into sweet art. After all, they say the way to anyone’s heart is through their stomach, and nothing says “I’m grateful for you” quite like a beautifully decorated cake. Ready to become the holiday hero? Let’s dive into creating your own stunning Thanksgiving centerpiece!
Why You’ll Love These Thanksgiving Cake Designs
The Ultimate Holiday Showstopper
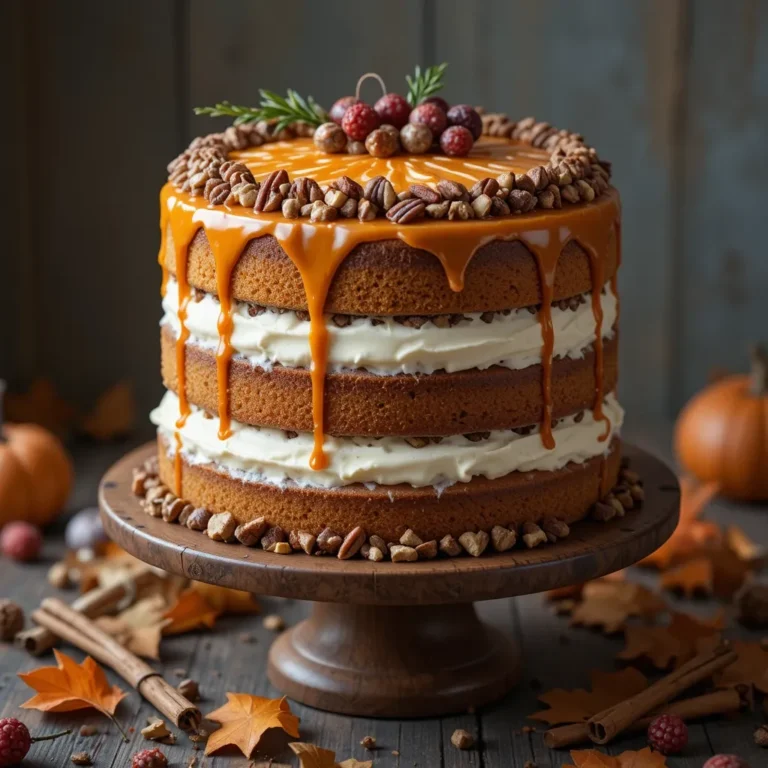
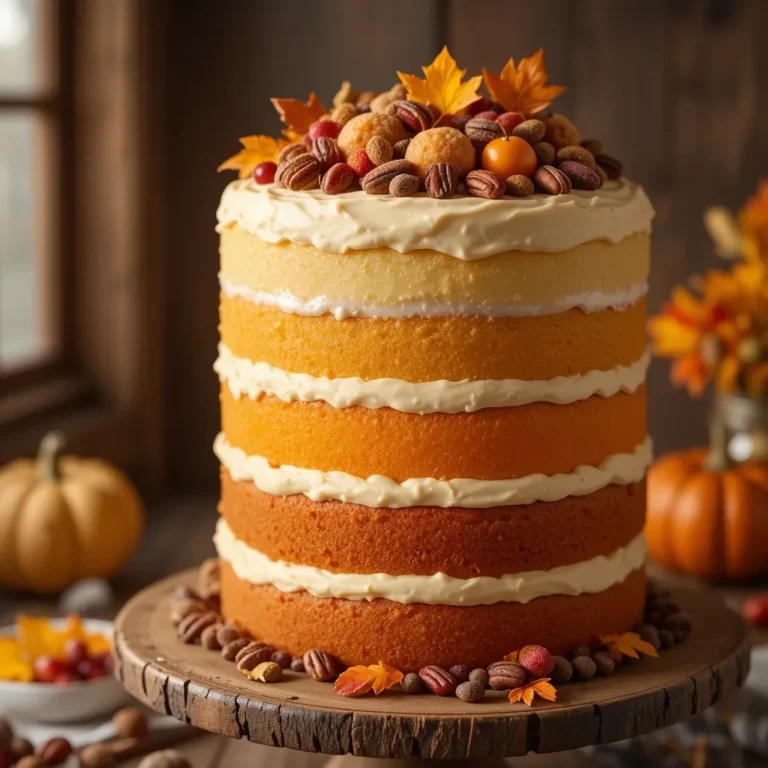
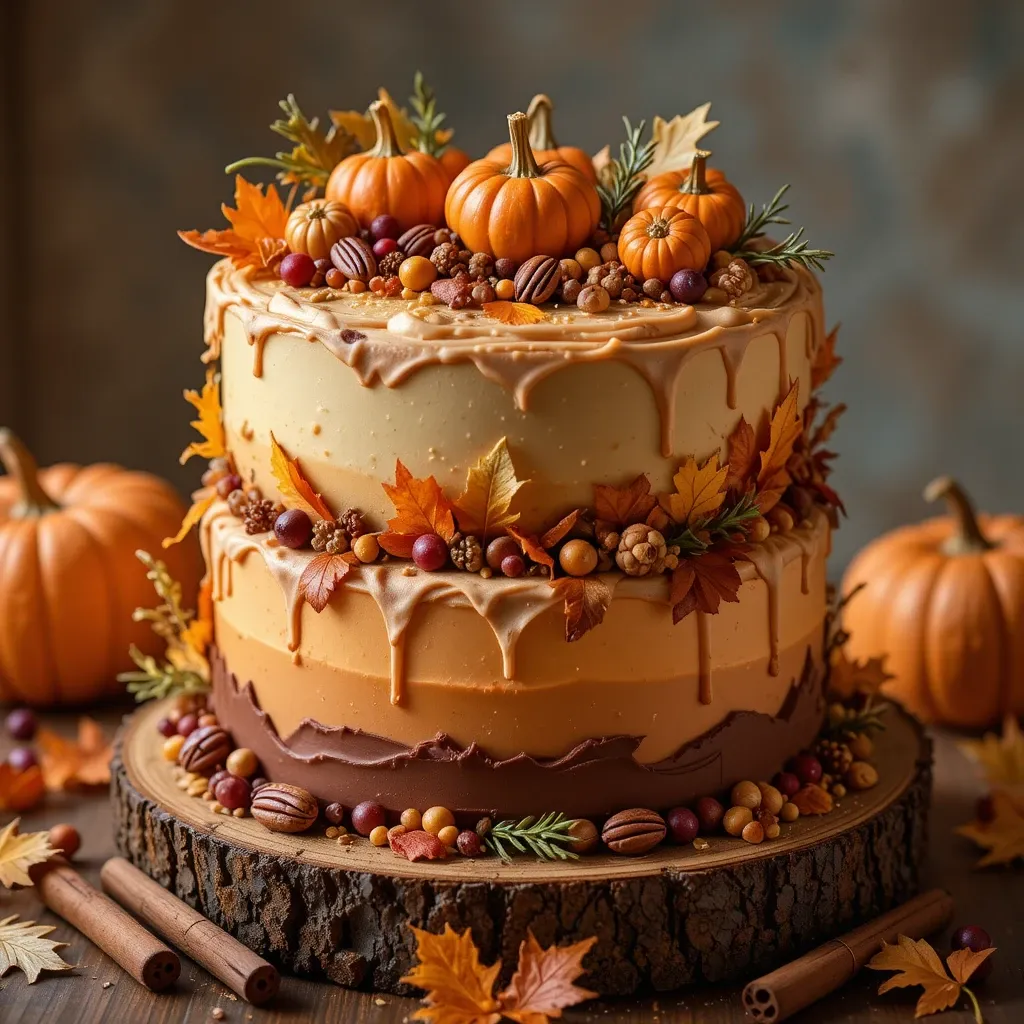
Your Thanksgiving cake designs will steal the spotlight at your holiday gathering. Imagine guests’ faces lighting up when they see your gorgeous autumn-themed creation. These cakes combine visual appeal with incredible taste, featuring seasonal flavors like pumpkin spice, apple cinnamon, and maple pecan. The warm fall color palette of oranges, browns, golds, and deep reds creates an Instagram-worthy dessert that doubles as table decor.
Budget-Friendly Homemade Magic
Skip the expensive bakery prices and create bakery-quality results at home. Making your own Thanksgiving cake designs saves you $50-100 compared to custom orders. You’ll use simple ingredients you likely have in your pantry, and basic decorating supplies from your local craft store. Plus, you control the quality and can customize everything to your family’s preferences. If you loved our Christmas cookie decorating ideas, you’ll absolutely adore these cake designs!
Endless Creative Possibilities
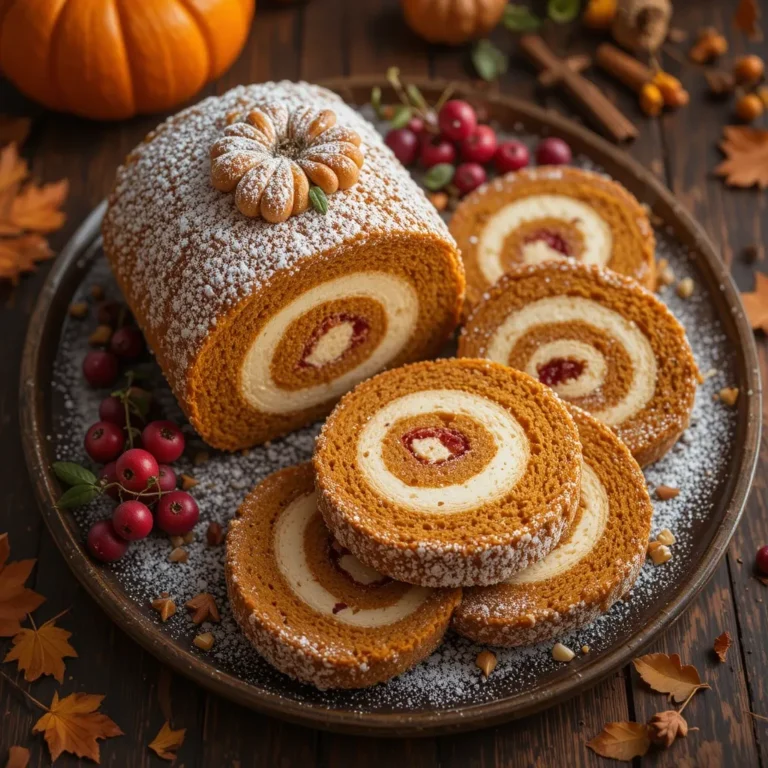
From elegant minimalist designs to whimsical turkey cakes, Thanksgiving cake designs offer something for every skill level. Top your creation with fondant leaves, buttercream flowers, fresh fruit, or edible gold dust. Add candied pecans, caramel drizzle, or cream cheese frosting for extra flavor dimensions. Each cake becomes uniquely yours, reflecting your personal style and holiday spirit.
Ready to create your masterpiece? Let’s get baking and decorating!
How to Make Thanksgiving Cake Designs
Quick Overview
Creating beautiful Thanksgiving cake designs is surprisingly simple and incredibly rewarding. This guide walks you through everything from baking the perfect cake base to applying professional-looking decorations.
Time Breakdown:
- Prep Time: 30 minutes
- Baking Time: 35-40 minutes
- Cooling Time: 1 hour
- Decorating Time: 1-2 hours
- Total Time: 3-4 hours
The actual hands-on work is minimal, and you’ll spend most time letting your cake cool and bringing your creative vision to life. The result? A stunning centerpiece that tastes as amazing as it looks.
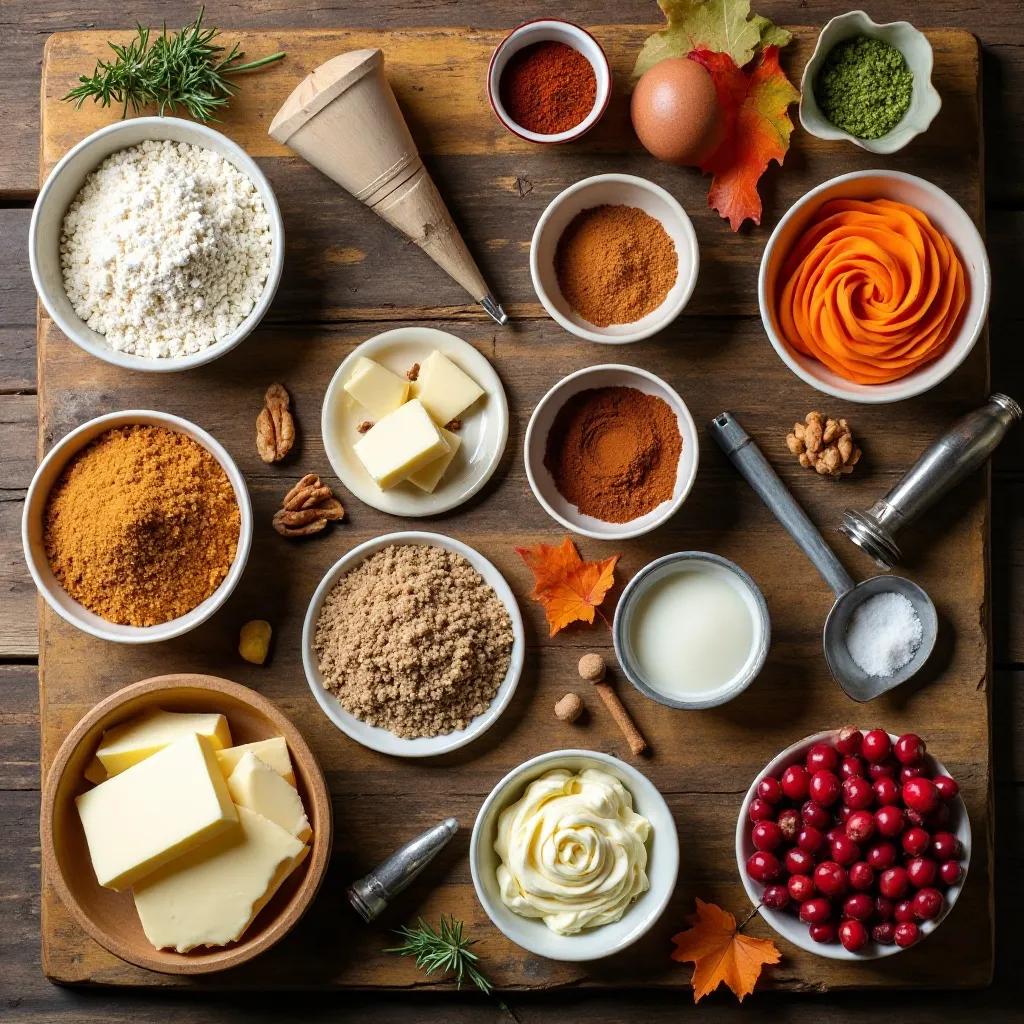
Key Ingredients for Thanksgiving Cake Designs
For the Cake Base:
- 3 cups all-purpose flour
- 2 cups granulated sugar
- 1 cup unsalted butter, softened
- 4 large eggs, room temperature
- 1 cup whole milk
- 1 tablespoon baking powder
- 1 teaspoon vanilla extract
- 1 teaspoon cinnamon
- ½ teaspoon nutmeg
- ½ teaspoon salt
For Buttercream Frosting:
- 2 cups unsalted butter, softened
- 8 cups powdered sugar
- ¼ cup heavy cream
- 2 teaspoons vanilla extract
- Gel food coloring (orange, brown, red, yellow, green)
For Decorations:
- Fondant (various fall colors)
- Edible gold dust or luster dust
- Fresh or candied cranberries
- Candied pecans or walnuts
- Fresh rosemary sprigs
- Edible fall leaves or flowers
- Piping bags and decorating tips
- Offset spatula
Step-by-Step Instructions
Step 1: Prepare Your Workspace
Preheat your oven to 350°F (175°C). Grease three 8-inch round cake pans and line the bottoms with parchment paper. This ensures easy cake removal and prevents sticking. Gather all your ingredients and measure them out before starting—this makes the process smooth and stress-free.
Step 2: Mix the Dry Ingredients
In a large bowl, whisk together the flour, baking powder, cinnamon, nutmeg, and salt. Sift the mixture twice to remove any lumps and ensure even distribution of the leavening agents. This step is crucial for a light, fluffy cake texture that serves as the perfect canvas for your Thanksgiving cake designs.
Step 3: Cream Butter and Sugar
Using a stand mixer or hand mixer, beat the softened butter and sugar together on medium-high speed for 4-5 minutes. The mixture should become pale, light, and fluffy. This incorporates air into your batter, creating a tender crumb. Scrape down the sides of the bowl periodically to ensure everything is well mixed.
Step 4: Add Eggs and Vanilla
Add the eggs one at a time, beating well after each addition. Mix in the vanilla extract. The batter should look smooth and creamy. If it appears slightly curdled, don’t worry—it will come together when you add the dry ingredients. This step builds the structure of your cake.
Step 5: Combine Wet and Dry Ingredients
Alternate adding the flour mixture and milk to the butter mixture in three parts, beginning and ending with the flour mixture. Mix on low speed just until combined after each addition. Overmixing develops gluten and creates a tough cake, so stop as soon as you don’t see any flour streaks.
Step 6: Bake the Cake Layers
Divide the batter evenly among the three prepared pans. Use a kitchen scale for accuracy—each pan should have about 600-650 grams of batter. Bake for 35-40 minutes, or until a toothpick inserted into the center comes out clean. The cakes should spring back when lightly pressed and pull away slightly from the pan edges.
Step 7: Cool Completely
Let the cakes cool in the pans for 10 minutes, then turn them out onto wire racks. Allow them to cool completely—at least 1 hour. Warm cakes will melt your frosting and make decorating impossible. For faster cooling, you can refrigerate the layers for 30 minutes once they’re no longer hot.
Step 8: Prepare the Buttercream
Beat the softened butter on medium speed for 3-4 minutes until creamy and pale. Gradually add the powdered sugar, one cup at a time, mixing on low speed. Add the heavy cream and vanilla extract, then beat on high speed for 5 minutes until light and fluffy. This creates the silky-smooth frosting that’s perfect for Thanksgiving cake designs.
Step 9: Color Your Frosting
Divide the buttercream into separate bowls based on how many colors you want for your Thanksgiving cake designs. Use gel food coloring to create autumn shades—orange, burnt orange, golden yellow, deep red, brown, and olive green. Start with a tiny amount of gel color and add more gradually until you reach your desired shade.
Step 10: Level and Layer Your Cakes
Use a serrated knife or cake leveler to trim any domed tops from your cake layers, creating flat, even surfaces. Place the first layer on your cake board or serving plate. Spread a generous amount of frosting on top (about ¾ cup), leaving a small border around the edge. Add the second layer and repeat. Top with the third layer, cut side down.
Step 11: Crumb Coat Application
Apply a thin layer of frosting over the entire cake—top and sides. This “crumb coat” seals in loose crumbs and creates a smooth base for your final frosting layer. Don’t worry about it looking perfect; this layer is meant to be messy. Refrigerate the cake for 30 minutes to let the crumb coat set firm.
Step 12: Apply Final Frosting Layer
Once the crumb coat is firm, apply your final, thicker layer of frosting. Use an offset spatula to spread the frosting evenly, working from bottom to top on the sides, then smoothing the top. For a rustic look, create texture with the spatula. For a smooth finish, use a bench scraper or cake smoother, rotating your turntable while holding the scraper steady.
Step 13: Create Your Design Elements
Now for the fun part—bringing your Thanksgiving cake designs to life! Use different colored frostings in piping bags fitted with various tips. Create fall leaves with leaf tips, rosettes with star tips, or write messages with round tips. Roll out fondant and cut leaf shapes, pumpkins, or acorns. Paint fondant pieces with edible gold dust mixed with vodka for a glamorous shimmer.
Step 14: Assemble Your Decorations
Arrange your decorative elements on the cake, starting from the bottom and working your way up. Create a cascading leaf effect, a floral crown, or a rustic wreath design. Press fondant pieces gently into the frosting so they adhere. Add fresh elements like cranberries, herbs, or edible flowers last, as they’re delicate. Step back frequently to assess your design from all angles.
Step 15: Final Touches
Add your finishing touches—a dusting of edible gold, a drizzle of caramel, or a scattering of candied nuts. Clean any frosting smudges from your cake board with a damp paper towel. Refrigerate your completed cake for at least 30 minutes to set all the decorations before serving. Remove from the fridge 30 minutes before serving for the best flavor and texture.
What to Serve Thanksgiving Cake Designs With
Your beautiful Thanksgiving cake designs pair wonderfully with various accompaniments. Serve slices with freshly whipped cream flavored with cinnamon and vanilla for a classic combination. A scoop of vanilla bean or maple ice cream adds delightful temperature contrast and complementary flavors.
For beverages, offer spiced apple cider, hot coffee, or dessert wines like late-harvest Riesling or tawny port. These drinks enhance the warm spices in your cake without overwhelming its flavors.
Create a dessert board featuring your cake alongside smaller treats. Include mini pecan tarts, pumpkin cheesecake bites, and apple crisp cups. This variety lets guests choose their perfect dessert combination.
For a brunch setting, pair your Thanksgiving cake designs with a cheese board featuring aged cheddar, brie, and goat cheese. Add fresh fruit, nuts, and honey for a sophisticated sweet-and-savory experience.
Top Tips for Perfecting Thanksgiving Cake Designs
Use Room Temperature Ingredients
Always bring eggs, butter, and milk to room temperature before baking. Cold ingredients don’t mix properly and can create a dense, uneven cake texture. Set ingredients out 1-2 hours before baking, or quick-warm eggs in a bowl of warm water for 10 minutes.
Invest in Quality Food Coloring
Skip liquid food coloring and invest in gel or powder food colors for vibrant Thanksgiving cake designs. Gel colors won’t thin your frosting and create much richer, truer colors with just a tiny amount. AmeriColor and Wilton make excellent options available at craft stores.
Master the Crumb Coat Technique
Never skip the crumb coat! This thin first layer of frosting traps all those pesky crumbs and creates a perfect canvas for your final decorating. Be patient and let it set fully in the refrigerator before applying your decorative frosting layer.
Keep Frosting at the Right Consistency
Too-thick frosting won’t spread smoothly; too-thin frosting won’t hold its shape. For spreading, aim for soft, creamy consistency. For piping details, use slightly stiffer frosting that holds peaks. Add powdered sugar to thicken or cream/milk to thin as needed.
Practice Piping Techniques First
Before decorating your actual cake, practice your piping techniques on parchment paper or a plate. This builds confidence and helps you perfect your pressure control and hand movements. You can scrape up practice frosting and reuse it for your cake.
Work in a Cool Environment
Buttercream frosting softens quickly in warm kitchens. If possible, work in air-conditioned comfort or in your coolest room. If your frosting becomes too soft, pop it in the refrigerator for 10-15 minutes to firm up before continuing.
Plan Your Design Beforehand
Sketch your Thanksgiving cake designs on paper before decorating. This helps you visualize placement, color distribution, and overall composition. Having a plan prevents mistakes and ensures a cohesive, professional-looking result.
Use a Turntable
A rotating cake turntable makes frosting and decorating exponentially easier. It allows smooth, even application and lets you view your cake from all angles without constantly moving around. Even an inexpensive plastic turntable makes a huge difference.
Storing and Reheating Tips
Refrigerator Storage
Store your completed Thanksgiving cake designs in the refrigerator for up to 5 days. Cover loosely with plastic wrap or place under a large cake dome to prevent the frosting from absorbing refrigerator odors. Buttercream creates a barrier that keeps the cake moist and fresh.
Remove the cake from the refrigerator 30-45 minutes before serving to allow it to come to room temperature. Cold cake has muted flavors and a firmer texture. Room temperature cake showcases all the delicious flavors and has the perfect, tender crumb.
Freezer Storage for Long-Term
Unfrosted cake layers freeze beautifully for up to 3 months. Wrap each layer tightly in plastic wrap, then in aluminum foil to prevent freezer burn. Label with the date and type of cake. Thaw layers overnight in the refrigerator before decorating.
You can also freeze a fully decorated cake, though some decorations may not freeze well. Fresh fruit, cream fillings, and delicate fondant work may become damaged. For best results, freeze plain frosted cakes and add decorative elements after thawing.
Serving Leftover Slices
Individual cake slices can be brought to room temperature in just 15-20 minutes. For a special treat, warm slices in the microwave for 10-15 seconds and serve with ice cream. The slight warmth intensifies the spices and creates a comforting, homestyle dessert experience.
Preserving Decorative Elements
If you’ve invested time in elaborate fondant decorations, consider removing them before refrigeration if possible. Store fondant pieces in an airtight container at room temperature. This prevents condensation from making them sticky or causing colors to bleed.
Frequently Asked Questions About Thanksgiving Cake Designs
What are the most popular Thanksgiving cake designs?
The most popular Thanksgiving cake designs include autumn leaf motifs, pumpkin-themed cakes, turkey designs, harvest cornucopia scenes, and rustic naked cakes decorated with fresh fruit and flowers. Fall color palettes featuring orange, burgundy, gold, and brown dominate these designs. Many bakers love the elegant simplicity of ombre frosting in autumn shades or watercolor-effect buttercream resembling fall foliage.
Can I make Thanksgiving cake designs ahead of time?
Absolutely! Bake your cake layers up to 3 days ahead and store them wrapped tightly in the refrigerator, or freeze them for up to 3 months. You can make buttercream frosting up to 1 week ahead and store it in the refrigerator—just bring it to room temperature and re-whip before using. Complete the entire decorated cake 1-2 days before your event and refrigerate it. The flavors actually improve as they meld together.
What flavors work best for Thanksgiving cakes?
Traditional fall flavors like pumpkin spice, apple cinnamon, maple, pecan, caramel, and brown butter are perfect for Thanksgiving cake designs. Spiced cakes featuring cinnamon, nutmeg, ginger, and cloves capture the season beautifully. Don’t overlook classic vanilla or chocolate as neutral bases that pair well with seasonal frostings and fillings like apple butter, cranberry compote, or cinnamon cream cheese.
Do I need special tools for Thanksgiving cake designs?
While you don’t need expensive equipment, a few basic tools make decorating easier. Essential items include piping bags, assorted decorating tips, an offset spatula, and a rotating turntable. For more elaborate designs, invest in fondant tools, leaf-shaped cutters, and edible food coloring. Most tools are available affordably at craft stores or online and can be reused for years.
How do I achieve smooth frosting on my cake?
The secret to smooth frosting lies in the crumb coat technique and proper tools. Apply a thin first layer of frosting to seal in crumbs, then refrigerate until firm. For the final coat, use an offset spatula to spread frosting generously, then smooth it with a bench scraper or cake smoother while rotating your turntable. Dip your tools in hot water and wipe dry between passes for an ultra-smooth finish.
Can I use store-bought cake mix for Thanksgiving cake designs?
Yes! Store-bought cake mixes work perfectly and save time without sacrificing quality in your Thanksgiving cake designs. Enhance boxed mixes by using melted butter instead of oil, milk instead of water, and adding an extra egg. Mix in spices like cinnamon and nutmeg for fall flavor. Your decorating skills will shine regardless of whether you bake from scratch.
What’s the best frosting for Thanksgiving cake designs?
American buttercream is ideal for Thanksgiving cake designs because it’s stable, easy to work with, pipes beautifully, and holds decorations well. It can be flavored and colored easily. Cream cheese frosting offers tangier flavor perfect for spice cakes but is softer and harder to work with for intricate designs. Swiss or Italian meringue buttercream provides silky-smooth texture but requires more skill to make.
How can I make my Thanksgiving cake look professional?
Professional-looking Thanksgiving cake designs come from clean technique and thoughtful details. Ensure your cake layers are level and even. Apply a proper crumb coat and let it set completely. Use quality decorating tools and practice piping techniques before decorating. Plan your design beforehand, and don’t overcrowd decorations. Sometimes less is more—a simple, well-executed design looks more professional than an overly complicated one.
Can I make Thanksgiving cake designs without fondant?
Definitely! Many stunning Thanksgiving cake designs use only buttercream frosting. Create beautiful effects with different piping tips, spatula textures, and color techniques like ombre or watercolor. Use fresh or candied fruits, nuts, herbs, and edible flowers for natural decorations. Buttercream-only designs often look more rustic and approachable, which suits the Thanksgiving aesthetic perfectly.
What size cake should I make for Thanksgiving?
Plan your cake size based on your guest count. An 8-inch three-layer cake serves 12-16 people generously. A 9-inch cake serves 16-20, while a 10-inch serves 20-24. For larger gatherings, make a two-tier cake or a sheet cake alongside a smaller decorated centerpiece cake. Remember that Thanksgiving features multiple desserts, so people typically take smaller cake portions.
Nutrition Information
| Nutrient | Per Slice (1/16 of cake) |
|---|---|
| Calories | 520 |
| Total Fat | 26g |
| Saturated Fat | 16g |
| Cholesterol | 95mg |
| Sodium | 220mg |
| Total Carbohydrates | 68g |
| Dietary Fiber | 1g |
| Sugars | 52g |
| Protein | 4g |
Nutrition information is approximate and based on cake and frosting only, without additional decorations or toppings.
Final Thoughts
Creating beautiful Thanksgiving cake designs transforms your holiday celebration into something truly memorable. These stunning desserts combine artistry with delicious flavors, giving you a centerpiece that sparks conversation and creates lasting memories.
The beauty of Thanksgiving cake designs lies in their versatility. Whether you prefer elegant sophistication or whimsical fun, rustic charm or modern minimalism, there’s a design that reflects your personal style. The techniques you’ve learned here apply to countless variations, limited only by your imagination.
Don’t be intimidated by elaborate designs you see online. Remember that even professional bakers started with simple projects. Your first Thanksgiving cake might not be perfect, and that’s completely okay. Each cake you create builds your skills and confidence.
The most important ingredient in any Thanksgiving cake design is the love you put into it. Your family and friends will appreciate the effort, creativity, and time you invested in creating something special just for them. That handmade touch carries more meaning than any store-bought alternative.
So gather your ingredients, put on your favorite apron, and let your creativity flow. This Thanksgiving, surprise everyone with a gorgeous cake that tastes as incredible as it looks. Your kitchen will smell amazing, your guests will be impressed, and you’ll have created a new holiday tradition.
Happy baking, and may your Thanksgiving table overflow with beauty, delicious food, and grateful hearts!
Pin this Thanksgiving cake designs guide for later, and share your beautiful creations with us on social media! Tag us so we can celebrate your baking success. Don’t forget to check out our other holiday dessert tutorials for more inspiration!