Thanksgiving Fondant Cupcake Toppers Step-by-Step Tutorial
Create bakery-style treats at home using Thanksgiving Fondant Cupcake Toppers! Fun, edible, and full of festive details for your dessert table.
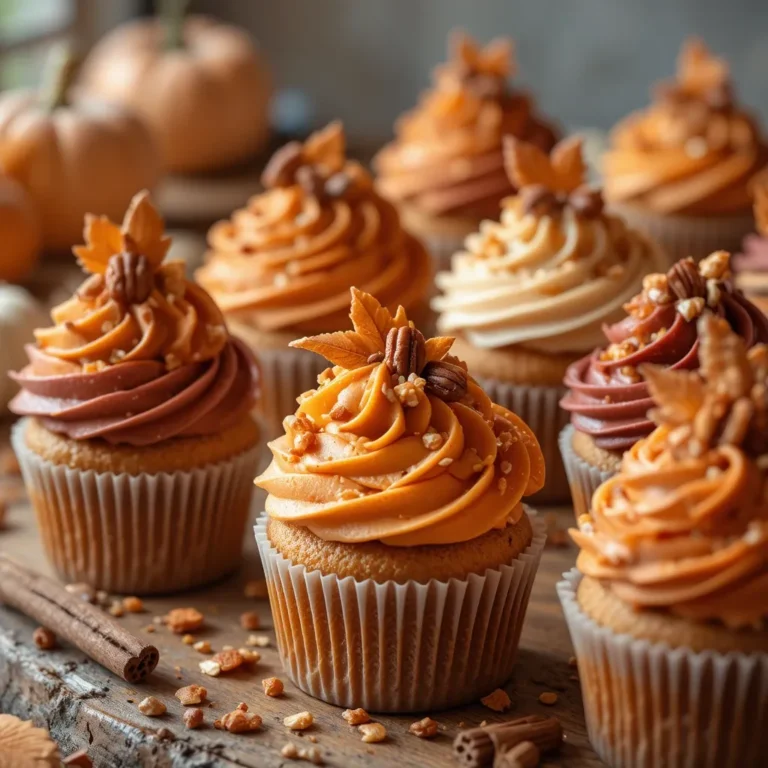
There’s something magical about homemade Thanksgiving fondant cupcake toppers that transforms ordinary cupcakes into showstoppers. These adorable, edible decorations bring festive charm to your dessert table without requiring professional pastry skills.
I still remember my first attempt – slightly lopsided pumpkins that my kids absolutely adored. Fun fact: fondant has been used in cake decorating since the 1500s! These toppers are perfect for beginners, taking just 30-45 minutes to create, and kids love helping shape turkeys and autumn leaves.
If you enjoyed my Pumpkin Spice Cupcakes recipe, you’ll find these toppers the perfect finishing touch. Get ready to impress your guests with bakery-worthy cupcakes that taste as good as they look!
What Are Thanksgiving Fondant Cupcake Toppers?
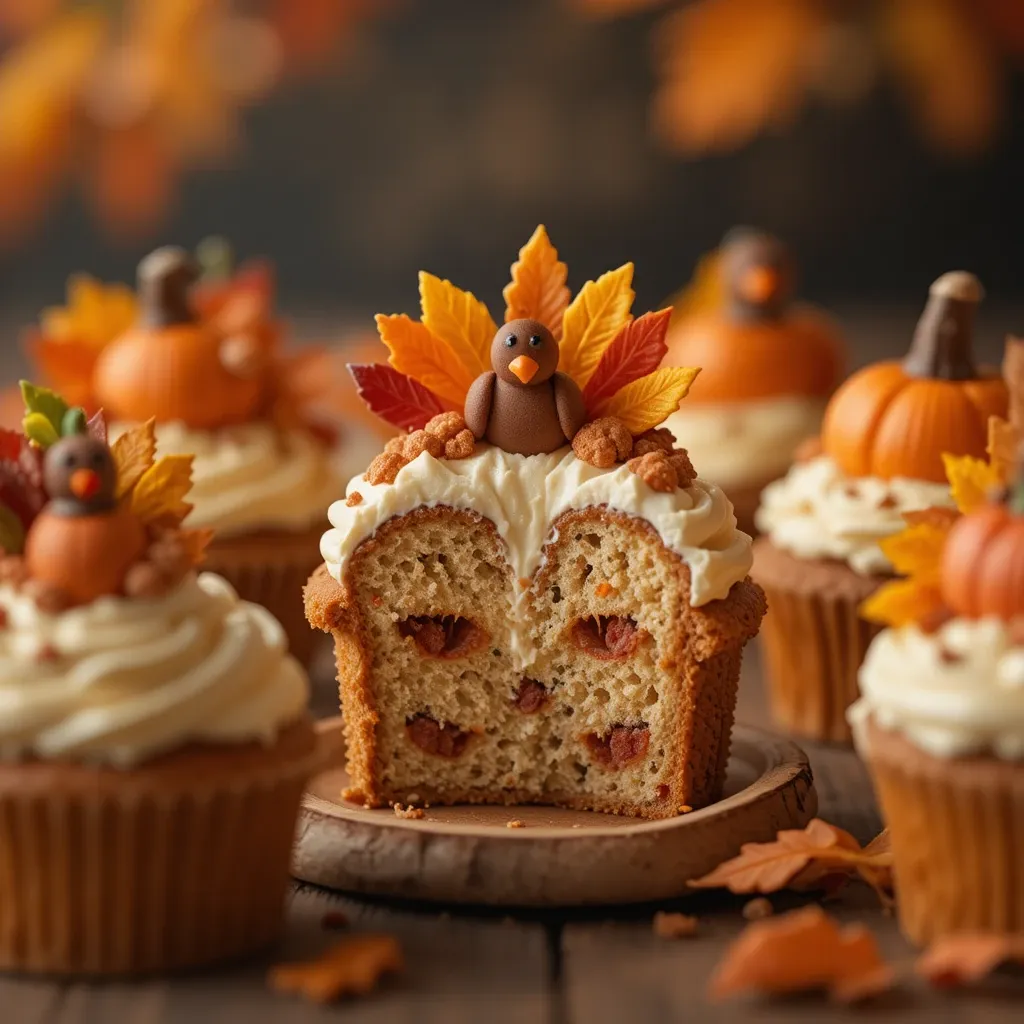
Ever wondered why these little edible sculptures steal the show at every Thanksgiving party? Thanksgiving fondant cupcake toppers are handcrafted decorations made from moldable fondant shaped into festive designs like turkeys, pumpkins, and fall leaves.
I call them “edible art” because honestly, who knew playing with your food could be this fun? My grandmother always said the way to anyone’s heart is through their stomach, and these charming toppers prove she was absolutely right. Ready to create your own edible masterpieces? Let’s dive in!
Why You’ll Love This Thanksgiving Fondant Cupcake Toppers Recipe
The Creative Freedom
The best part about making Thanksgiving fondant cupcake toppers is the endless customization possibilities. You can create miniature pumpkins in burnt orange, adorable turkeys with colorful tail feathers, or elegant maple leaves in autumn hues. The smooth, pliable texture of fondant makes it incredibly forgiving for beginners while offering enough versatility for experienced decorators to create intricate designs.
Budget-Friendly Bakery Style
Making these toppers at home saves you serious money compared to ordering custom cupcakes. A basic fondant kit costs around $10-15 and yields enough toppers for 24-36 cupcakes, while bakery cupcakes with custom decorations can run $4-6 each. You’re looking at savings of over $100 for a party-sized batch! Plus, you control the quality and colors exactly how you want them.
The Perfect Finishing Touch
These toppers pair beautifully with any cupcake flavor – from classic vanilla to spiced apple cinnamon. The subtle sweetness of fondant complements without overwhelming, and the firm texture holds up beautifully on buttercream frosting. If you loved my Cream Cheese Frosted Carrot Cupcakes, imagine them topped with tiny fondant carrots or autumn leaves! The visual impact is incredible, transforming simple cupcakes into conversation starters. Why not give your dessert table that professional bakery feel this Thanksgiving?
How to Make Thanksgiving Fondant Cupcake Toppers
Quick Overview
These Thanksgiving fondant cupcake toppers are surprisingly simple to create, even if you’ve never worked with fondant before. The process involves coloring, shaping, and assembling small fondant pieces into festive designs.
The sweet vanilla flavor and smooth texture make them both beautiful and delicious. You’ll love how the fondant holds its shape perfectly, creating crisp details that last for days.
Time Breakdown:
- Prep Time: 20 minutes
- Decorating Time: 30-45 minutes
- Drying Time: 2-4 hours (or overnight)
- Total Active Time: 50-65 minutes
Key Ingredients for Thanksgiving Fondant Cupcake Toppers
For the Fondant Base:
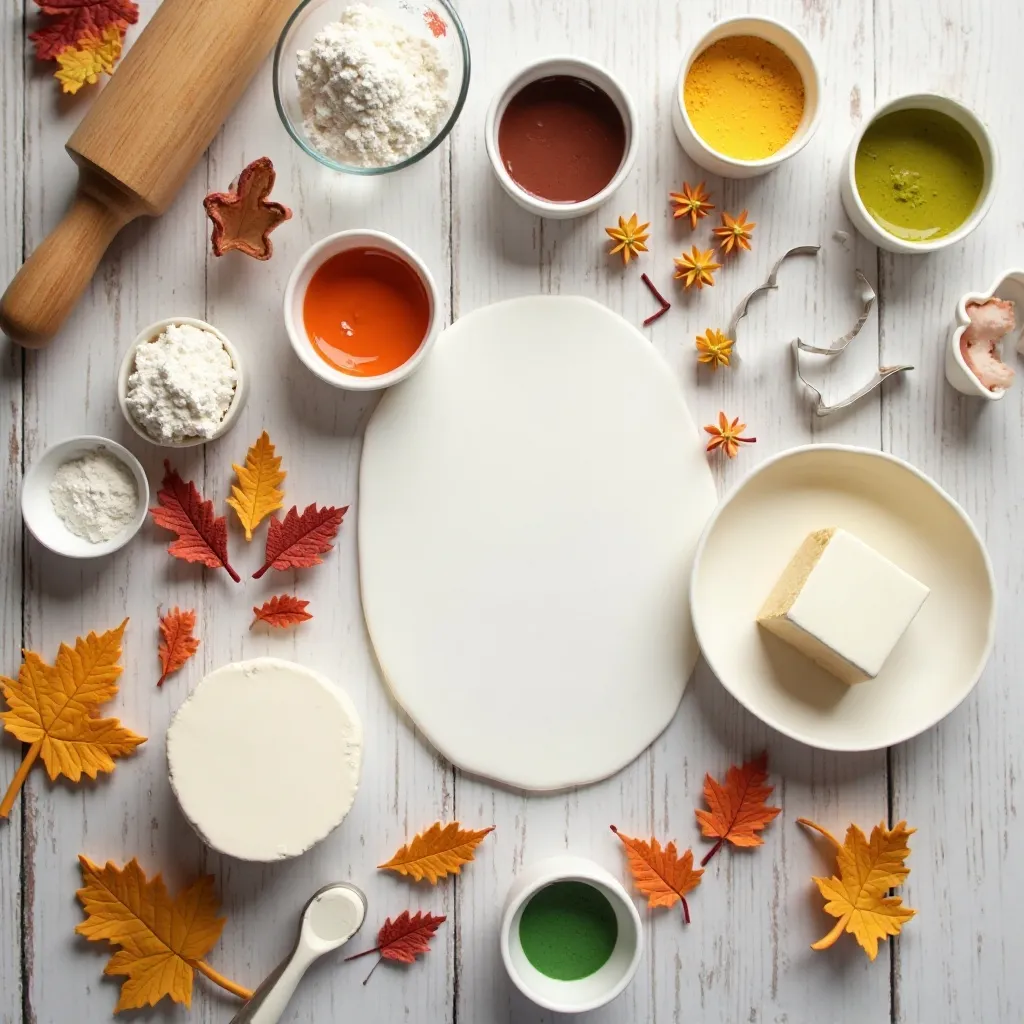
- 1 pound white fondant (store-bought or homemade)
- Gel food coloring (orange, brown, red, yellow, green)
- 2 tablespoons powdered sugar (for dusting)
- 1 tablespoon cornstarch (prevents sticking)
- 2 teaspoons shortening (for smooth texture)
For Assembly and Details:
- Edible food markers (black and brown)
- Small amount of water or edible glue
- Piping gel (for adding shine)
- Luster dust (optional, for shimmer)
Tools You’ll Need:
- Rolling pin (small fondant roller works best)
- Small cookie cutters (leaf, circle shapes)
- Toothpicks or fondant tools
- Small knife or pizza cutter
- Parchment paper or silicone mat
- Small paintbrush
Step-by-Step Instructions
Step 1: Prepare Your Workspace
Start by clearing a clean, dry surface and dusting it lightly with powdered sugar mixed with cornstarch in equal parts. This prevents sticking while you work. Gather all your tools and colors before beginning so you’re not scrambling mid-project. I learned this the hard way when my fondant dried out while I searched for my rolling pin! Set out small bowls for each color you plan to make.
Step 2: Color Your Fondant
Divide your white fondant into portions based on how many colors you need. For a classic Thanksgiving palette, I recommend: orange (40%), brown (20%), red (10%), yellow (10%), green (10%), and leave 10% white. Knead a tiny amount of gel coloring into each portion, adding gradually until you reach your desired shade. Gel colors work much better than liquid because they won’t make your fondant sticky. Wrap each colored portion in plastic wrap to prevent drying.
Step 3: Create Mini Pumpkins
Roll orange fondant into smooth balls about the size of a marble (roughly ¾ inch diameter). Using the back of a knife or a toothpick, gently press vertical lines from top to bottom to create pumpkin ridges – I usually make 5-6 lines per pumpkin. Roll a tiny piece of brown fondant into a small stem and attach it to the top using a dab of water. For extra detail, add a small green leaf by rolling out green fondant, cutting a tiny leaf shape, and pressing veins with a toothpick.
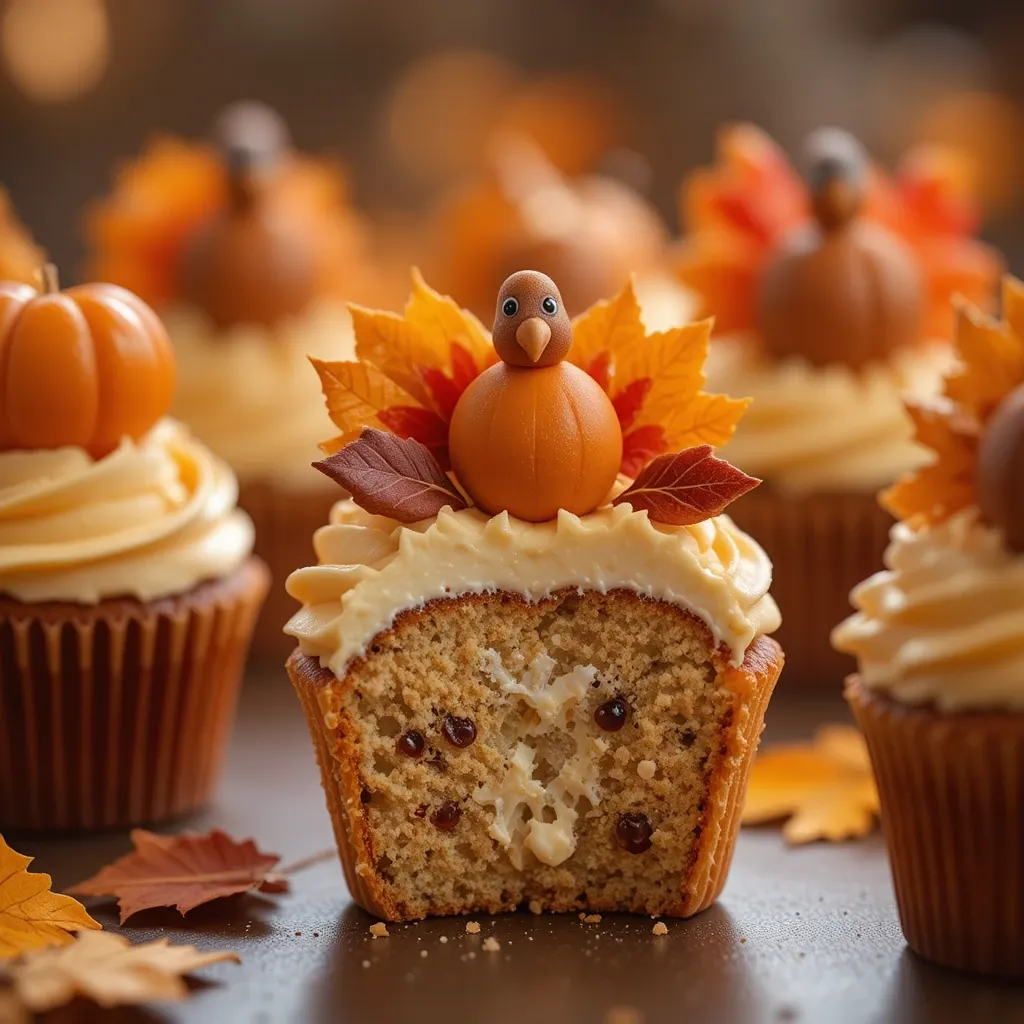
Step 4: Make Adorable Turkeys
Form a brown fondant ball (about 1 inch) for the turkey body. Create a smaller ball for the head and attach it with a dab of water. For the tail feathers, roll out small teardrops in red, orange, and yellow fondant, then arrange them in a fan shape behind the body, pressing gently to attach. Use orange fondant to create tiny triangles for the beak and feet. The cutest touch? Add two tiny white dots with black centers for eyes using a toothpick dipped in food coloring. My kids insist on naming each turkey!
Step 5: Craft Fall Leaves
Roll out colored fondant (red, orange, yellow, or green) to about ⅛ inch thickness. Use small leaf-shaped cookie cutters or cut freehand with a knife to create maple, oak, or generic leaf shapes. Using a toothpick or veining tool, draw leaf veins from the center outward. For a realistic touch, dust edges with luster dust in a contrasting color. Gently curl the leaves while still pliable by laying them over a rolled-up paper towel to dry – this creates beautiful dimension.
Step 6: Add Fine Details
Once your basic shapes are formed, use edible food markers to add personality. Draw faces on turkeys, add texture to pumpkin stems, or write tiny messages on leaves. You can also brush a thin layer of piping gel on pumpkins for a glossy finish or dust leaves with edible gold luster for an elegant shimmer. This is where your creations really come to life!
Step 7: Drying and Setting
Arrange all your completed toppers on a parchment-lined baking sheet, making sure they don’t touch. Allow them to dry at room temperature for at least 2-4 hours, or overnight for best results. The fondant will firm up significantly, making them easier to handle and less likely to lose their shape when placed on cupcakes. I usually make mine 1-2 days ahead to ensure they’re completely set.
Step 8: Attach to Cupcakes
Once your cupcakes are frosted with buttercream, gently press each fondant topper into the frosting. The buttercream acts as a natural glue. For heavier toppers like turkeys, you can insert a toothpick through the bottom for extra support, just remember to warn guests! Arrange multiple small toppers together for an impressive display – three tiny leaves, a pumpkin, and a turkey on one cupcake looks absolutely stunning.
What to Serve Thanksgiving Fondant Cupcake Toppers With
These decorated cupcakes shine as part of a complete Thanksgiving dessert spread. Pair them with traditional pumpkin pie and apple crisp for variety in flavors and textures. They also look beautiful alongside a cheese platter with fruits and nuts as guests mingle before dinner.
For beverages, serve with spiced apple cider, hot chocolate, or coffee for adults, and sparkling apple juice for kids. The mild sweetness of the fondant toppers complements rich, creamy drinks without being overwhelming.
Consider creating a dessert board with your topped cupcakes as the centerpiece, surrounded by chocolate-covered pretzels, candied pecans, and small maple cookies. The color coordination creates an Instagram-worthy display that guests will love photographing before devouring!
Top Tips for Perfecting Thanksgiving Fondant Cupcake Toppers
Work in Small Batches
Don’t try to color all your fondant at once. Work with one color at a time, keeping the rest tightly wrapped in plastic. Fondant dries out quickly when exposed to air, becoming cracked and difficult to shape. I learned to work in 15-minute intervals, which keeps everything fresh and manageable.
Achieve Perfect Color Consistency
When mixing colors, use gel food coloring sparingly – you can always add more but can’t take it away. Start with a toothpick amount and knead thoroughly. For more vibrant colors, let the fondant rest for 30 minutes after coloring; the shade deepens as it sits. If colors become too dark, knead in plain white fondant to lighten.
Prevent Sticking Without Excess
The key to smooth fondant work is using minimal powder. Too much cornstarch creates a dry, cracked surface, while too much powdered sugar makes toppers overly sweet. My secret? Mix equal parts of both and dust lightly with a clean makeup brush. If fondant becomes sticky, add a tiny amount of shortening and knead well.
Size Matters for Proportion
Keep your toppers proportional to your cupcakes. Mini cupcakes need tiny ½-inch toppers, while standard cupcakes can handle 1-1.5 inch decorations. Oversized toppers make cupcakes look awkward and can sink into soft frosting. When in doubt, go smaller – delicate details always look more professional.
Repair Cracks and Mistakes
If your fondant cracks while shaping, don’t panic! Rub a tiny amount of shortening into the crack and smooth it with your finger. For broken pieces, use a dab of water as glue. You can also cover mistakes with additional details – a crack on a pumpkin becomes character, or hide it under a strategically placed leaf!
Create Depth with Layering
Professional-looking toppers use dimension. Instead of flat leaves, overlap multiple leaves at angles. Add smaller details on top of larger bases. For turkeys, attach the tail feathers in a layered fan rather than flat. This creates shadows and visual interest that photographs beautifully.
Test Your Fondant First
Not all fondant brands have the same texture and taste. Before making a full batch for a party, create one or two test toppers. Some fondants are firmer (great for holding shape), while others are more elastic (easier to roll thin). Satin Ice and Wilton are my go-to brands for reliability, but homemade marshmallow fondant tastes better if you have time.
Storing and Reheating Tips
Short-Term Storage
Completed fondant toppers can be stored in an airtight container at room temperature for up to 2 weeks. Place them in a single layer on parchment paper, separated by additional parchment sheets if stacking is necessary. Keep them away from humidity and direct sunlight, which can cause colors to fade or fondant to become sticky. Never refrigerate bare fondant toppers – condensation will ruin them!
Long-Term Storage
For longer storage, fondant toppers can last up to 2 months in an airtight container in a cool, dark place. Make sure they’re completely dry before storing. I love making these ahead for stress-free holiday prep. Just remember that colors may slightly fade over time, especially reds and purples.
Storing Decorated Cupcakes
Once toppers are placed on frosted cupcakes, store the cupcakes in a single layer in an airtight container. They can be refrigerated for up to 3 days. Before serving, let them come to room temperature for 30 minutes – the frosting will soften and taste better. The fondant toppers will remain firm and beautiful.
Freezing Guidelines
You can freeze unfrosted cupcakes for up to 3 months, but I don’t recommend freezing fondant toppers or decorated cupcakes. Thawing creates moisture that makes fondant sticky and can cause colors to bleed. Instead, freeze plain cupcakes and add fresh toppers when needed.
Revival Tips
If your fondant toppers absorb humidity and become soft or sticky, place them on a parchment-lined tray and let them air-dry in a cool room with a fan running nearby. Don’t use heat or direct sunlight. Within a few hours, they should firm up again. For slight stickiness, dust very lightly with cornstarch using a soft brush.
Common Baking Mistakes to Avoid
Mistake 1: Using Fondant on Unstable Frosting
Placing fondant toppers on whipped cream or cream cheese frosting that’s too soft causes them to sink or slide. Always use a firm buttercream or ganache base that’s been chilled for at least 30 minutes. The frosting should hold a peak without collapsing.
Mistake 2: Making Toppers Too Thick
Thick fondant toppers are heavy, difficult to bite through, and can overwhelm your cupcakes. Keep pieces no thicker than ¼ inch. Thinner fondant also dries faster and develops better texture. Use a rolling pin with thickness guides or rubber bands wrapped around the ends.
Mistake 3: Not Planning Color Ratios
Running out of a specific color mid-project is frustrating, and trying to remix the exact shade is nearly impossible. Before starting, sketch your designs and estimate how much of each color you’ll need. Always make 20% more than you think necessary.
Mistake 4: Overworking the Fondant
Kneading fondant too much makes it warm, sticky, and difficult to work with. If this happens, wrap it and refrigerate for 10-15 minutes. Work in short sessions, and if your hands are naturally warm (like mine!), run cold water over your wrists to cool down before handling fondant.
Mistake 5: Skipping the Drying Time
Placing soft, undried toppers on cupcakes leads to smudging, losing shape, and details merging together. Always allow adequate drying time. If you’re short on time, place toppers near (not directly in front of) a fan to speed up the process.
Mistake 6: Using Water Too Liberally
Too much water dissolves fondant and creates sticky messes. When attaching pieces, use barely damp brushes or switch to edible glue for cleaner work. A single drop goes a long way.
Mistake 7: Ignoring Humidity
High humidity is fondant’s enemy. If you live in a humid climate or it’s a rainy day, work in an air-conditioned room and consider using a dehumidifier. I once made beautiful toppers that melted into sad puddles overnight during a humid summer – lesson learned!
Frequently Asked Questions
Can I make fondant toppers without special tools?
Absolutely! While fondant tools make the process easier, you can use household items. A regular rolling pin works fine, toothpicks create details, and small cookie cutters from any kitchen store are perfect. I’ve even used the cap of a pen for tiny circles and a butter knife for cutting. Your hands are the best tools for shaping and smoothing.
How far in advance can I make these toppers?
You can make Thanksgiving fondant cupcake toppers up to 2 weeks in advance if stored properly in an airtight container at room temperature. This makes them perfect for stress-free party prep. I usually make mine 3-5 days ahead, which gives them plenty of time to dry completely while not risking any color fading.
What’s the best fondant for beginners?
Store-bought fondant like Wilton or Satin Ice is ideal for beginners because it’s pre-made and has consistent texture. Wilton is more affordable and widely available, while Satin Ice is smoother and easier to work with. If you want better taste, homemade marshmallow fondant is surprisingly easy and delicious, though slightly stickier to handle.
Can I make these toppers vegan or gluten-free?
Yes! Many store-bought fondants are naturally vegan (check labels), and you can make vegan marshmallow fondant using plant-based marshmallows. Fondant is typically gluten-free since it’s made from sugar, but always verify ingredient labels if this is a concern. The toppers will work the same way regardless.
Why is my fondant cracking when I shape it?
Cracking usually means your fondant is too dry or you’re working with it cold. Knead in a tiny amount of shortening or vegetable oil to add moisture. You can also warm it slightly in your hands before shaping. If store-bought fondant seems dry right out of the package, this is an easy fix that takes just a minute of kneading.
Do fondant toppers taste good?
Homemade marshmallow fondant tastes much better than store-bought, with a sweet, vanilla-marshmallow flavor. Store-bought fondant can be quite sweet and have a slight waxy texture, though Satin Ice is notably better than others. Many people prefer to remove the toppers before eating, but kids typically love them! The decorative value is worth it either way.
Can I use frosting instead of water to attach fondant pieces?
I don’t recommend it. Buttercream or frosting between fondant pieces looks messy and doesn’t dry properly. Water or edible glue creates clean, invisible seams. If water isn’t working (sometimes with very dry fondant), use special fondant glue or a tiny amount of light corn syrup.
How do I fix fondant that’s too sticky?
Knead in small amounts of cornstarch or powdered sugar, just a pinch at a time. Dust your work surface and hands lightly as well. If it’s extremely sticky, the room might be too warm or humid. Pop the fondant in the refrigerator for 5-10 minutes to firm up, then work quickly in a cooler environment.
Can kids help make these toppers?
Definitely! This is a wonderful activity for children ages 5 and up. Kids love rolling, shaping, and creating their own designs. Give them their own portion of fondant in various colors and let their creativity flow. Their toppers might not be perfect, but they’ll be made with love, and that’s what matters most at Thanksgiving!
Will the colors stain my hands?
Gel food coloring can temporarily stain hands while kneading, especially with darker colors like red and black. Wear disposable gloves if you’re concerned, or rub a small amount of shortening on your hands first, which creates a barrier. Most staining washes off within a day or two and comes off faster with lemon juice or baking soda scrub.
Nutrition Information
| Nutrient | Per Topper (approximately) |
|---|---|
| Calories | 25-30 kcal |
| Total Fat | 0g |
| Saturated Fat | 0g |
| Cholesterol | 0mg |
| Sodium | 0-2mg |
| Total Carbohydrates | 7g |
| Dietary Fiber | 0g |
| Sugars | 6g |
| Protein | 0g |
Note: Nutritional values are approximate and based on standard fondant. Values will vary based on size of toppers and specific fondant brand used. These values do not include the cupcake or frosting.
Final Thoughts
Creating Thanksgiving fondant cupcake toppers is more than just decorating desserts – it’s about crafting memories and adding a personal touch to your holiday celebration. There’s something incredibly satisfying about transforming simple fondant into tiny works of edible art that make people smile.
Whether you’re a complete beginner or an experienced baker, these toppers offer endless creative possibilities. Don’t worry about perfection; even slightly wonky turkeys have charm that store-bought decorations can’t match. My family still talks about the “turkey with an attitude” from three Thanksgivings ago!
The best part? You can make these with your kids, creating traditions that last far longer than the desserts themselves. The time spent rolling fondant and giggling over misshapen pumpkins becomes part of your family’s Thanksgiving story.
So gather your fondant, pick your colors, and let your creativity shine this Thanksgiving. Your cupcakes (and your guests) will thank you for it. Happy decorating, and may your Thanksgiving table be filled with love, laughter, and beautifully topped cupcakes!