Thanksgiving Oreo Cake Balls Recipe For Perfect Holiday
Delight guests with Thanksgiving Oreo cake balls — rich, creamy, and decorated for fall, these mini desserts are perfect for festive indulgence.
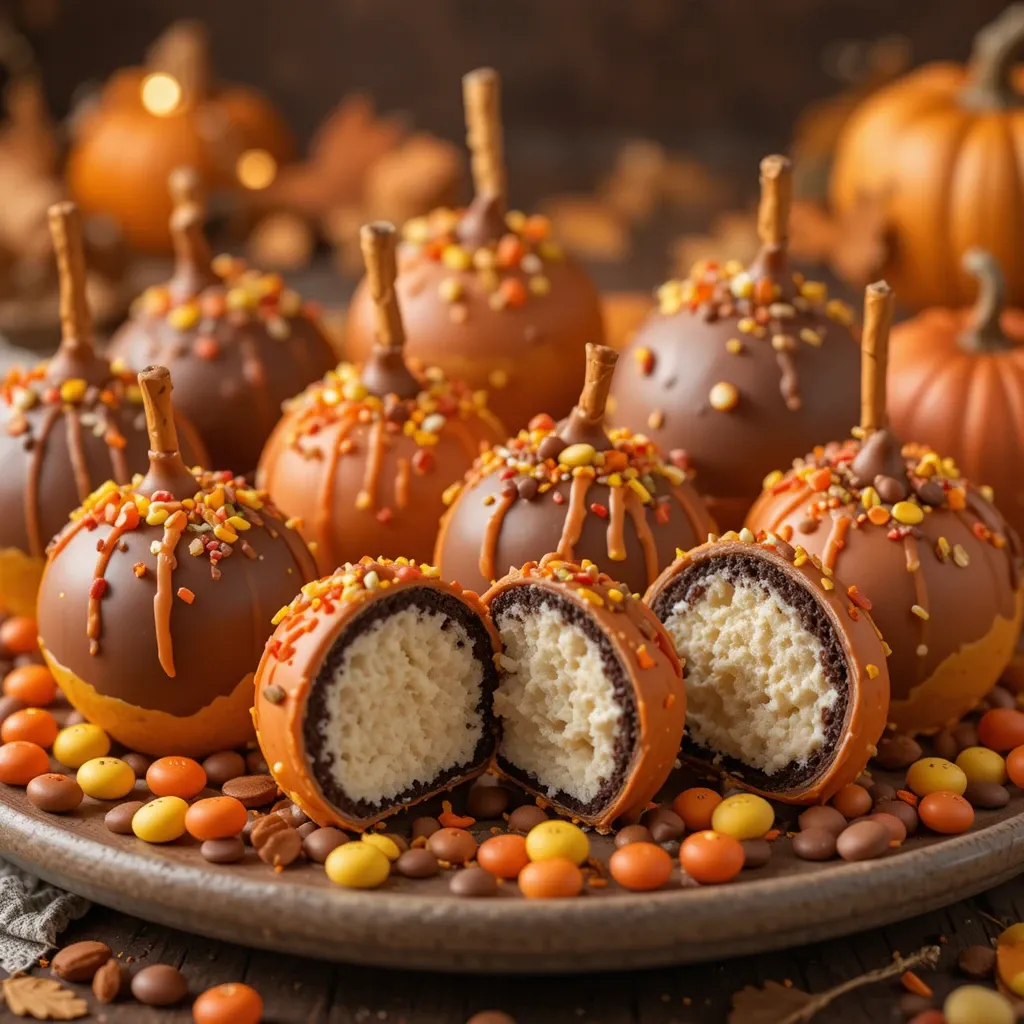
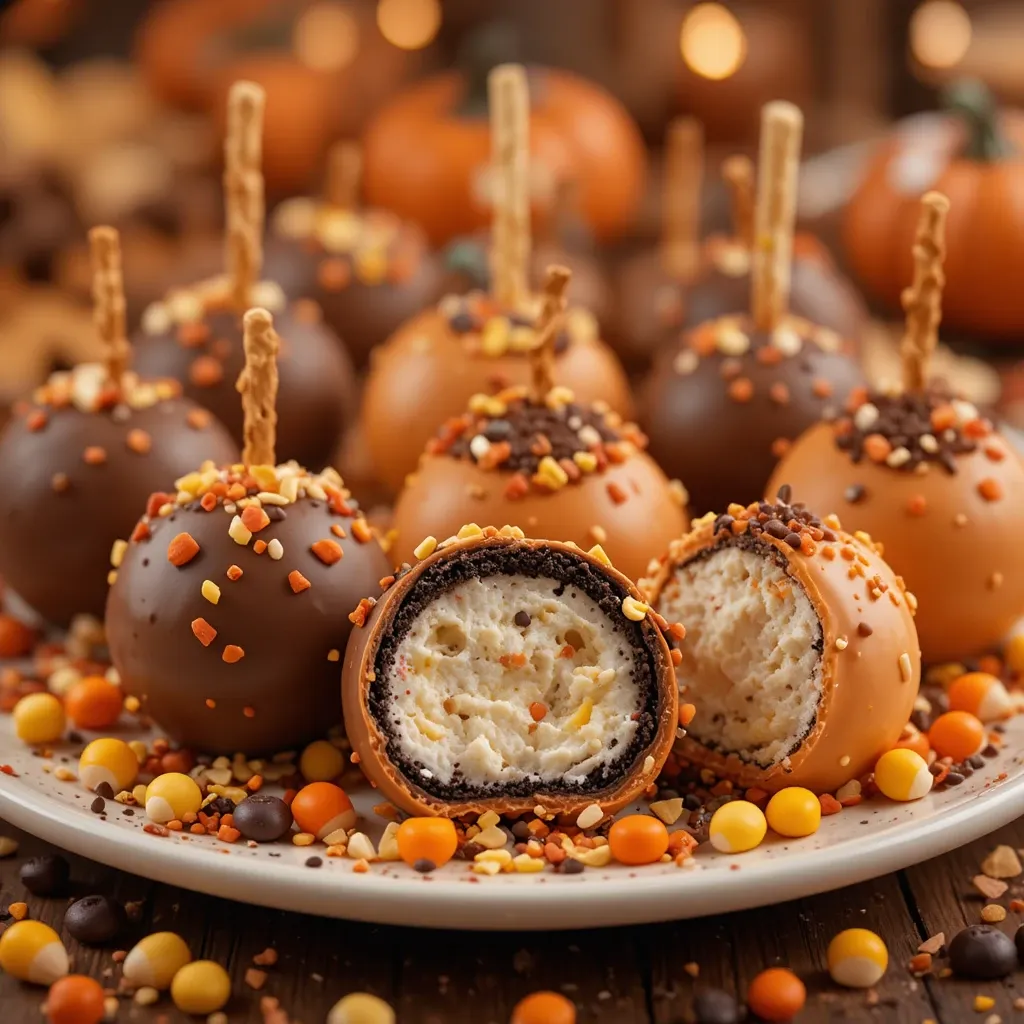
These Thanksgiving Oreo cake balls are the perfect festive treat that combines the beloved cookies-and-cream flavor with adorable autumn decorations. With just three simple ingredients and no baking required, you’ll have impressive holiday desserts ready in under an hour.
These bite-sized beauties are creamy, rich, and absolutely irresistible—perfect for Thanksgiving gatherings, potlucks, or gifting to friends and family. They remind me of our popular pumpkin spice cake pops, but these are even easier to make and require no special equipment!
What Are Thanksgiving Oreo Cake Balls?
Ever wonder why these delightful treats are called “cake balls” when they’re made with cookies? It’s because the combination of crushed Oreos and cream cheese creates a texture so smooth and cake-like, you’d swear you were biting into the world’s most decadent chocolate cake!
The magic happens when cookies meet cream cheese—it’s like they were destined to be together. As the classic saying goes, “the way to a man’s heart is through his stomach,” and these Thanksgiving Oreo cake balls will steal hearts at your holiday table. Don’t wait until Thanksgiving to try these—they’re so simple, you could whip up a batch tonight!
Why You’ll Love This Thanksgiving Oreo Cake Balls Recipe
Incredibly Easy and No-Bake
These Thanksgiving Oreo cake balls require absolutely no baking skills or fancy equipment. You’ll mix, roll, dip, and decorate—that’s it! Even kids can help make these festive treats. The no-bake nature means your oven stays free for turkey and casseroles while you prepare a show-stopping dessert everyone will rave about.
Budget-Friendly Holiday Treats
Forget spending a fortune on fancy bakery desserts. With just Oreos, cream cheese, and chocolate coating, you’ll create impressive treats for a fraction of the cost. One batch makes 24-30 cake balls, which means you’re spending less than 50 cents per serving. Compare that to $3-4 per cake pop at a bakery, and you’ll see why homemade is the way to go!
Customizable and Festive
The beauty of Thanksgiving Oreo cake balls lies in their versatility. Coat them in chocolate, white chocolate, or candy melts in autumn colors like orange, brown, and yellow. Add festive sprinkles, drizzle with contrasting chocolate, or shape them into tiny pumpkins or turkeys. They’re similar to our chocolate truffles recipe but with that signature Oreo crunch that makes them extra special.
Make a batch this weekend and watch them disappear faster than pumpkin pie!
How to Make Thanksgiving Oreo Cake Balls
Quick Overview
These Thanksgiving Oreo cake balls come together in three simple steps: crush, mix, and dip. The hardest part is waiting for the chocolate coating to set before devouring them!
The cookies and cream cheese blend into a fudgy, truffle-like texture that’s absolutely divine. The chocolate shell adds that satisfying snap with every bite.
Total Time Breakdown:
- Prep Time: 30 minutes
- Chilling Time: 30 minutes
- Coating Time: 20 minutes
- Total Time: 1 hour 20 minutes
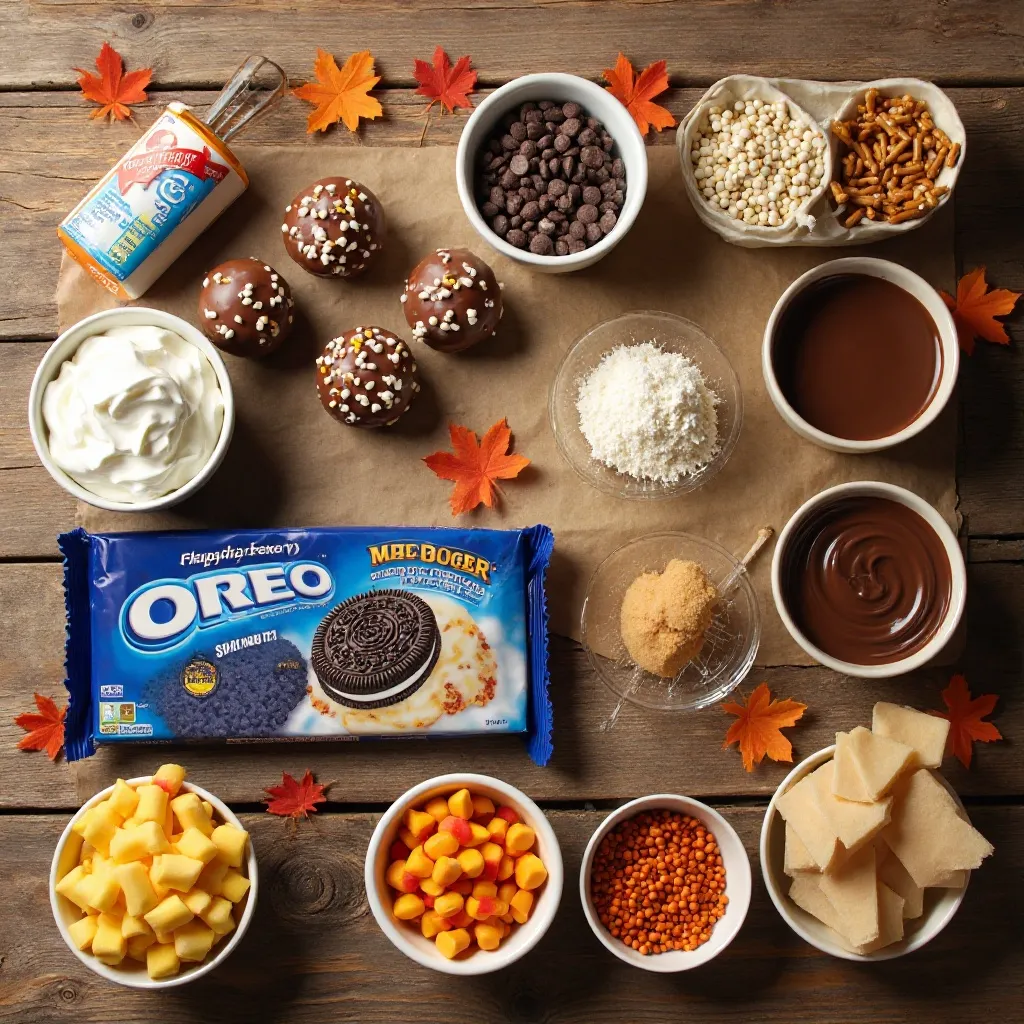
Key Ingredients for Thanksgiving Oreo Cake Balls
For the Cake Balls:
- 36 Oreo cookies (1 standard package) – regular, not Double Stuf
- 8 oz cream cheese, softened to room temperature
- 16 oz chocolate candy melts or almond bark (milk, dark, or white chocolate)
For Thanksgiving Decorations:
- Orange, brown, and yellow candy melts
- Fall-themed sprinkles
- Candy corn pieces
- Mini chocolate chips (for turkey eyes)
- Pretzel sticks (for turkey feet)
- Autumn-colored sanding sugar
Step-by-Step Instructions
Step 1: Crush the Oreos
Place all 36 Oreo cookies (including the cream filling—don’t remove it!) into a food processor. Pulse 15-20 times until the cookies are finely ground into crumbs that resemble dark sand. You shouldn’t see any large chunks.
If you don’t have a food processor, place cookies in a large zip-top bag and crush them with a rolling pin until very fine. This takes about 5 minutes of good arm work, but it’s worth it!
Step 2: Mix with Cream Cheese
In a large mixing bowl, combine the Oreo crumbs with the softened cream cheese. Make sure your cream cheese is truly soft—leave it out for 30-45 minutes before starting.
Use a sturdy spatula or your hands (wearing gloves) to mix everything together. Keep mixing until the cream cheese is fully incorporated and the mixture holds together when squeezed. This takes about 2-3 minutes. The mixture should be moist enough to hold its shape but not overly sticky.
Step 3: Roll into Balls
Line a large baking sheet with parchment paper. Using a small cookie scoop (about 1 tablespoon size) or a spoon, portion out the mixture. Roll each portion between your palms to create smooth, round balls about 1 inch in diameter.
Work quickly so the mixture doesn’t get too warm from your hands. If it becomes too soft, pop it in the fridge for 10 minutes. Place each ball on the prepared baking sheet, spacing them about an inch apart. You should get 24-30 balls depending on size.
Step 4: Chill the Balls
Transfer the baking sheet to the refrigerator and chill for at least 30 minutes, or up to 2 hours. This step is crucial—cold cake balls are much easier to dip in chocolate and the coating will set properly. Don’t skip this step or your cake balls might fall apart during coating!
Step 5: Melt the Chocolate
While the balls chill, prepare your chocolate coating. Place candy melts or chopped almond bark in a microwave-safe bowl. Microwave in 30-second intervals, stirring thoroughly between each interval, until completely smooth and melted. Usually takes 1.5-2 minutes total.
The chocolate should be fluid enough to easily coat the balls. If it’s too thick, add 1 teaspoon of vegetable oil or shortening and stir until smooth.
Step 6: Dip the Cake Balls
Remove 6-8 balls from the fridge at a time (keep the rest cold). Using a fork or dipping tool, place one ball in the melted chocolate. Gently roll it around to coat completely, then lift it with the fork, allowing excess chocolate to drip back into the bowl.
Tap the fork gently on the rim of the bowl to remove more excess chocolate. Slide the coated ball back onto the parchment-lined baking sheet. Repeat with remaining balls, working in small batches so they stay cold.
Step 7: Decorate While Wet
This is where the fun happens! While the chocolate coating is still wet, add your Thanksgiving decorations. Sprinkle with autumn-colored sprinkles, press on candy corn pieces, or add a drizzle of contrasting chocolate using a piping bag or spoon.
For turkey cake balls: Add a candy corn beak, mini chocolate chip eyes, and broken pretzel pieces for feet. For pumpkins: Use orange candy melts as the coating and add a green candy melt stem.
Work quickly—the chocolate sets fast! Decorate each ball right after dipping before moving to the next one.
Step 8: Set and Serve
Let the coated balls sit at room temperature for 15-20 minutes until the chocolate is completely set, or pop them in the fridge for 10 minutes for faster setting. Once set, they’re ready to serve! Arrange them on a festive platter and watch them disappear.
What to Serve Thanksgiving Oreo Cake Balls With
These versatile treats fit beautifully into any Thanksgiving spread:
As Dessert:
- Serve alongside pumpkin pie, pecan pie, and apple crisp for a dessert buffet
- Pair with vanilla ice cream and hot fudge for an indulgent treat
- Create a dessert board with fresh berries, whipped cream, and mini cookies
With Beverages:
- Hot apple cider or spiced chai tea
- Pumpkin spice lattes or regular coffee
- Hot chocolate with marshmallows for the kids
- Dessert wine or Irish cream coffee for adults
As Party Favors:
- Package 3-4 balls in clear cellophane bags tied with ribbon
- Arrange in small boxes for take-home Thanksgiving treats
- Display on tiered cake stands at your dessert table
- Create a “build your own” cake ball decorating station for kids
Top Tips for Perfecting Thanksgiving Oreo Cake Balls
Use Room Temperature Cream Cheese
Cold cream cheese creates lumps and makes mixing difficult. Let it sit out for at least 45 minutes before starting. If you forgot, microwave it for 10 seconds (unwrapped) to soften slightly—but be careful not to melt it!
Don’t Skip the Chilling Step
Warm cake balls will fall apart when dipped in chocolate. Always chill them for at least 30 minutes. If your kitchen is warm, chill them longer—even overnight works perfectly. Cold balls = successful coating every single time.
Keep Your Hands Cool
If your hands are warm, the mixture will get sticky while rolling. Keep a bowl of ice water nearby and dip your hands in it occasionally (dry them before rolling). This keeps the balls perfectly round and smooth.
Master the Chocolate Temperature
If chocolate is too hot, it will be too thin and won’t coat properly. If it’s too cool, it gets thick and lumpy. The perfect temperature feels warm but not hot when you touch the bowl. Reheat in 10-second bursts if it starts to thicken while you’re working.
Ingredient Substitutions:
- Use Golden Oreos for vanilla cake balls
- Replace cream cheese with mascarpone for extra richness
- Try different Oreo flavors: mint, peanut butter, or pumpkin spice
- Use dark chocolate coating for a less sweet version
- Add 1 teaspoon pumpkin pie spice to the mixture for extra fall flavor
Timing Adjustments:
- Make the balls up to 3 days ahead and store uncoated in the fridge
- Coat them the day of your event for the freshest appearance
- If coating multiple batches, keep uncoated balls in the fridge between batches
Storing and Reheating Tips
Refrigerator Storage:
Store Thanksgiving Oreo cake balls in an airtight container in the refrigerator for up to 2 weeks. Layer them between sheets of parchment paper to prevent sticking. The cream cheese filling means they must be refrigerated—don’t leave them at room temperature for more than 2 hours.
For best taste, remove them from the fridge 15-20 minutes before serving so the chocolate coating isn’t too hard and the filling softens slightly.
Freezer Storage:
These freeze beautifully for up to 3 months! Arrange coated balls in a single layer on a baking sheet and freeze until solid (about 2 hours). Transfer to a freezer-safe container or bag, separating layers with parchment paper.
To thaw, move them to the refrigerator overnight. Never microwave to defrost—this will make the chocolate coating soft and messy.
Make-Ahead Tips:
Want to save time? Prepare the uncoated balls up to 5 days ahead. Store them covered in the fridge, then coat them 1-2 days before your event. This strategy works perfectly for busy holiday schedules.
You can also freeze uncoated balls for up to 2 months. Thaw in the fridge overnight before coating.
My Personal Testing Story
Last year, I volunteered to bring dessert for our family Thanksgiving and wanted something different from the usual pies. I tested this recipe on a Tuesday night, and my husband couldn’t stop eating them straight from the fridge!
My first attempt was a bit messy—I learned the hard way that warm cream cheese makes the mixture too soft. I also discovered that dipping cold balls in chocolate that’s TOO hot causes cracks in the coating.
After adjusting the temperature of both the balls and chocolate, batch number two was perfect. The kids helped me decorate them as little turkeys with candy corn and pretzels, and they were the hit of Thanksgiving dinner. My mother-in-law asked for the recipe three times! Now I make them for every fall gathering.
Common Baking Mistakes to Avoid
Mistake #1: Not Processing Oreos Fine Enough
Large chunks of cookie won’t bind properly with cream cheese, making crumbly balls that fall apart. Pulse until very fine—the texture should be like cocoa powder, not chunky crumbs.
Mistake #2: Adding Too Much Cream Cheese
More cream cheese might seem like it would make smoother balls, but it actually makes the mixture too soft and impossible to coat. Stick to 8 oz for one package of Oreos—the ratio is perfect.
Mistake #3: Rolling Balls Too Large
Giant cake balls might seem impressive, but they’re harder to coat evenly and the chocolate-to-filling ratio is off. Keep them around 1 inch diameter—about the size of a walnut. They’re rich, so small bites are perfect!
Mistake #4: Dipping Warm Balls
This is the #1 mistake! Warm balls fall apart in the chocolate and create a crumbly mess. Always chill thoroughly—30 minutes minimum, 2 hours is even better. When in doubt, chill longer!
Mistake #5: Overheating the Chocolate
Scorched chocolate becomes grainy and unusable. Always melt in short intervals and stir between each one. If chocolate gets too thick, add a tiny bit of vegetable oil to thin it—not more chocolate or milk.
Mistake #6: Not Tapping Off Excess Chocolate
Too much chocolate creates thick, heavy coatings with a “foot” at the bottom. After dipping, tap your fork gently on the bowl rim 3-4 times to let excess drip off. The coating should be thin and even.
Mistake #7: Decorating Too Late
Sprinkles and decorations must go on while chocolate is wet—within 30 seconds of dipping. Once chocolate sets, decorations won’t stick. Work one ball at a time if needed.
Frequently Asked Questions
Can I use regular chocolate chips instead of candy melts?
Yes, but add 1 tablespoon of coconut oil or shortening per cup of chocolate chips. Regular chips are thicker and don’t coat as smoothly without this addition. Candy melts are easier for beginners because they’re formulated for coating.
Do I need to remove the Oreo cream filling?
No! Keep the cream filling inside—it’s essential to the recipe. The filling helps bind everything together and adds to the cookies-and-cream flavor. Removing it makes the mixture too dry.
Why are my cake balls falling off the fork while dipping?
They weren’t chilled long enough, or the chocolate is too hot. Make sure balls are very cold (30+ minutes in fridge) and let melted chocolate cool for 2-3 minutes before dipping. Use a dipping tool or toothpick for extra support.
Can I make these with different Oreo flavors?
Absolutely! Golden Oreos, mint Oreos, peanut butter Oreos, and pumpkin spice Oreos all work beautifully. Match your coating color to the Oreo flavor—white chocolate for vanilla, dark chocolate for mint.
How do I fix chocolate that’s too thick?
Add vegetable oil or shortening 1 teaspoon at a time, stirring well after each addition. The chocolate should be thin enough to easily coat a spoon. Don’t add milk or water—this causes seizing.
Can I make these dairy-free?
Yes! Use dairy-free Oreos (they exist!) and dairy-free cream cheese. Coat with dairy-free chocolate chips melted with coconut oil. The texture will be slightly different but still delicious.
Why do my cake balls have cracks in the coating?
Temperature shock causes cracks. The balls are too cold, or the chocolate is too hot. Let chilled balls sit at room temperature for 5 minutes before dipping, and make sure chocolate isn’t steaming hot.
How far in advance can I make these?
Make them up to 3 days ahead for best texture and freshness. Store coated balls in an airtight container in the fridge. For longer storage (up to 3 months), freeze them in a freezer-safe container.
What’s the best way to transport cake balls?
Layer them in a container between sheets of parchment paper. Keep them cold with ice packs if traveling longer than 30 minutes. A cupcake carrier with inserts works perfectly to prevent rolling.
Can I double this recipe?
Definitely! Use 2 packages of Oreos and 16 oz cream cheese. Mix in batches if your bowl isn’t large enough. You’ll get 48-60 balls—perfect for large gatherings or gifting.
Nutrition Information
| Nutrient | Amount Per Serving |
|---|---|
| Serving Size | 1 cake ball |
| Calories | 135 |
| Total Fat | 7g |
| Saturated Fat | 4g |
| Cholesterol | 10mg |
| Sodium | 95mg |
| Total Carbohydrates | 17g |
| Dietary Fiber | 0.5g |
| Sugars | 12g |
| Protein | 1g |
Nutrition information is approximate and based on 28 servings per batch
Final Thoughts
These Thanksgiving Oreo cake balls prove that impressive holiday desserts don’t need to be complicated. With minimal ingredients, no baking required, and endless decoration possibilities, they’re perfect for busy hosts who want to serve something special.
Whether you’re making them for your Thanksgiving dessert table, packaging them as hostess gifts, or creating them with kids for a fun holiday activity, these treats deliver maximum wow factor with minimum effort.
The best part? You can make them days ahead and store them in the fridge, freeing up your Thanksgiving Day schedule for more important things—like actually enjoying time with your loved ones.
So grab a package of Oreos and let’s get rolling! Your Thanksgiving guests will be asking for the recipe before they even finish their first bite.