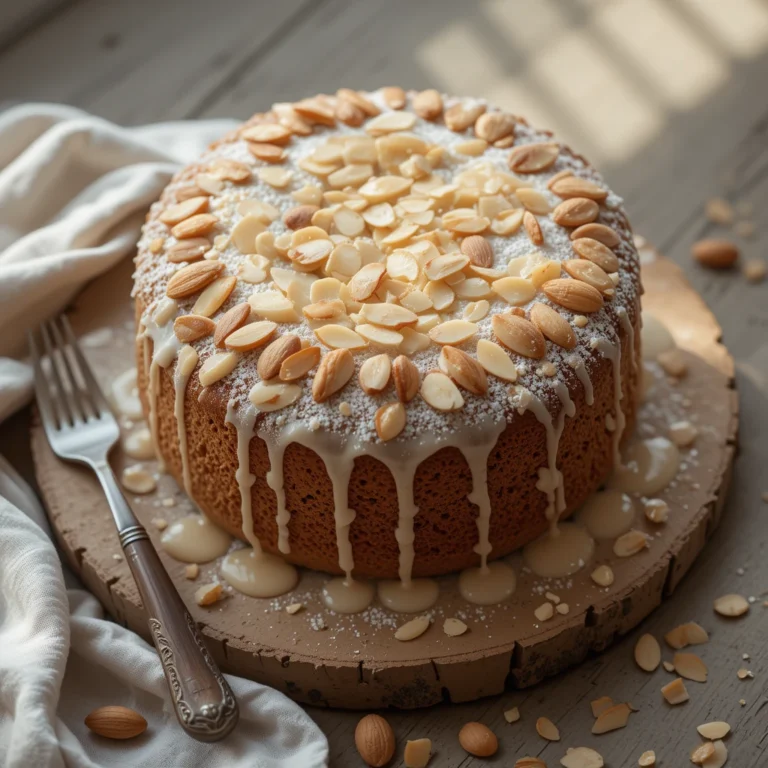
Thanksgiving Upside Down Cake Everyone Asks for Seconds
Picture this: a golden, caramelized masterpiece that flips your holiday dessert game upside down—literally! This Thanksgiving Upside Down Cake combines the warm spices of fall with a gorgeous caramelized topping that’ll have your guests reaching for seconds. It’s easier than pie (yes, really!), takes just 15 minutes to prep, and delivers that wow-factor presentation every…
Picture this: a golden, caramelized masterpiece that flips your holiday dessert game upside down—literally! This Thanksgiving Upside Down Cake combines the warm spices of fall with a gorgeous caramelized topping that’ll have your guests reaching for seconds.
It’s easier than pie (yes, really!), takes just 15 minutes to prep, and delivers that wow-factor presentation every single time. Whether you’re a seasoned baker or just starting out, this recipe is your ticket to becoming the dessert hero of Thanksgiving dinner.
What is Thanksgiving Upside Down Cake?
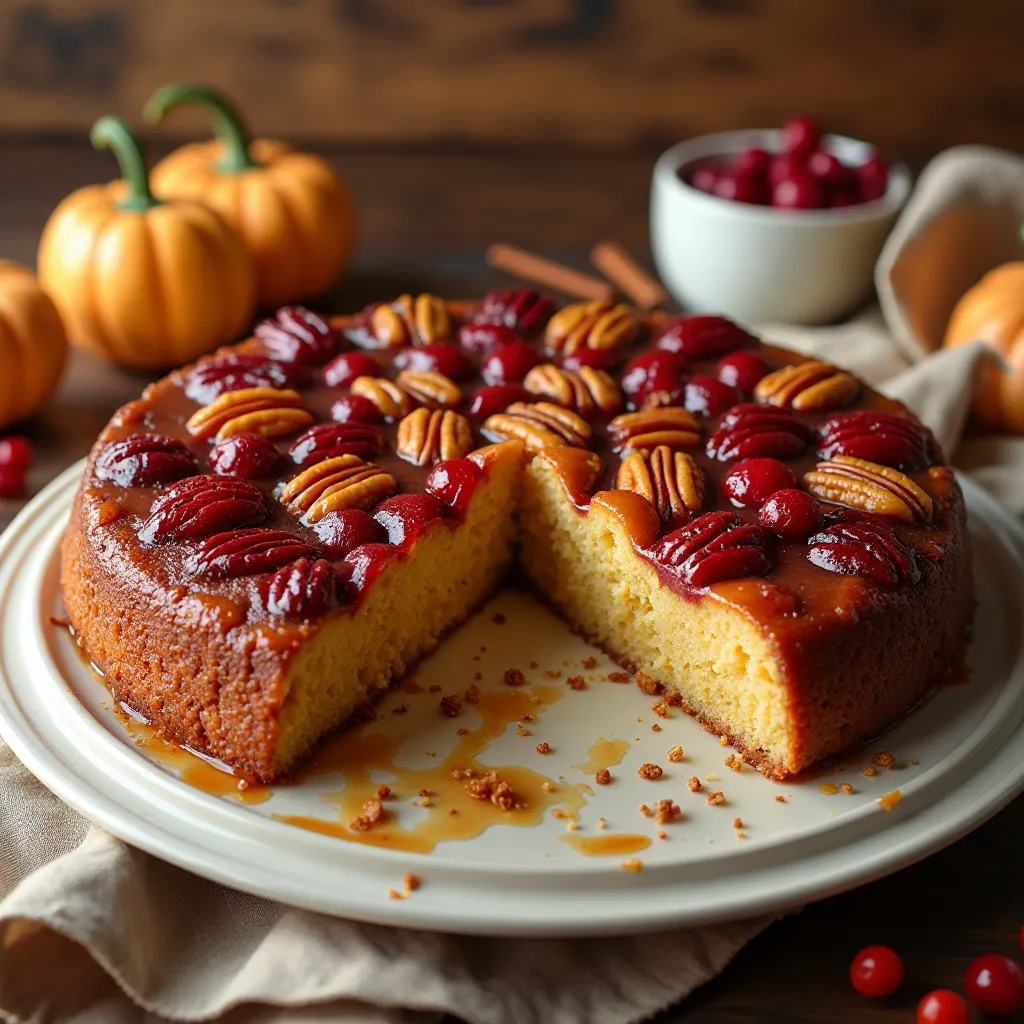
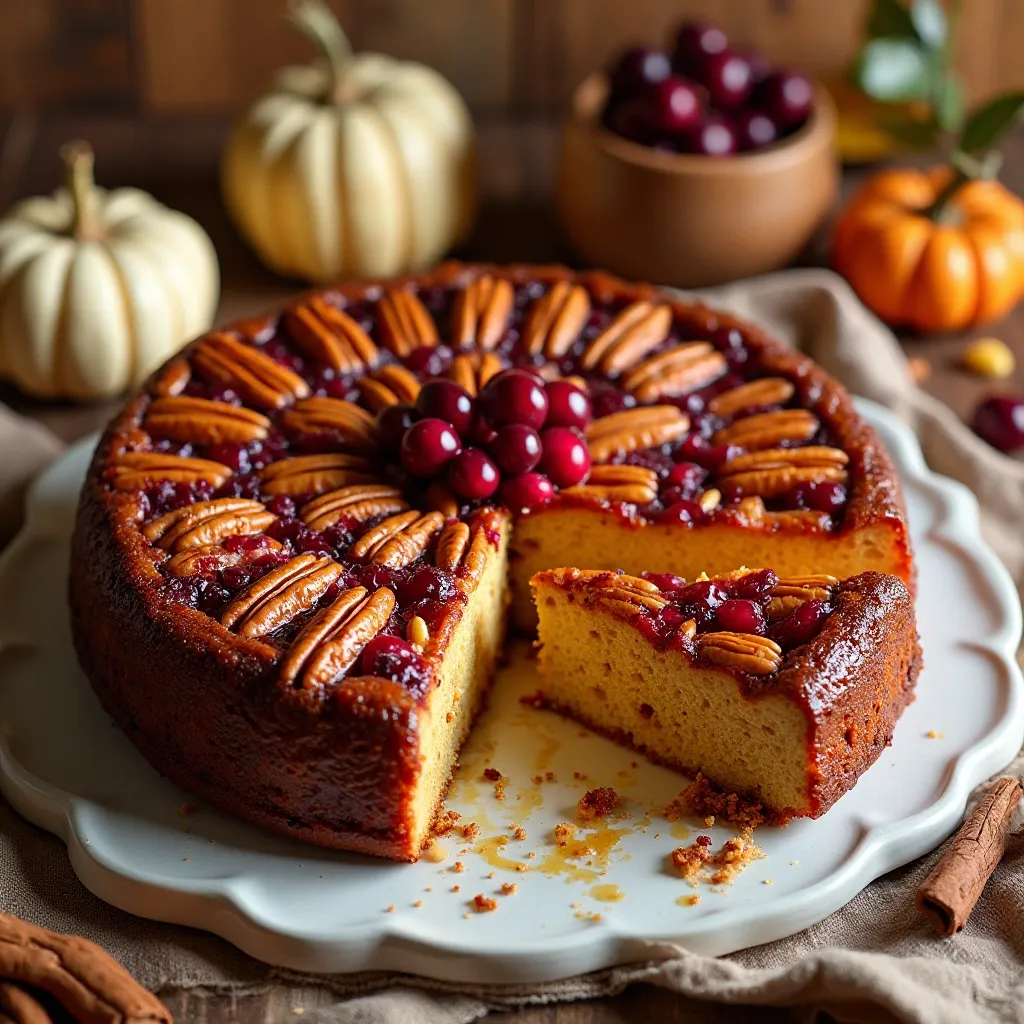
Ever wonder why we flip perfectly good cakes upside down? This delightful dessert starts with a buttery caramel layer studded with cranberries, pecans, and autumn fruits, then gets topped with spiced cake batter. After baking, you flip it over to reveal a stunning, glistening masterpiece that looks like you spent hours on it.
They say the way to anyone’s heart is through their stomach, and this cake is your express lane! The name comes from the classic baking technique where toppings become the crowning glory. Ready to flip your Thanksgiving menu on its head? Let’s dive in!
Why You’ll Love This Thanksgiving Upside Down Cake
A Show-Stopping Holiday Centerpiece
This isn’t just another cake—it’s an edible work of art. The moment you flip this beauty onto your serving platter, revealing that glossy, caramelized topping with jewel-toned cranberries and toasted pecans, you’ll hear the collective gasps around your table. The combination of warm cinnamon, nutmeg, and ginger creates that quintessential Thanksgiving aroma that fills your kitchen with holiday magic.
Budget-Friendly Bakery-Quality Results
Skip the $40 bakery cake and make this stunning dessert at home for a fraction of the cost. You’re looking at about $12-15 in ingredients that serve 10-12 people—that’s barely over a dollar per slice! Plus, you probably have most of the pantry staples already. When you compare it to our popular Pumpkin Cheesecake recipe, this upside down cake is even more economical and requires less specialized ingredients.
Irresistible Flavor Combinations
The magic happens in layers: buttery brown sugar caramel melts into tart cranberries and crunchy pecans, while the spiced cake base stays incredibly moist. Each forkful delivers the perfect balance of sweet and tart, soft and crunchy, rich and warming. If you loved our Apple Cinnamon Coffee Cake, you’ll be obsessed with this elevated holiday version. The best part? You can customize the toppings with your favorite fall fruits—try apples, pears, or even fresh figs. Ready to create your own Thanksgiving masterpiece? Let’s get baking!
How to Make Thanksgiving Upside Down Cake
Quick Overview
This Thanksgiving Upside Down Cake is surprisingly simple to master. You’ll start by creating a caramel base in your pan, arrange beautiful fruit and nuts on top, then pour a lightly spiced cake batter over everything.
The real magic happens in the oven where the caramel bubbles up through the cake, infusing it with buttery sweetness. When you flip it after baking, you’re rewarded with a gorgeous, glossy topping that looks professionally made.
Prep Time: 15 minutes
Bake Time: 45-50 minutes
Cooling Time: 15 minutes
Total Time: 1 hour 20 minutes
Servings: 10-12 slices
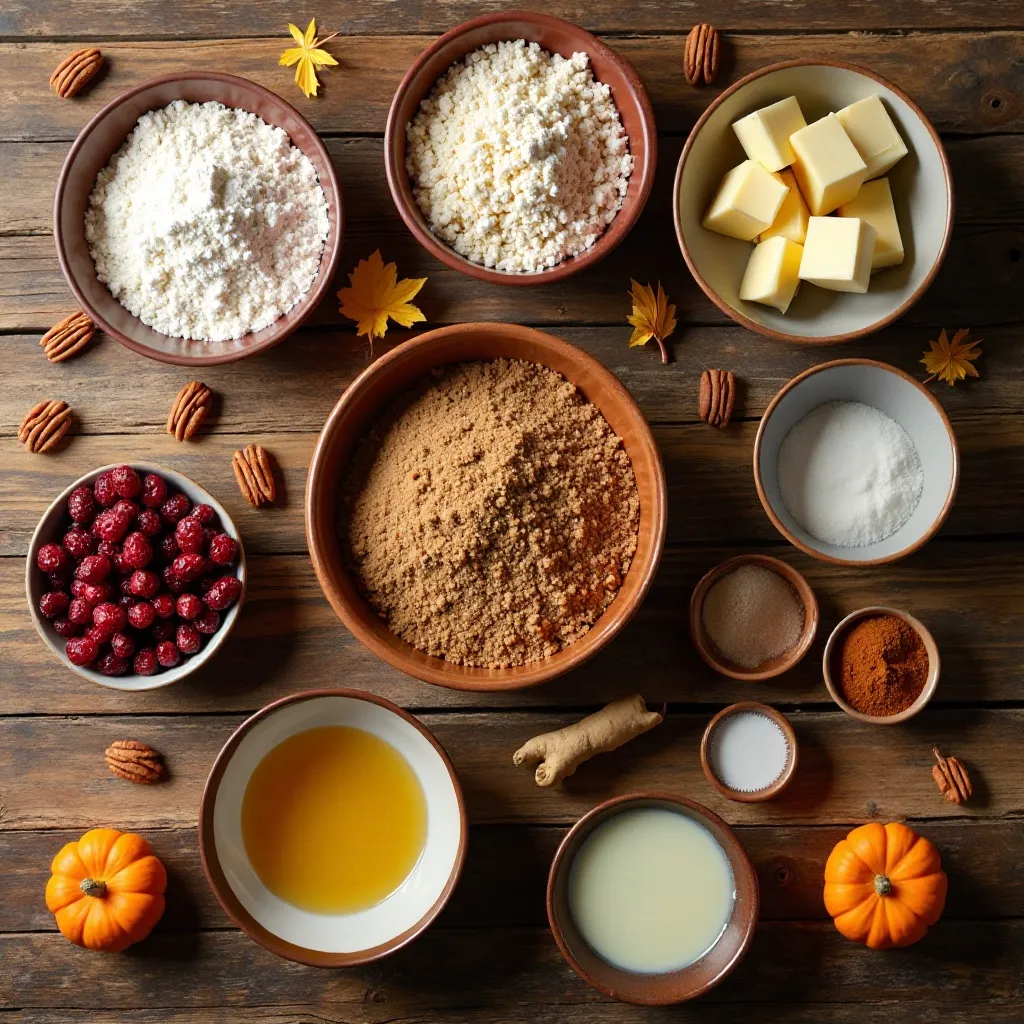
Key Ingredients for Thanksgiving Upside Down Cake
For the Caramel Topping:
- 6 tablespoons unsalted butter
- ¾ cup packed light brown sugar
- 2 tablespoons heavy cream
- ¼ teaspoon salt
- 1½ cups fresh cranberries
- 1 cup pecan halves
- 1 medium apple, thinly sliced (optional)
For the Cake:
- 1¾ cups all-purpose flour
- 2 teaspoons baking powder
- ½ teaspoon baking soda
- ½ teaspoon salt
- 1½ teaspoons ground cinnamon
- ½ teaspoon ground ginger
- ¼ teaspoon ground nutmeg
- ¼ teaspoon ground cloves
- ½ cup unsalted butter, softened
- 1 cup granulated sugar
- 2 large eggs, room temperature
- 1 teaspoon vanilla extract
- ¾ cup buttermilk, room temperature
- ⅓ cup sour cream
Step-by-Step Instructions
Step 1: Prepare Your Pan and Oven
Preheat your oven to 350°F (175°C). This is crucial—you want the oven fully heated before your cake goes in. Grab a 10-inch cast iron skillet or a 9×13-inch baking pan. If using a regular pan, line the bottom with parchment paper for easier flipping later. This little trick is your insurance policy against sticky disasters!
Step 2: Create the Caramel Base
In your skillet or pan over medium heat, melt the 6 tablespoons of butter completely. Once melted and bubbling gently, sprinkle the brown sugar evenly across the bottom. Stir constantly for about 2-3 minutes until the sugar dissolves and combines with the butter. The mixture should look smooth and glossy. Add the heavy cream and salt, stirring for another minute until everything is well combined. Remove from heat immediately—you don’t want the caramel to burn. If using a regular baking pan, make this caramel in a saucepan first, then pour it into your prepared pan.
Step 3: Arrange the Beautiful Topping
Now for the fun part! Arrange your cranberries evenly across the caramel—they’ll look like little ruby jewels. Nestle the pecan halves around the cranberries, flat side down for the prettiest presentation. If using apple slices, arrange them in an overlapping pattern for that extra wow-factor. Press everything gently into the caramel so it sticks. Get creative here—this is what everyone will see when you flip the cake! Take a photo because this layer looks amazing even before baking.
Step 4: Mix the Dry Ingredients
In a medium bowl, whisk together the flour, baking powder, baking soda, salt, cinnamon, ginger, nutmeg, and cloves. Whisk thoroughly for at least 30 seconds to ensure all the spices are evenly distributed. This step prevents pockets of spice or leavening that can create uneven texture. Set this bowl aside—you’ll need it soon.
Step 5: Cream the Butter and Sugar
In a large mixing bowl using an electric mixer, beat the softened butter and granulated sugar together on medium-high speed for 3-4 minutes. The mixture should become noticeably lighter in color and fluffy in texture. This incorporates air into your cake, making it tender and light. Scrape down the sides of the bowl halfway through to ensure everything mixes evenly. Don’t rush this step—proper creaming is the foundation of great cake texture.
Step 6: Add Eggs and Vanilla
Add the eggs one at a time, beating well after each addition (about 30 seconds per egg). The mixture might look slightly curdled at first, but keep mixing—it’ll come together. Add the vanilla extract and mix until just combined. The batter should look smooth and creamy now.
Step 7: Combine Wet and Dry Ingredients
Here’s where technique matters. With your mixer on low speed, add the dry ingredients in three additions, alternating with the buttermilk and sour cream mixture (combined together first). Start and end with dry ingredients: dry, wet, dry, wet, dry. Mix each addition only until just combined—you should still see a few flour streaks before adding the next portion. After the final addition, mix for just 10-15 seconds until no dry flour remains. Overmixing develops gluten and creates tough, dense cake. The batter should be thick but pourable.
Step 8: Pour and Smooth
Carefully pour the cake batter over your beautiful fruit and nut arrangement. Pour gently in a spiral pattern starting from the center to avoid disturbing your design. Use an offset spatula to spread the batter evenly to all edges, filling any gaps. The batter should completely cover the toppings. Gently tap the pan on the counter 2-3 times to release any air bubbles trapped underneath.
Step 9: Bake to Perfection
Place the pan in the center of your preheated oven. Bake for 45-50 minutes, or until a toothpick inserted into the center comes out with just a few moist crumbs (not wet batter). The top should be golden brown and spring back when gently pressed. If the top browns too quickly, tent loosely with aluminum foil for the last 10-15 minutes. Every oven is different, so start checking at 40 minutes. The edges should pull away slightly from the pan when done.
Step 10: The Grand Flip
This is the moment of truth! Remove the cake from the oven and let it cool in the pan for exactly 15 minutes—not more, not less. Too short and the caramel won’t set; too long and it’ll stick. Run a butter knife gently around the edges to loosen any stuck bits. Place a large serving platter or cutting board over the top of the pan.
Using oven mitts (the pan is still hot!), hold the platter and pan together firmly and quickly flip them over in one confident motion. Let the pan sit for 30 seconds, then slowly lift it off. If any fruit sticks, gently remove it from the pan and place it back on the cake. Admire your gorgeous creation before it disappears!
What to Serve Thanksgiving Upside Down Cake With
This stunning cake deserves equally delicious companions. Serve warm slices with a generous dollop of fresh whipped cream or a scoop of vanilla bean ice cream that melts into the caramel. The contrast between cold cream and warm cake is absolutely heavenly.
For a truly elegant presentation, drizzle each slice with salted caramel sauce and sprinkle with additional toasted pecans. A dusting of cinnamon adds a beautiful finishing touch.
Pair it with hot spiced apple cider, pumpkin spice lattes, or a robust cup of coffee to complement the warm spices. For adult gatherings, this cake is phenomenal with a glass of dessert wine like late-harvest Riesling or tawny port.
Create a dessert bar by serving it alongside Pumpkin Pie and Pecan Pie for variety. Your guests will love having options, and the flavors complement each other perfectly.
Top Tips for Perfecting Thanksgiving Upside Down Cake
Use Room Temperature Ingredients
This cannot be stressed enough. Room temperature eggs, buttermilk, and sour cream blend more easily into the batter, creating a smoother, more uniform texture. Cold ingredients can cause the butter to seize up, resulting in a lumpy batter. Take everything out of the fridge 30-60 minutes before baking.
Don’t Overmix the Batter
Once you add the flour, mix only until you can’t see dry flour anymore. Overmixing develops gluten strands that make your cake tough and dense instead of tender and fluffy. It’s okay if the batter isn’t perfectly smooth—a few small lumps are fine and will bake out.
Choose the Right Pan
Cast iron skillets are ideal because they distribute heat evenly and hold the caramel beautifully. If using a regular cake pan, make sure it’s at least 2 inches deep to prevent overflow. Metal pans work better than glass for this recipe because they conduct heat more efficiently.
Test for Doneness Properly
Insert a toothpick into the center of the cake, not near the edges where it cooks faster. You want a few moist crumbs clinging to the toothpick, not wet batter. The cake will continue cooking slightly as it cools, so slightly underdone is better than overbaked and dry.
Time the Flip Perfectly
The 15-minute cooling window is critical. If you flip too early, the cake might break apart because it’s too soft. Wait too long, and the caramel hardens and sticks to the pan. Set a timer! If your cake does stick, gently warm the pan on the stove for 30 seconds to loosen the caramel.
Ingredient Substitutions That Work
Can’t find buttermilk? Make your own by adding 2 teaspoons of lemon juice or white vinegar to ¾ cup regular milk. Let it sit for 5 minutes before using. For dairy-free versions, use coconut cream instead of heavy cream in the caramel and coconut oil for butter. The texture will be slightly different but still delicious.
Spice Alternatives
No ground ginger? Use fresh grated ginger (1 tablespoon) or substitute with additional cinnamon. You can also use 2 teaspoons of pumpkin pie spice instead of individual spices. Want more warmth? Add a pinch of cardamom or allspice.
Prevent Soggy Bottoms
Make sure your caramel isn’t too thin—it should coat the back of a spoon. Too much liquid creates a soggy layer between the topping and cake. Also, let the cake cool completely before covering or storing to prevent condensation.
Storing and Reheating Tips
Room Temperature Storage
If you’re serving the cake within 24 hours, keep it loosely covered with plastic wrap or under a cake dome at room temperature. The caramel layer keeps the cake incredibly moist, so it doesn’t dry out quickly. Avoid airtight containers right away as they trap moisture and can make the topping weepy.
Refrigerator Storage
For longer storage, cover the cake tightly and refrigerate for up to 5 days. The cold will firm up the caramel slightly, but the cake remains deliciously moist. Before serving, let slices come to room temperature for 20-30 minutes, or warm them briefly.
Freezing Instructions
This cake freezes beautifully! Wrap individual slices tightly in plastic wrap, then place them in a freezer-safe container or zip-top bag. Freeze for up to 3 months. Thaw overnight in the refrigerator or at room temperature for 2-3 hours. You can also freeze the whole cake—just make sure it’s completely cooled first and wrapped in several layers of plastic wrap followed by aluminum foil.
Reheating for Best Results
To restore that fresh-from-the-oven warmth, microwave individual slices for 15-20 seconds on medium power. For larger portions, reheat in a 300°F oven for 10-12 minutes, covered loosely with foil. The caramel will soften and become beautifully gooey again. Avoid high heat, which can dry out the cake.
Tips for Avoiding Common Baking Mistakes
Mistake #1: Burnt Caramel
The caramel can go from perfect to burnt in seconds. Keep the heat at medium (never high) and stir constantly. If you smell any burning, immediately remove from heat. The residual heat will continue cooking it.
Mistake #2: Fruit Floating in Batter
Press your cranberries and pecans firmly into the caramel before adding batter. If they’re just sitting loosely, they can shift or float when you pour the batter, ruining your design.
Mistake #3: Cake Sticking to Pan
This usually happens when you wait too long to flip. The caramel re-hardens and acts like glue. Set a timer for exactly 15 minutes after removing from oven. If it does stick, place the pan on a warm burner for 30 seconds to re-melt the caramel slightly.
Mistake #4: Dry, Crumbly Cake
This results from overbaking or too much flour. Always spoon flour into measuring cups and level off—don’t scoop directly from the bag, which packs it down. Check for doneness 5 minutes before the minimum baking time.
Mistake #5: Sunken Center
This happens when you open the oven door too early or too frequently during baking. Wait at least 35 minutes before checking. Also, make sure your leavening agents (baking powder and baking soda) are fresh—they lose potency after 6 months.
Mistake #6: Uneven Baking
Rotate your pan 180 degrees halfway through baking if your oven has hot spots. Place the pan on the center rack, not too high or low, for the most even heat distribution.
Mistake #7: Watery Topping
If your caramel seems thin and watery, it didn’t cook long enough. It should thicken slightly as it bubbles. Also, avoid adding too much heavy cream—stick to the 2 tablespoons specified.
Frequently Asked Questions
Can I make this cake ahead of time?
Absolutely! This cake actually tastes better the next day as the flavors meld together. Bake it completely, let it cool, then store covered at room temperature for up to 24 hours. For longer storage, refrigerate up to 5 days. The caramel softens beautifully when reheated.
What if I don’t have a cast iron skillet?
No problem! Use any 9×13-inch baking pan or 9-inch round cake pan. Just line the bottom with parchment paper and make your caramel separately in a saucepan, then pour it into the prepared pan. The flip will be just as impressive.
Can I use frozen cranberries?
Yes! No need to thaw them first—use them straight from the freezer. They might release slightly more juice during baking, but the cake will still be delicious. Fresh cranberries give a slightly firmer texture, but frozen work beautifully.
Why did my cake sink in the middle?
The most common cause is opening the oven door too early, which causes a sudden temperature drop. Other culprits include overmixing the batter, expired leavening agents, or underbaking. Make sure you’re measuring ingredients accurately and checking doneness properly.
Can I substitute the buttermilk?
Yes! Mix ¾ cup regular milk with 2 teaspoons lemon juice or white vinegar. Let it sit 5 minutes before using. You can also use plain yogurt thinned with a little milk. For dairy-free options, try oat milk or almond milk with the same acidification method.
What other fruits can I use?
Get creative! Pears, apples, fresh figs, or even persimmons work wonderfully. You can also mix in dried cranberries, cherries, or apricots with the fresh fruit. Just keep the total amount of fruit around 1½-2 cups for the best ratio.
How do I know when the caramel is ready?
The brown sugar should be completely dissolved with no granules remaining. The mixture should be smooth, bubbly, and coat the back of a spoon. It takes about 3-4 minutes total. Don’t rush this step—underdissolved sugar creates a grainy texture.
Can I make mini versions?
Definitely! Use a muffin tin and divide the caramel and toppings among 12 cups. Fill each about ⅔ full with batter. Bake for 20-25 minutes. Let cool for 5 minutes before flipping each one out. These make adorable individual servings perfect for parties.
Is this cake gluten-free adaptable?
Yes, with modifications. Use a 1:1 gluten-free baking flour blend that contains xanthan gum. The texture will be slightly denser but still delicious. Make sure all other ingredients are certified gluten-free.
What can I do if my cake breaks when flipping?
Don’t panic! Simply piece it back together on the serving platter—the caramel and toppings will hide any cracks. You can also cover imperfections with whipped cream or extra caramel drizzle. It’ll still taste amazing, and honestly, rustic looks are charming!
Nutrition Information
| Nutrient | Per Slice (1/12 of cake) |
|---|---|
| Calories | 385 |
| Total Fat | 18g |
| Saturated Fat | 9g |
| Cholesterol | 75mg |
| Sodium | 285mg |
| Total Carbohydrates | 52g |
| Dietary Fiber | 2g |
| Sugars | 35g |
| Protein | 4g |
| Vitamin A | 10% DV |
| Calcium | 8% DV |
| Iron | 8% DV |
Note: Nutritional values are approximate and will vary based on specific ingredients used and portion sizes.
Final Thoughts
This Thanksgiving Upside Down Cake is about to become your new holiday tradition. It’s got everything you want in a Thanksgiving dessert: stunning presentation, warm autumn flavors, and a texture that’s impossibly moist and tender.
The best part? While it looks like you spent hours in the kitchen, it comes together in about 15 minutes of actual work. The oven does the rest while you focus on everything else.
Whether you’re hosting a full Thanksgiving feast or bringing dessert to someone else’s celebration, this cake will steal the show. That moment when you flip it and reveal the gorgeous caramelized topping? Pure magic. The oohs and ahhs from your guests? Priceless.
So grab your ingredients, preheat that oven, and get ready to create a Thanksgiving dessert that’s as delicious as it is beautiful. Your holiday table deserves this showstopper!
Happy Thanksgiving, and happy baking! 🍂🦃
Don’t forget to PIN this recipe for later and SHARE it with friends who love amazing Thanksgiving desserts! Leave a COMMENT below if you try it—I’d love to hear how it turns out!