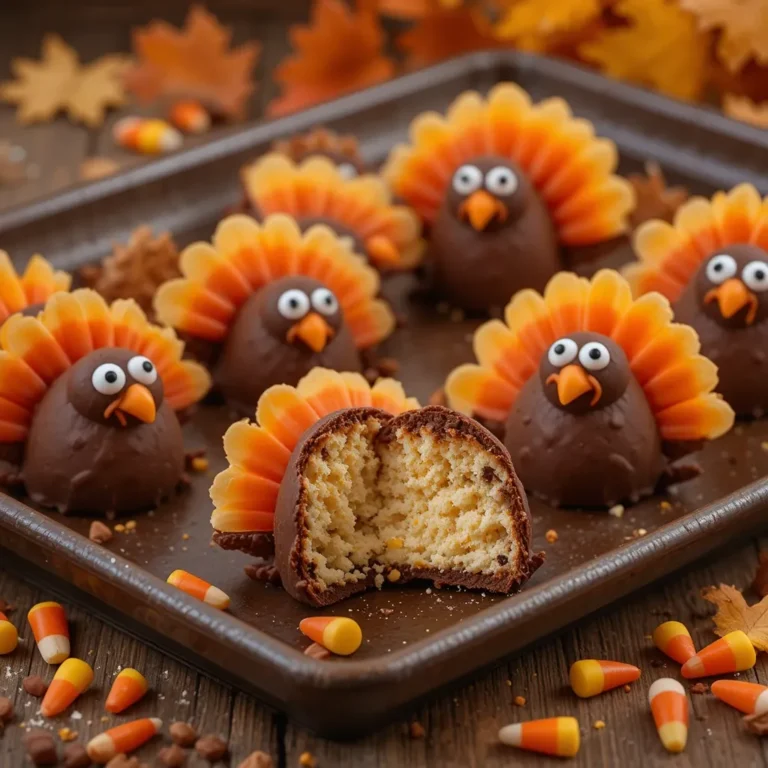
Turkey Cake Balls Recipe – Easy Thanksgiving Dessert Kids Will Love
Thanksgiving memorable with Turkey Cake Balls. Cute, festive, and flavorful, these holiday dessert treats are perfect for parties and dessert tables.
These turkey cake balls are the most adorable dessert you’ll serve this Thanksgiving! Moist cake mixed with creamy frosting, rolled into balls, and decorated to look like tiny turkeys – they’re as fun to make as they are to eat. I still remember my daughter’s face lighting up when she first saw these little edible turkeys on our dessert table.
They disappeared faster than the pumpkin pie! These bite-sized treats combine the indulgence of cake pops with festive holiday charm, making them perfect for Thanksgiving gatherings, fall parties, or just because you want something whimsical.
If you loved my pumpkin cake pops, you’re going to be absolutely obsessed with these turkey cake balls. Trust me, once you make these, they’ll become your go-to fall dessert every single year!
What Are Turkey Cake Balls?
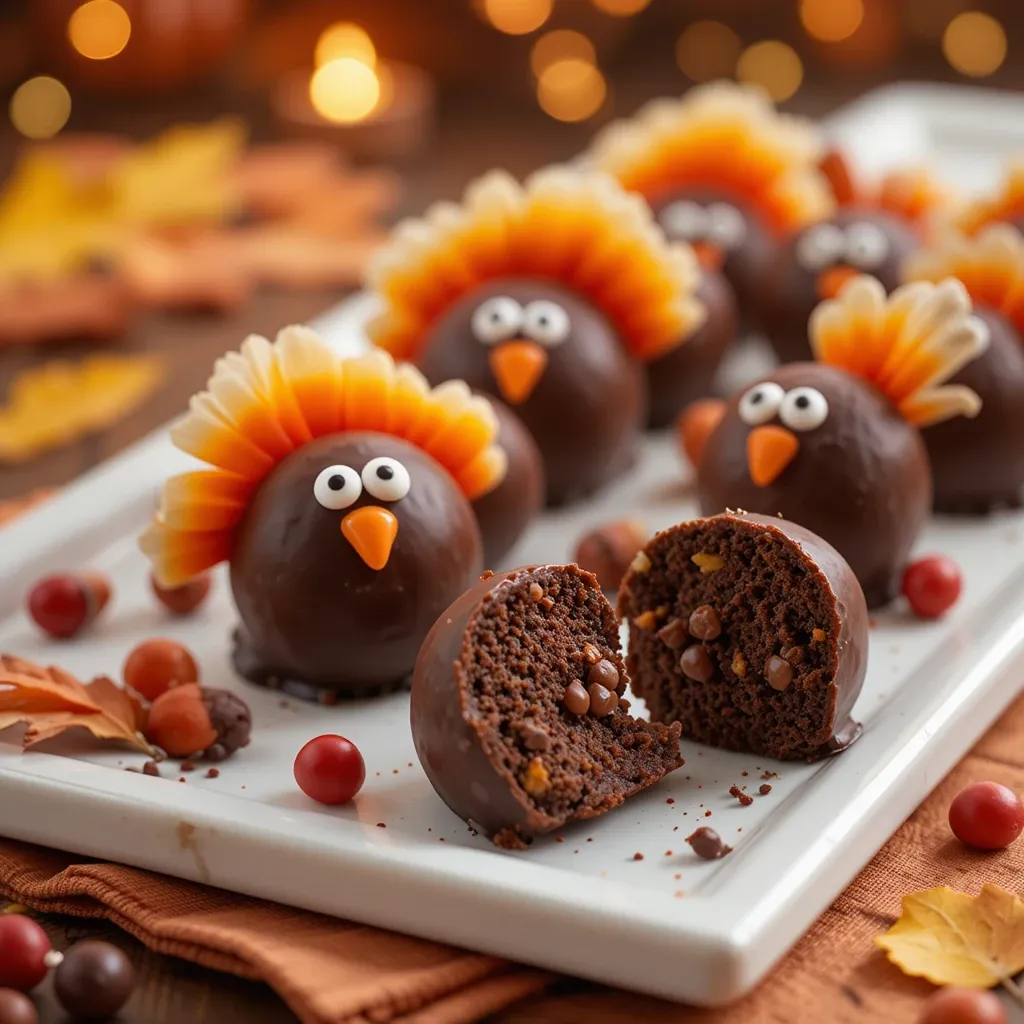
Ever wonder who had the genius idea to turn cake into adorable little turkeys? Turkey cake balls are essentially cake pops without the sticks – crumbled cake mixed with frosting, shaped into balls, then decorated with candy corn, chocolate chips, and candy eyes to resemble festive turkeys.
It’s like someone asked, “How can we make dessert cuter?” and these were born! They say the way to anyone’s heart is through their stomach, and these charming treats definitely prove that point. Whether you’re a seasoned baker or just starting out, these turkey cake balls will make you look like a dessert decorating pro. Roll up your sleeves and let’s create some edible magic together!
Why You’ll Love This Turkey Cake Balls Recipe
The Ultimate Crowd-Pleaser
These turkey cake balls are guaranteed showstoppers at any Thanksgiving celebration. Kids go absolutely wild for them, and adults can’t resist their nostalgic charm. The combination of moist chocolate cake (or your favorite flavor) with rich, creamy frosting creates an irresistible texture that melts in your mouth. Each bite delivers that perfect balance of sweetness without being overwhelmingly sugary.
Budget-Friendly Holiday Baking
Making turkey cake balls at home costs a fraction of what you’d pay at a bakery or specialty shop. A single batch yields 24-36 cake balls, depending on size, and you probably already have most ingredients in your pantry. Plus, this recipe is incredibly forgiving – you can use boxed cake mix or homemade cake, store-bought frosting or make your own. The decorations are simple candies available at any grocery store, making this an accessible project that won’t break the bank.
Customizable and Creative
The beauty of these turkey cake balls lies in their versatility. Use chocolate cake for a rich flavor, vanilla for something lighter, or even spice cake to embrace those autumn vibes. The frosting combinations are endless – cream cheese frosting pairs beautifully with carrot cake, while chocolate buttercream complements vanilla cake perfectly.
Speaking of creative desserts, my Oreo cake balls use similar techniques but with a completely different flavor profile. The decorating process is where you can really let your creativity shine, and it’s an fantastic activity to do with kids on a cozy fall afternoon.
Simple Enough for Anyone
Don’t let the adorable appearance fool you – these turkey cake balls don’t require professional pastry skills. The process is straightforward: bake, crumble, mix, roll, dip, and decorate. Even if your turkeys look a little wonky (mine definitely did the first time!), they’ll still taste absolutely incredible. Ready to transform simple ingredients into the cutest Thanksgiving dessert ever? Let’s get started!
How to Make Turkey Cake Balls
Quick Overview
Turkey cake balls are surprisingly simple to make and require minimal baking experience. The result is a deliciously moist, perfectly sweet treat with an adorable festive appearance. The creamy interior comes from mixing crumbled cake with frosting, creating that signature cake ball texture that’s softer than cake but firmer than frosting.
Time Breakdown:
- Prep Time: 30 minutes
- Baking Time: 25-30 minutes (if baking fresh cake)
- Chilling Time: 2 hours
- Decorating Time: 45 minutes
- Total Time: 3 hours 45 minutes
Key Ingredients for Turkey Cake Balls
For the Cake Balls:
- 1 box chocolate cake mix (or your preferred flavor) with required ingredients (eggs, oil, water)
- 1 cup cream cheese frosting (or chocolate frosting)
- 24 oz chocolate candy melts or almond bark
- 2 tablespoons vegetable shortening (optional, for thinning chocolate)
For the Turkey Decorations:
- 24-36 candy corn pieces
- 48-72 candy eyes
- 24-36 pieces of candy corn (for the beak, cut in half)
- Mini chocolate chips or Reese’s Pieces (for additional details)
- Orange and red fondant or small candies (optional, for wattle)
Step-by-Step Instructions
How do you bake and prepare the cake?
Start by preheating your oven to 350°F (175°C). Prepare your chocolate cake according to package directions in a 9×13 inch baking pan. Once baked, let the cake cool completely in the pan for at least one hour. This cooling step is crucial – if the cake is even slightly warm, it will make the frosting too soft and your cake balls won’t hold their shape properly. I learned this the hard way when my first batch turned into a sticky mess!
How do you create the cake ball mixture?
Once your cake has cooled completely, crumble it into a large mixing bowl. Use your hands or a fork to break it into fine crumbs – there should be no large chunks remaining. Add one cup of frosting to the crumbled cake. Start with 3/4 cup and add more if needed.
Mix thoroughly using your hands or a sturdy spoon until the mixture is completely uniform and holds together when squeezed. The texture should resemble cookie dough – moist enough to stick together but not so wet that it’s sticky. If the mixture feels too dry and crumbly, add frosting one tablespoon at a time. If it’s too wet and sticky, refrigerate for 15 minutes before proceeding.
How do you shape the turkey cake balls?
Line two baking sheets with parchment paper or silicone baking mats. Using a cookie scoop or tablespoon, scoop out portions of the cake mixture. Roll each portion between your palms to create smooth, round balls about 1.5 inches in diameter. Aim for consistency in size so they look uniform and finish coating at the same time. Place each formed ball onto your prepared baking sheet, spacing them about an inch apart. Once all balls are formed, refrigerate them for at least 2 hours, or freeze for 30 minutes. This chilling step is essential – it firms up the cake balls so they won’t fall apart during the coating process.
How do you melt and apply the chocolate coating?
Melt your chocolate candy melts according to package directions. I prefer using a double boiler for better temperature control, but the microwave works perfectly fine. If using a microwave, heat in 30-second intervals, stirring between each interval until smooth.
If your chocolate seems too thick, add 1-2 tablespoons of vegetable shortening to thin it out slightly – this makes dipping much easier. Remove a few cake balls from the refrigerator at a time, keeping the rest cold. Drop one cake ball into the melted chocolate.
Use a fork to roll it around until completely coated, then lift it out, allowing excess chocolate to drip back into the bowl. Gently tap the fork on the edge of the bowl to remove more excess. Carefully slide the coated ball back onto the parchment-lined baking sheet using a toothpick or second fork to help guide it off.
How do you decorate the turkey cake balls?
This is where the magic happens! Work quickly while the chocolate coating is still wet. For each turkey, immediately press 5-6 candy corn pieces into the back of the ball in a fan shape to create the turkey’s colorful tail feathers. Position them pointing upward and slightly outward for the best effect. Press two candy eyes onto the front of the ball for the turkey’s face. Cut a candy corn piece in half and use the orange tip for the beak, pressing it gently below the eyes.
For the turkey’s red wattle (the dangly thing under the beak), you can use a small piece of red fondant, a red M&M broken in half, or a tiny dot of red frosting piped on with a toothpick. Some people skip the wattle entirely – they’re still adorable turkeys! Let the decorated cake balls sit at room temperature for about 30 minutes until the chocolate coating has completely hardened.
What to Serve Turkey Cake Balls With
Turkey cake balls are perfect finger food desserts that pair wonderfully with various Thanksgiving and fall beverages. Serve them alongside:
- Hot apple cider or spiced chai tea for a cozy autumn pairing
- Coffee or espresso to balance the sweetness
- Milk for kids (and adults who love the classic combo)
- Sparkling cider for an elegant holiday touch
- Hot chocolate with marshmallows for a double chocolate experience
These cake balls work beautifully on a Thanksgiving dessert table alongside traditional pies, or as a standalone treat at fall parties. I love arranging them on a tiered cake stand with autumn leaves scattered around the base. They also make fantastic additions to cookie trays and dessert charcuterie boards.
Top Tips for Perfecting Turkey Cake Balls
Use room temperature frosting
Cold frosting doesn’t incorporate as smoothly into the cake crumbs. Let your frosting sit at room temperature for about 30 minutes before mixing it with the cake. This ensures even distribution and the perfect texture.
Don’t overmix the cake and frosting
Once you add the frosting to the crumbled cake, mix just until combined. Overmixing can make the mixture too dense and heavy. The texture should be moist and moldable but still have a slight cake-like quality.
Keep everything cold
Temperature control is your secret weapon. Cold cake balls won’t fall apart when dipped in warm chocolate. If you’re working in a warm kitchen, pop the baking sheet back in the fridge between batches.
Thin your chocolate coating properly
Thick chocolate creates a heavy coating that can overwhelm the cake ball and doesn’t set as smoothly. Adding a bit of vegetable shortening (not butter or oil) creates a thinner, more workable consistency that results in a professional-looking finish.
Decorate immediately after dipping
The chocolate coating starts setting within seconds. Have all your decorating supplies organized and within reach before you start dipping. I like to arrange everything on a small tray: candy corn, eyes, beaks, and toothpicks all ready to go.
Invest in good quality candy melts
Not all chocolate coatings are created equal. Higher quality candy melts melt more smoothly, taste better, and create a shinier finish. I’ve found CandiQuik and Ghirardelli melting wafers work exceptionally well.
Use a fork, not a spoon
A fork allows excess chocolate to drip through the tines more effectively than a spoon. This prevents a thick, heavy coating and gives you more control when transferring the cake ball back to the parchment paper.
Storing and Reheating Tips
Room Temperature Storage: Turkey cake balls can be stored at room temperature in an airtight container for up to 3 days. Keep them in a cool, dry place away from direct sunlight and heat sources. If your kitchen is particularly warm, they’re better off in the refrigerator.
Refrigerator Storage: For longer storage, keep turkey cake balls refrigerated in an airtight container for up to 1 week. Layer them between sheets of parchment paper to prevent sticking. Let them sit at room temperature for about 15 minutes before serving for the best texture and flavor.
Freezer Storage: These freeze beautifully! Place decorated cake balls on a baking sheet and freeze until solid (about 2 hours), then transfer to a freezer-safe container or bag. Layer them with parchment paper to prevent decorations from breaking off. They’ll keep for up to 3 months frozen. Thaw overnight in the refrigerator or at room temperature for 2-3 hours before serving.
Reheating: Cake balls are best enjoyed at room temperature or slightly chilled. They don’t need reheating. If frozen, simply thaw as described above.
Common Baking Mistakes to Avoid
Mistake #1: Using warm cake Never rush the cooling process! Warm or even slightly warm cake will melt your frosting, creating a soupy, unworkable mixture. Always let your cake cool completely, preferably refrigerated, before crumbling.
Mistake #2: Adding too much frosting More frosting seems like a good idea, but it makes the mixture too soft and sticky to work with. Start with less frosting than you think you need – you can always add more, but you can’t take it out once it’s mixed in.
Mistake #3: Skipping the chilling step I know you’re excited to get to decorating, but patience pays off here. Unchilled cake balls will fall apart when dipped in chocolate or slide right off your fork. That two-hour chill time isn’t optional!
Mistake #4: Making balls too large Bigger isn’t always better with cake balls. Large cake balls are harder to coat evenly, take longer to set, and can be overwhelmingly sweet. Stick to 1-1.5 inch diameter for the perfect bite-sized treat.
Mistake #5: Overheating the chocolate Chocolate can seize or burn if overheated. Always use low heat or short microwave intervals. Overheated chocolate becomes grainy, thick, and difficult to work with.
Mistake #6: Not tapping off excess chocolate That pool of chocolate at the base of your cake ball isn’t just unattractive – it makes them hard to pick up and creates an uneven coating. Always tap the fork gently on the bowl’s edge to remove excess.
Mistake #7: Decorating on a hot day High temperatures are the enemy of chocolate coating. If you’re working on a warm day, keep your workspace cool, work in smaller batches, and consider using a fan nearby (not directly on the cake balls).
Frequently Asked Questions
Can I use homemade cake instead of boxed mix?
Absolutely! Any cake recipe works beautifully. Just ensure it’s completely cooled before crumbling. Homemade cakes may need slightly less frosting since they tend to be more moist than boxed mixes.
What’s the best cake flavor for turkey cake balls?
Chocolate is the most popular choice because it pairs well with chocolate coating, but vanilla, funfetti, red velvet, spice cake, and carrot cake all work wonderfully. Choose your favorite or match the flavor to your Thanksgiving menu.
Can I make these without candy melts?
Yes! You can use chocolate chips melted with a tablespoon of coconut oil or vegetable shortening. However, candy melts are specifically designed for coating and will give you the smoothest, easiest results with the best shine.
How far in advance can I make turkey cake balls?
You can make the cake balls up to 2 days before decorating and keep them refrigerated. Fully decorated cake balls are best made 1-2 days before your event. They’ll stay fresh for up to a week refrigerated.
Why did my cake balls fall apart when dipping?
This usually happens because they weren’t chilled long enough, contain too much frosting, or the chocolate was too hot. Make sure your cake balls are very cold and your chocolate is just barely melted and warm.
Can I use a cake pop mold instead of rolling by hand?
You can try, but cake balls have a different texture than traditional cake pops and may not work as well in molds. Hand-rolling gives you better control over shape and size.
What if I don’t have candy eyes?
Get creative! Use mini chocolate chips, white chocolate chips with a dot of melted chocolate for pupils, or tiny dots of white and black icing. You can even use small round sprinkles.
How do I transport turkey cake balls to a party?
Use a sturdy, shallow container with a tight-fitting lid. Line it with parchment paper and arrange cake balls in a single layer. If stacking, place parchment between layers. Keep them cool during transport.
Can I make these dairy-free or gluten-free?
Yes! Use a gluten-free cake mix or recipe, dairy-free frosting, and ensure your candy melts and decorations are free from allergens. Many candy melts are naturally dairy-free.
My chocolate coating cracked – what happened?
Cracking typically occurs when cold cake balls meet warm chocolate, and then the chocolate sets and contracts. Let your cake balls sit at room temperature for about 5 minutes before dipping to minimize temperature shock.
Nutrition Information
| Nutrient | Per Cake Ball (based on 30 servings) |
|---|---|
| Calories | 145 |
| Total Fat | 7g |
| Saturated Fat | 4g |
| Cholesterol | 15mg |
| Sodium | 95mg |
| Total Carbohydrates | 21g |
| Dietary Fiber | 1g |
| Sugars | 16g |
| Protein | 2g |
Note: Nutritional values are approximate and may vary based on specific ingredients used.
Final Thoughts
Turkey cake balls have become one of my absolute favorite Thanksgiving traditions. There’s something magical about watching these little treats come together – the kids love helping decorate, and adults love eating them! The best part is that they look incredibly impressive but are genuinely simple to make. Even if your first batch isn’t Pinterest-perfect, they’ll still taste amazing and bring smiles to everyone’s faces.
These charming desserts capture everything I love about holiday baking: they’re festive, delicious, and create wonderful memories in the kitchen. Whether you’re making them for a large Thanksgiving gathering, a school party, or just because you want to embrace the season, turkey cake balls deliver on every level.
So gather your ingredients, invite the kids to help, and let’s make some edible turkey magic! I’d love to hear how your turkey cake balls turn out – tag me in your photos and share which cake flavor combination you chose. Happy Thanksgiving, and happy baking!
Pin this recipe for later and share it with friends who’d love these adorable turkey cake balls!