Turkey Cake Design for Thanksgiving – Easy Tutorial
Imagine the look on your guests’ faces when you present a stunning turkey cake design at your Thanksgiving celebration! This showstopping dessert combines creativity with deliciousness, transforming a simple cake into an edible centerpiece. I still remember the first time I attempted one—my nephew thought it was an actual turkey decoration until I cut into…
Imagine the look on your guests’ faces when you present a stunning turkey cake design at your Thanksgiving celebration! This showstopping dessert combines creativity with deliciousness, transforming a simple cake into an edible centerpiece.
I still remember the first time I attempted one—my nephew thought it was an actual turkey decoration until I cut into it! What makes this turkey cake design truly special is how surprisingly easy it is to create, requiring just basic cake decorating skills and about 2-3 hours of prep time.
Unlike my popular [Pumpkin Spice Layer Cake], this recipe lets you craft something that’s both a conversation starter and a crowd-pleasing dessert. Get ready to become the hero of your holiday gathering!
What is a Turkey Cake Design?
Ever wondered why we call it a turkey cake design and not just “that adorable bird-shaped dessert”? Well, it’s exactly what it sounds like—a cake cleverly decorated to look like a beautiful Thanksgiving turkey! The name might seem straightforward, but the magic lies in how you transform ordinary cake layers into something extraordinary.
As the saying goes, “the way to a man’s heart is through his stomach,” and this festive creation certainly captures hearts and appetites alike. Whether you’re a beginner baker or a seasoned pro, this turkey cake design will have everyone asking for your secret. Ready to create some holiday magic in your kitchen?
Why You’ll Love This Turkey Cake Design
Impressive Yet Achievable
The beauty of this turkey cake design lies in its “wow factor” versus effort ratio. While it looks like you spent days crafting a bakery-quality masterpiece, the reality is much simpler. The cake itself uses a straightforward recipe—moist, flavorful layers that serve as your canvas.
What transforms it into a turkey is clever decorating with buttercream frosting, candy pieces, and cookies. The golden-brown tones created with caramel or butterscotch frosting give that authentic roasted turkey appearance, while candy corn or fondant pieces become colorful tail feathers.
Budget-Friendly Celebration Centerpiece
Creating a turkey cake design at home costs a fraction of what you’d pay at a specialty bakery. A custom-designed turkey cake from a bakery can easily run $75-150, but making it yourself typically costs $15-25 in ingredients. You’re getting premium quality at homemade prices!
Plus, you control every ingredient, ensuring freshness and the ability to accommodate dietary restrictions. If you loved making my [Chocolate Celebration Cake], you’ll appreciate how this turkey design takes that same approachable method and adds holiday flair.
Customizable and Family-Friendly
This is where your creativity shines! You can customize everything from the cake flavor (vanilla, chocolate, spice cake, or even pumpkin) to the decoration style. Want a cute cartoon turkey for kids? Use bright colors and fun candies. Prefer an elegant, realistic look for adult gatherings?
Go with natural browns, golds, and subtle details. The decorating process is also a wonderful family activity—kids love helping place the feather decorations and candy corn accents. Trust me, making this turkey cake design together creates memories that last far longer than the dessert itself!
How to Make a Turkey Cake Design
Quick Overview
This turkey cake design is easier than you think! Here’s what makes it achievable:
- Uses simple round cake layers as the base
- Basic buttercream frosting does most of the work
- Common candies and cookies create the decorative elements
- No special equipment needed beyond standard baking tools
- Forgiving design—imperfections add to the handmade charm
Time Breakdown:
- Prep Time: 30 minutes
- Baking Time: 30-35 minutes
- Cooling Time: 1 hour
- Decorating Time: 1-2 hours
- Total Time: 3-4 hours
Key Ingredients for Turkey Cake Design
For the Cake:
- 2 boxes cake mix (your choice of flavor) or homemade cake batter for three 9-inch layers
- Eggs, oil, and water as directed by mix
- 1 box instant pudding mix (matching flavor) for extra moisture
For the Buttercream Frosting:
- 2 cups (4 sticks) unsalted butter, softened
- 8 cups powdered sugar
- 1/4 cup heavy cream or milk
- 2 teaspoons vanilla extract
- 1/4 teaspoon salt
- Brown, orange, red, and yellow gel food coloring
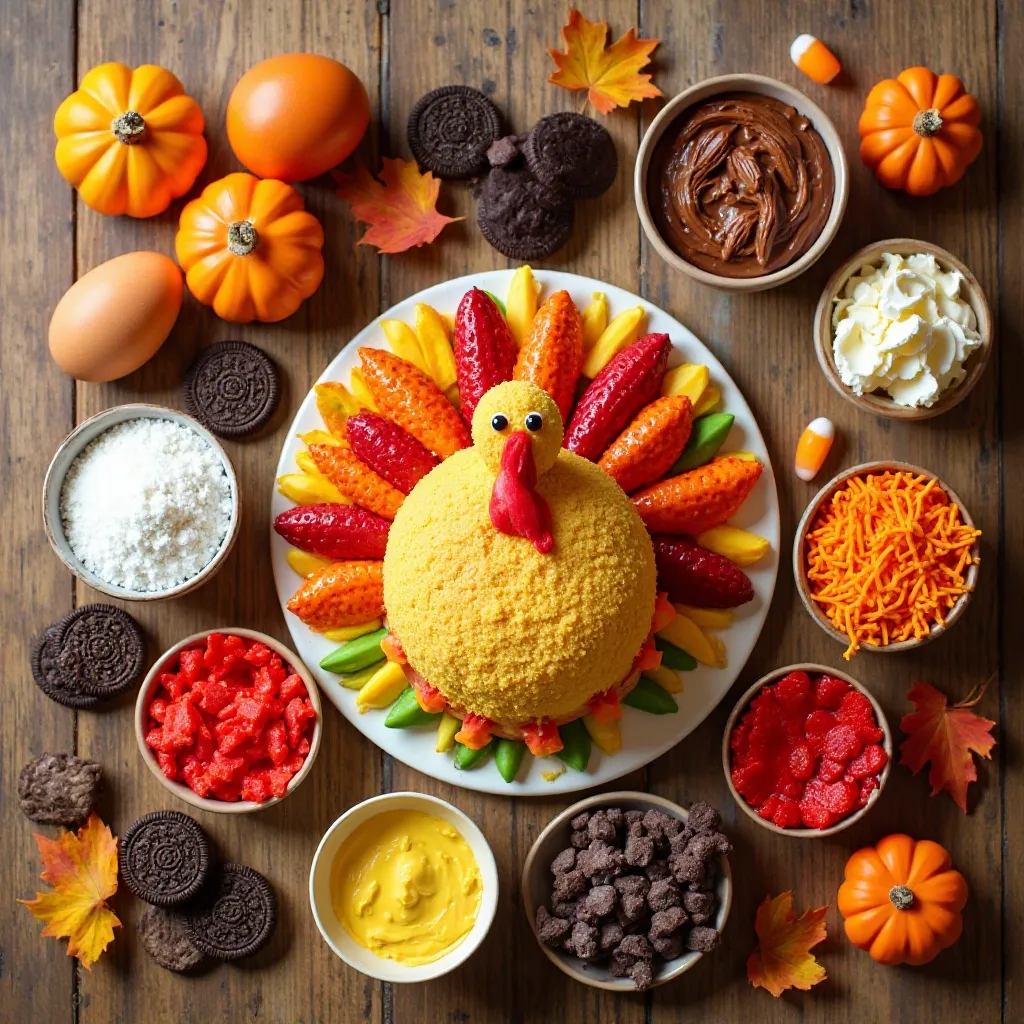
For Decoration:
- 1 package Oreo cookies (for tail feathers)
- 1 bag candy corn
- 1 bag chocolate chips or candy eyes
- 1 red fruit leather or fondant (for wattle)
- 1 package Milano cookies or wafer cookies (optional, for wing texture)
- Orange fondant or fruit leather (for beak and feet)
Step-by-Step Instructions
Baking the Cake Layers
Start by preheating your oven to 350°F. Prepare three 9-inch round cake pans by greasing them thoroughly and lining the bottoms with parchment paper—this ensures easy removal later. Mix your cake batter according to package directions, or use your favorite homemade recipe. Here’s my secret: add a small box of instant pudding mix to boxed cake batter for extra moisture and flavor. Divide the batter evenly among the three pans, using a kitchen scale for precision if you have one.
Bake for 30-35 minutes until a toothpick inserted in the center comes out clean. Don’t open the oven door during the first 25 minutes, as this can cause the cakes to sink. Once done, let them cool in the pans for 10 minutes, then turn out onto wire racks to cool completely. This is crucial—decorating warm cake is a recipe for disaster, as the frosting will melt and slide right off!
Preparing the Buttercream
While your cakes cool, make your buttercream frosting. Beat the softened butter on medium-high speed for 3-4 minutes until it’s light and fluffy—don’t skip this step, as it creates the best texture. Gradually add the powdered sugar, one cup at a time, mixing on low speed to avoid a sugar cloud in your kitchen. Once incorporated, add the vanilla, salt, and heavy cream. Beat on high speed for 3-5 minutes until the frosting is smooth, fluffy, and spreadable.
Divide your frosting into separate bowls. You’ll need the largest portion colored in varying shades of brown (mix brown, orange, and a touch of red for realistic turkey coloring). Keep some white for highlights, and create small amounts of red, orange, and yellow for detail work. Gel food coloring works best as it won’t thin the frosting.
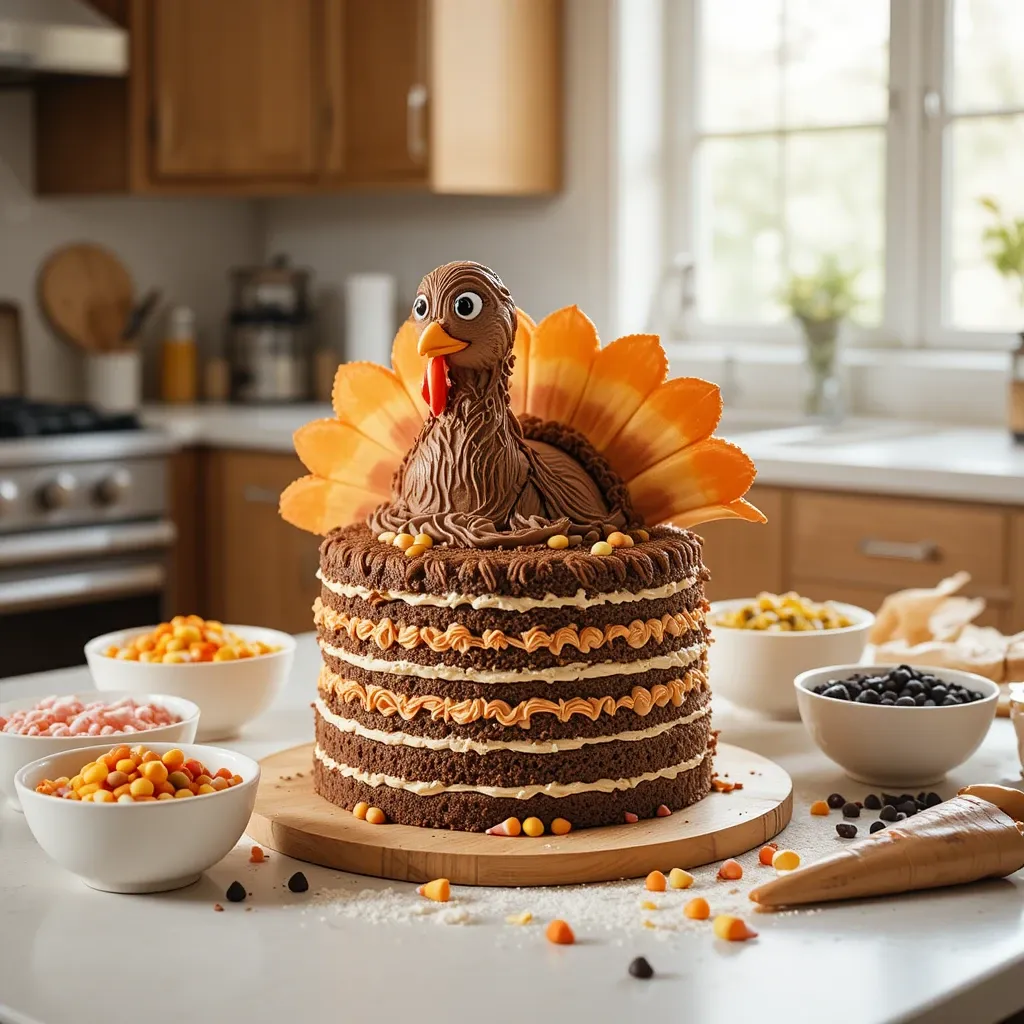
Assembling the Turkey Body
Level your cake layers using a serrated knife or cake leveler to create flat surfaces. Place your first layer on a cake board or serving platter. Spread a generous layer of frosting on top, about 1/4 inch thick. Add the second layer and repeat. Top with the third layer, placing it cut-side down for a flat top.
Now apply a thin crumb coat—a light layer of frosting that seals in crumbs. Spread a thin layer all over the cake, then refrigerate for 30 minutes. This step seems tedious but makes the final coating smooth and professional-looking. After chilling, apply your final thick coat of brown-toned frosting, using an offset spatula to smooth the sides and top.
Creating the Turkey Shape
Here’s where it gets fun! Use a separate small round cake (about 6 inches) or stack cupcakes for the turkey’s head and neck, positioned at the top front of your main cake. Cover this section with frosting, creating a rounded, three-dimensional turkey body. Use darker brown frosting to create shadows and dimension, applying it to the lower portions of the turkey and blending upward to lighter shades.
With a piping bag fitted with a small round tip, pipe vertical lines down the body to mimic turkey feather texture. Don’t worry about perfection—turkeys are naturally textured! Use a toothpick or skewer to drag through the frosting slightly, creating a ruffled feather effect.
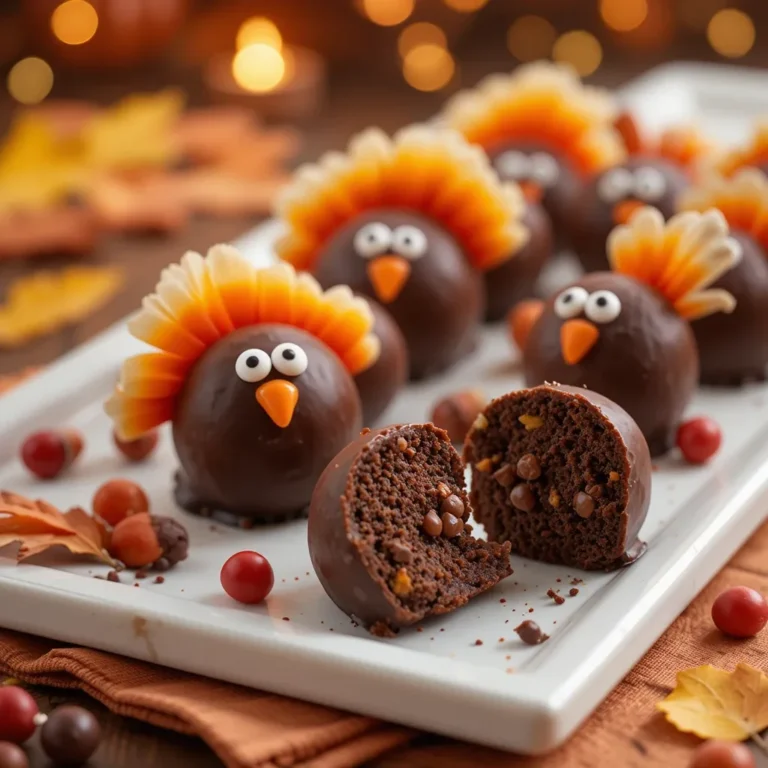
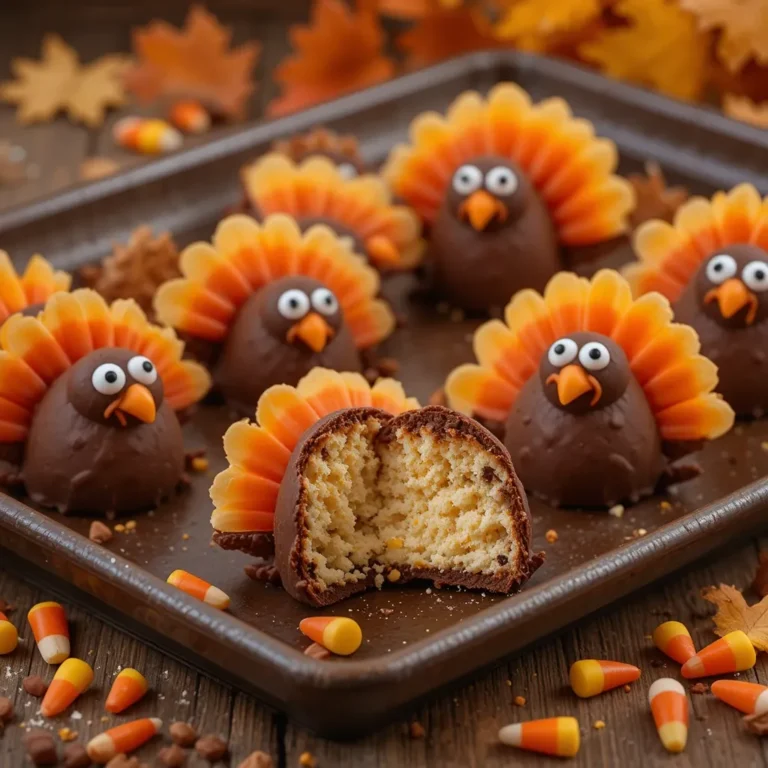
Adding the Decorative Elements
Push Oreo cookies vertically into the back of the cake to create the tail feathers—the classic turkey fan. Arrange them in a semi-circle for maximum visual impact. Between and around the Oreos, insert candy corn pointing upward to add color and mimic additional feathers. You can also attach candy corn to the Oreos using dots of frosting.
For the face, use two chocolate chips or candy eyes positioned on the head portion. Create a small orange triangle from fondant or rolled fruit leather for the beak. Roll a small piece of red fruit leather or fondant for the wattle, positioning it below the beak. For feet, cut orange fondant into three-toed shapes and place them peeking out from the front bottom of the cake.
If you’re using Milano cookies or wafers, insert them on the sides to create wings, angling them slightly outward. Dust everything with edible gold luster dust for an extra-special shimmer if you’re feeling fancy!
What to Serve Turkey Cake Design With
This turkey cake design is a stunning dessert on its own, but pairing it thoughtfully enhances the entire experience. Serve it alongside:
Beverages: Hot apple cider, spiced coffee, or vanilla chai tea complement the warm fall flavors beautifully. For adults, a dessert wine like Moscato or a smooth Irish cream liqueur pairs wonderfully.
Ice Cream: A scoop of vanilla bean, butter pecan, or cinnamon ice cream alongside each slice adds a creamy contrast to the cake’s texture.
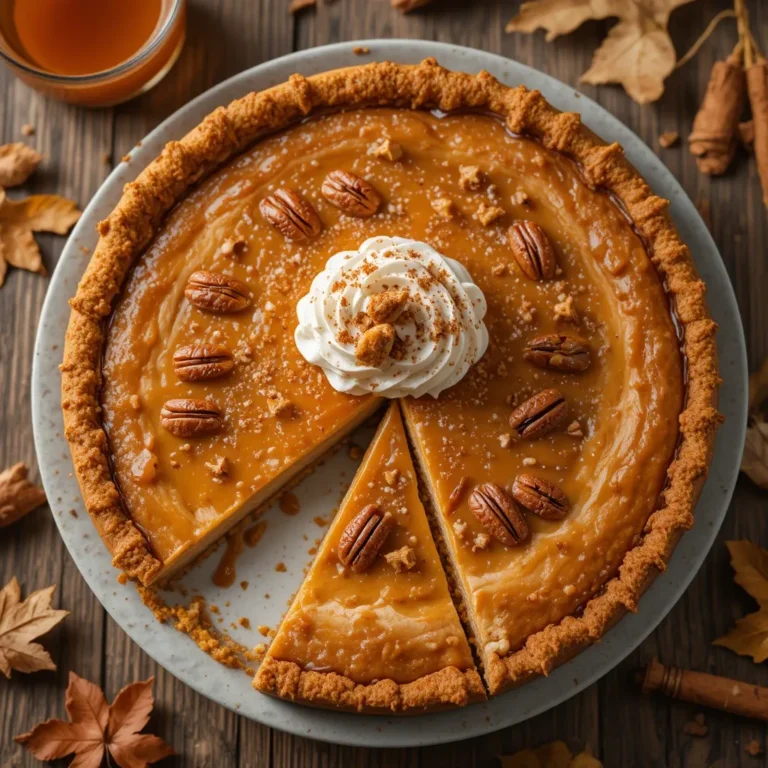
Other Desserts: If you’re creating a full dessert table, pair your turkey cake with pumpkin pie, apple crisp, or pecan tarts for variety. The turkey cake becomes the centerpiece while offering different flavor profiles.
Whipped Cream Bar: Set up a whipped cream station with various toppings—caramel sauce, crushed nuts, mini chocolate chips—letting guests customize their slice.
Top Tips for Perfecting Turkey Cake Design
Use Room Temperature Ingredients
Everything should be at room temperature—butter, eggs, milk. Cold ingredients don’t incorporate well and can result in lumpy batter or frosting. Take items out of the fridge 1-2 hours before starting.
Don’t Overmix Your Batter
Mix cake batter just until ingredients are combined. Overmixing develops gluten, creating a tough, dense cake instead of the tender crumb you want. Mix on low speed and stop as soon as you don’t see dry ingredients.
Invest in Gel Food Coloring
Liquid food coloring can make your frosting runny. Gel colors are concentrated, so you need less, and they won’t compromise your frosting’s consistency. A little goes a long way!
Chill Between Steps
Refrigerate your cake after the crumb coat and whenever the frosting seems too soft to work with. Cold frosting is easier to pipe and holds shapes better.
Test Your Decorations First
Before inserting cookies or candies directly into your masterpiece, test them on a small frosted surface. This helps you visualize placement and ensures they’ll stay put.
Make It Ahead
Bake cake layers a day ahead, wrap them tightly, and refrigerate. You can even freeze them for up to a month! This spreads out the work and actually makes cakes easier to frost when slightly chilled.
Embrace Imperfection
Real turkeys aren’t perfectly symmetrical, and neither should your cake be! Rustic, handmade charm is part of the appeal. If a feather falls or frosting isn’t perfect, just add more decoration to that area.
Storing and Reheating Tips
Room Temperature Storage: If serving within 24 hours and your home is cool (below 70°F), you can keep the turkey cake design covered at room temperature. Use a cake dome or carefully tented aluminum foil to protect decorations.
Refrigerator Storage: For longer storage, refrigerate the cake in an airtight container or covered with plastic wrap for up to 5 days. Buttercream frosting holds up beautifully in the fridge. Before serving, let it sit at room temperature for 30-45 minutes—cold cake doesn’t have the same flavor impact.
Freezing: You can freeze decorated cake for up to 2 months! Place it in the freezer uncovered for 1 hour to harden the frosting, then wrap carefully in plastic wrap and aluminum foil. Thaw overnight in the refrigerator, then bring to room temperature before serving. Note: Candy decorations may weep slightly after freezing, so you might want to add fresh candy corn before serving.
Leftover Slices: Individual slices can be wrapped in plastic wrap and stored in airtight containers. They’ll stay fresh in the fridge for 5-7 days or frozen for up to 3 months.
Reheating: While cake is typically served at room temperature, if you prefer it slightly warm, microwave individual slices for 10-15 seconds. This brings out the flavors and makes the cake extra tender.
Frequently Asked Questions
Can I make a turkey cake design without fondant?
Absolutely! This entire design works beautifully with just buttercream frosting and common candies. Fondant is optional and only needed if you prefer extremely smooth, precise details. Most home bakers achieve stunning results using only frosting and creativity.
What cake flavor works best for turkey cake design?
Any flavor you love! Vanilla and chocolate are classics, but spice cake, carrot cake, and pumpkin cake are perfect for Thanksgiving themes. Match the flavor to your family’s preferences—the decoration works with any base.
How far in advance can I make a turkey cake?
Bake the cake layers up to 1 month ahead and freeze them. Decorate the cake 1-2 days before serving and refrigerate. This actually makes decorating easier and ensures you’re not rushed on the day of your event.
My buttercream is too soft to pipe. What should I do?
Refrigerate the frosting for 15-20 minutes, then re-whip it. If it’s still soft, add more powdered sugar 1/4 cup at a time until you reach the right consistency. Too much liquid or warm butter are the usual culprits.
Can I use store-bought frosting instead of homemade?
Yes, though you’ll need 3-4 containers for a full turkey cake design. Store-bought frosting is softer, so refrigerate your cake between decorating steps. The taste won’t be as rich, but it absolutely works in a pinch!
What if I don’t have Oreos for the tail feathers?
Get creative! Use Milano cookies, wafer cookies, or even cut-out cookies decorated to look like feathers. You can also pipe large buttercream feathers directly onto parchment paper, freeze them, then insert into the cake.
How do I transport a turkey cake without ruining it?
Use a sturdy cake box or carrier. If your tail feathers are tall, you may need to remove and reinsert them at your destination. Alternatively, transport the cake and decorations separately, doing final assembly on-site.
Is turkey cake design suitable for beginners?
Definitely! While it looks impressive, the techniques are basic—baking, frosting, and decorating. Start with a simpler design using fewer colors and decorations. Even a simple version looks amazing and tastes delicious!
Avoiding Common Baking Mistakes
Dense, Heavy Cake: This usually results from overmixing batter or using expired leavening agents. Check expiration dates on baking powder and baking soda. Mix batter only until ingredients are just combined, not a second longer.
Cake Sticking to Pans: Always grease pans thoroughly and use parchment paper on the bottom. Let cakes cool in pans for exactly 10 minutes—too short and they’ll fall apart, too long and they’ll stick.
Lopsided Cake Layers: Uneven oven temperature causes this. Rotate pans halfway through baking, and invest in an oven thermometer to ensure accurate temperature. Level layers with a knife before stacking.
Frosting Pulling Up Crumbs: Your cake wasn’t completely cool, or you skipped the crumb coat. Always let cakes cool completely (they should be cool to touch), and never skip that first thin frosting layer.
Decorations Falling Off: The frosting was too soft or warm. Refrigerate your cake between adding heavy decorations like cookies. Use toothpicks for extra support if needed.
Colors Bleeding Together: You didn’t let previous layers set before adding new colors. Refrigerate for 10-15 minutes between color applications, or use plastic wrap to mask off sections.
Dry Cake: Overbaking is the main culprit. Check cakes 5 minutes before the recommended time. They’re done when a toothpick comes out with just a few moist crumbs—not completely clean. Also, adding pudding mix to boxed cakes helps immensely.
Buttercream Breaking or Separating: Temperature issues cause this. Butter should be around 68°F—soft but not greasy. If frosting breaks, try warming the bowl gently with a hairdryer while mixing, or refrigerate and re-whip.
Nutrition Information
| Nutrient | Per Slice (1/12 of cake) |
|---|---|
| Calories | 520 |
| Total Fat | 24g |
| Saturated Fat | 14g |
| Cholesterol | 85mg |
| Sodium | 380mg |
| Total Carbohydrates | 72g |
| Dietary Fiber | 1g |
| Sugars | 58g |
| Protein | 4g |
Note: Nutritional values are approximate and vary based on specific ingredients used.
Final Thoughts
Creating a turkey cake design is more than just baking—it’s about crafting memories and bringing joy to your holiday table. Yes, it takes a few hours and some patience, but the smiles, photos, and “how did you make that?!” questions make every minute worthwhile.
I’ll never forget the year my daughter helped me make our first turkey cake. We laughed at our lopsided frosting, cheered when the Oreos stayed upright, and felt so proud presenting it at dinner. That cake wasn’t perfect, but it was ours, made with love and lots of giggles.
Your turkey cake doesn’t need to be flawless to be wonderful. In fact, the handmade touches and little imperfections make it even more special. So gather your ingredients, invite your kids or friends to help, put on some festive music, and enjoy the process.
This Thanksgiving, skip the ordinary store-bought dessert. Create something extraordinary—a turkey cake design that becomes your new holiday tradition. I promise you, it’ll be the most photographed dish on your table!