Turkey Cupcakes Made Simple – Ready in 30 Minutes
Turkey cupcakes are a must for Thanksgiving! Fun, and festive, these cupcakes make a delightful holiday treat for kids, family, and friends alike.
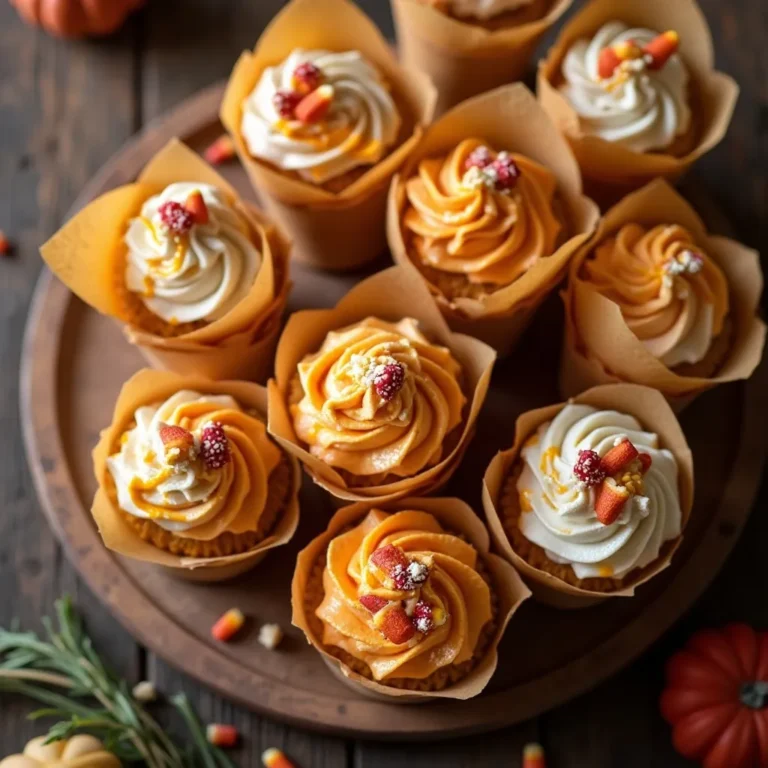
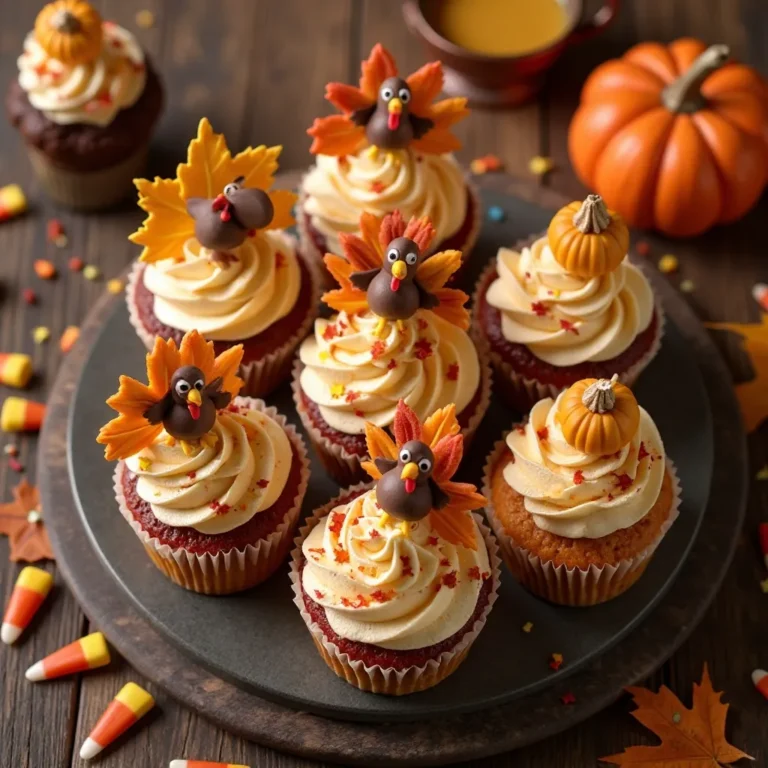
There’s something magical about transforming ordinary cupcakes into adorable turkey cupcakes that make everyone smile at the Thanksgiving table. These festive treats combine moist, fluffy vanilla cupcakes with creamy frosting and candy decorations to create the most charming edible turkeys you’ve ever seen.
I still remember the first time my daughter helped me make these—her eyes lit up when we added the candy corn feathers, and suddenly baking became our favorite holiday tradition. What makes turkey cupcakes truly special is how simple they are to create, taking just 30 minutes from start to finish, yet they look like you spent hours on them.
They’re perfect for kids and adults alike, and honestly, they’re almost too cute to eat (almost!). If you loved my pumpkin spice cupcakes from last fall, you’ll absolutely adore these turkey cupcakes—they’re just as delicious but with an extra dose of Thanksgiving charm that’ll have your guests reaching for seconds.
What Are Turkey Cupcakes?
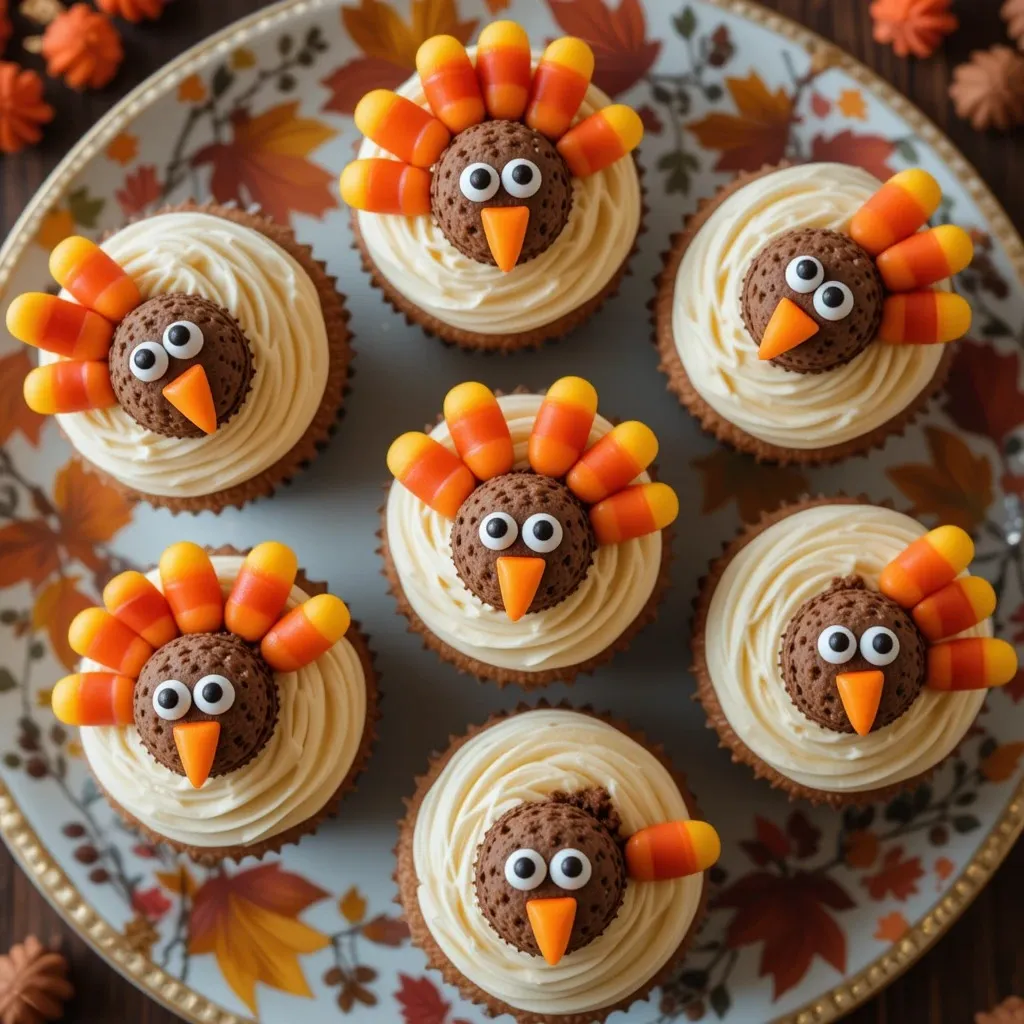
Ever wonder why we call them turkey cupcakes when they’re really just frosted cupcakes in disguise? Well, the name comes from their adorable turkey-shaped decorations featuring candy corn “feathers,” cookie “bodies,” and those sweet little candy eyes that seem to follow you around the kitchen.
It’s like the saying goes—the way to a family’s heart is through adorable holiday desserts that taste as good as they look! These whimsical treats got their name from creative bakers who wanted to bring Thanksgiving fun to the dessert table without spending hours on complicated decorating. Why not grab your ingredients and join the turkey cupcake revolution? Your Thanksgiving table is about to get a whole lot cuter!
Why You’ll Love This Turkey Cupcakes Recipe
The absolute best part about turkey cupcakes is how they turn ordinary baking into a fun family activity that creates lasting memories. I can’t tell you how many times I’ve heard giggles erupt in my kitchen as kids carefully place candy eyes on their chocolate-covered cookies. These cupcakes are conversation starters, photo magnets, and the kind of dessert that makes everyone feel like a kid again.
Making turkey cupcakes at home saves you serious money compared to buying fancy decorated cupcakes from bakeries. Store-bought decorated cupcakes can cost $4-6 each, but you can make an entire batch of 24 turkey cupcakes for under $15. Plus, you get to control the quality of ingredients—real butter, pure vanilla extract, and your choice of chocolate chips or candy melts for that glossy finish.
The flavor combination is absolutely heavenly. Moist vanilla cupcakes topped with rich chocolate or caramel frosting, crunchy cookies, sweet candy corn, and those little pops of chocolate from the candy-coated pieces create a texture and taste experience that’s pure Thanksgiving joy.
The sweetness is perfectly balanced, and every bite offers something different. If you enjoyed my chocolate chip cookie cupcakes, you’ll notice similar flavor profiles here but with that festive holiday twist. Trust me, once you make these turkey cupcakes at home, you’ll wonder why you ever bought store-bought decorated desserts!
How to Make Turkey Cupcakes
Quick Overview
These turkey cupcakes are surprisingly easy to make and deliver big on both taste and presentation. The cupcakes themselves are classic vanilla with a tender crumb and buttery flavor that pairs perfectly with chocolate frosting.
What makes them stand out is the creative decorating process that transforms simple cupcakes into festive turkeys. The chocolate-covered cookies create sturdy “bodies” while candy corn becomes colorful tail feathers.
Total Time Breakdown:
- Prep Time: 15 minutes
- Baking Time: 18-20 minutes
- Cooling Time: 30 minutes
- Decorating Time: 20 minutes
- Total Time: Approximately 1 hour 30 minutes
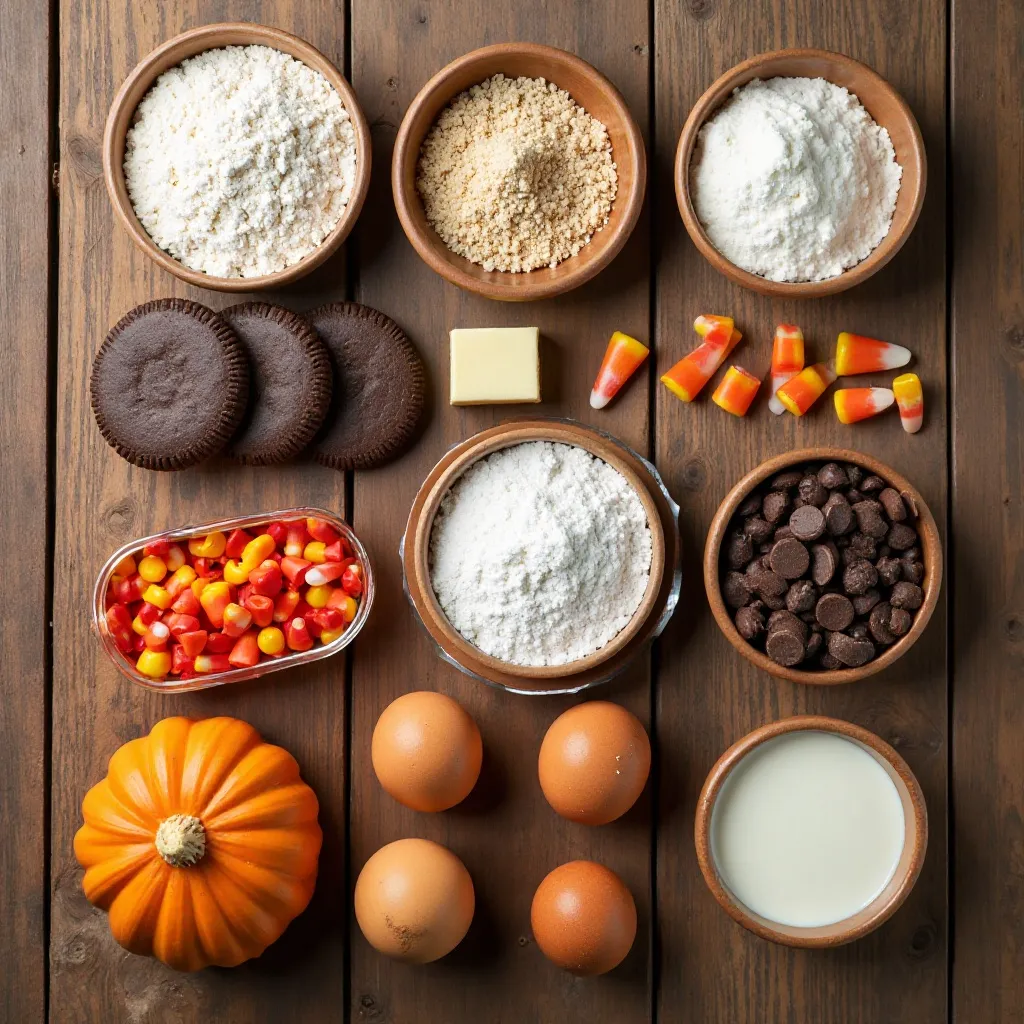
Key Ingredients for Turkey Cupcakes
For the Cupcakes:
- 1 ½ cups all-purpose flour
- 1 ½ teaspoons baking powder
- ¼ teaspoon salt
- ½ cup unsalted butter, softened
- 1 cup granulated sugar
- 2 large eggs, room temperature
- 2 teaspoons pure vanilla extract
- ½ cup whole milk, room temperature
For the Frosting:
- 1 cup unsalted butter, softened
- 3-4 cups powdered sugar
- 3 tablespoons heavy cream
- 2 teaspoons vanilla extract
- Pinch of salt
For the Turkey Decorations:
- 24 chocolate sandwich cookies (like Oreos)
- 1 cup chocolate chips or candy melts
- 24 pieces candy corn (for beaks)
- 48 candy eyes
- 144 pieces candy corn (for tail feathers, 6 per turkey)
- 24 pieces orange or red candy-coated chocolates (for wattles)
Step-by-Step Instructions
Step 1: Prepare Your Baking Station
Preheat your oven to 350°F (175°C). Line two 12-cup muffin tins with paper cupcake liners. I always use paper liners instead of greasing the pan because it makes cleanup easier and helps the cupcakes maintain their shape. Set your tins aside while you prepare the batter.
Step 2: Mix the Dry Ingredients
In a medium bowl, whisk together the flour, baking powder, and salt. Whisking aerates the flour and ensures the baking powder is evenly distributed throughout. This step might seem small, but it’s crucial for achieving evenly risen cupcakes without any pockets of baking powder. Set this bowl aside.
Step 3: Cream the Butter and Sugar
In a large mixing bowl or stand mixer, beat the softened butter and sugar together on medium-high speed for 3-4 minutes. The mixture should become pale, fluffy, and almost doubled in volume. This creaming process incorporates air into the batter, which is essential for light, fluffy cupcakes. Don’t rush this step—properly creamed butter creates the perfect texture.
Step 4: Add Eggs and Vanilla
Add the eggs one at a time, beating well after each addition until fully incorporated. Then mix in the vanilla extract. The mixture might look slightly curdled at this point, but don’t worry—that’s completely normal. The eggs should be at room temperature because cold eggs can cause the butter to seize up and create a lumpy batter.
Step 5: Alternate Dry Ingredients and Milk
With your mixer on low speed, add one-third of the flour mixture to the butter mixture. Mix just until combined, then add half of the milk. Add another third of the flour, then the remaining milk, and finally the last of the flour mixture. Mix each addition just until no white streaks remain. Overmixing develops gluten and creates tough, dense cupcakes, so stop mixing as soon as the ingredients come together.
Step 6: Fill and Bake
Use a cookie scoop or spoon to divide the batter evenly among the prepared cupcake liners, filling each about two-thirds full. This is the perfect amount—too little and your cupcakes will be flat, too much and they’ll overflow. Bake for 18-20 minutes, or until a toothpick inserted into the center comes out clean or with just a few moist crumbs. The tops should spring back when lightly touched.
Step 7: Cool Completely
Remove the cupcakes from the oven and let them cool in the pan for 5 minutes. Then transfer them to a wire cooling rack to cool completely, about 30 minutes. This cooling time is important—frosting warm cupcakes will cause the frosting to melt and slide right off. I learned this lesson the hard way during my first Thanksgiving baking attempt!
Step 8: Make the Buttercream Frosting
While the cupcakes cool, make your frosting. Beat the softened butter on medium speed for 2-3 minutes until smooth and creamy. Gradually add the powdered sugar, one cup at a time, beating on low speed after each addition. Add the heavy cream, vanilla extract, and salt, then increase the speed to medium-high and beat for 3-4 minutes until the frosting is light and fluffy. If the frosting is too thick, add more cream one teaspoon at a time. If it’s too thin, add more powdered sugar.
Step 9: Prepare the Turkey Bodies
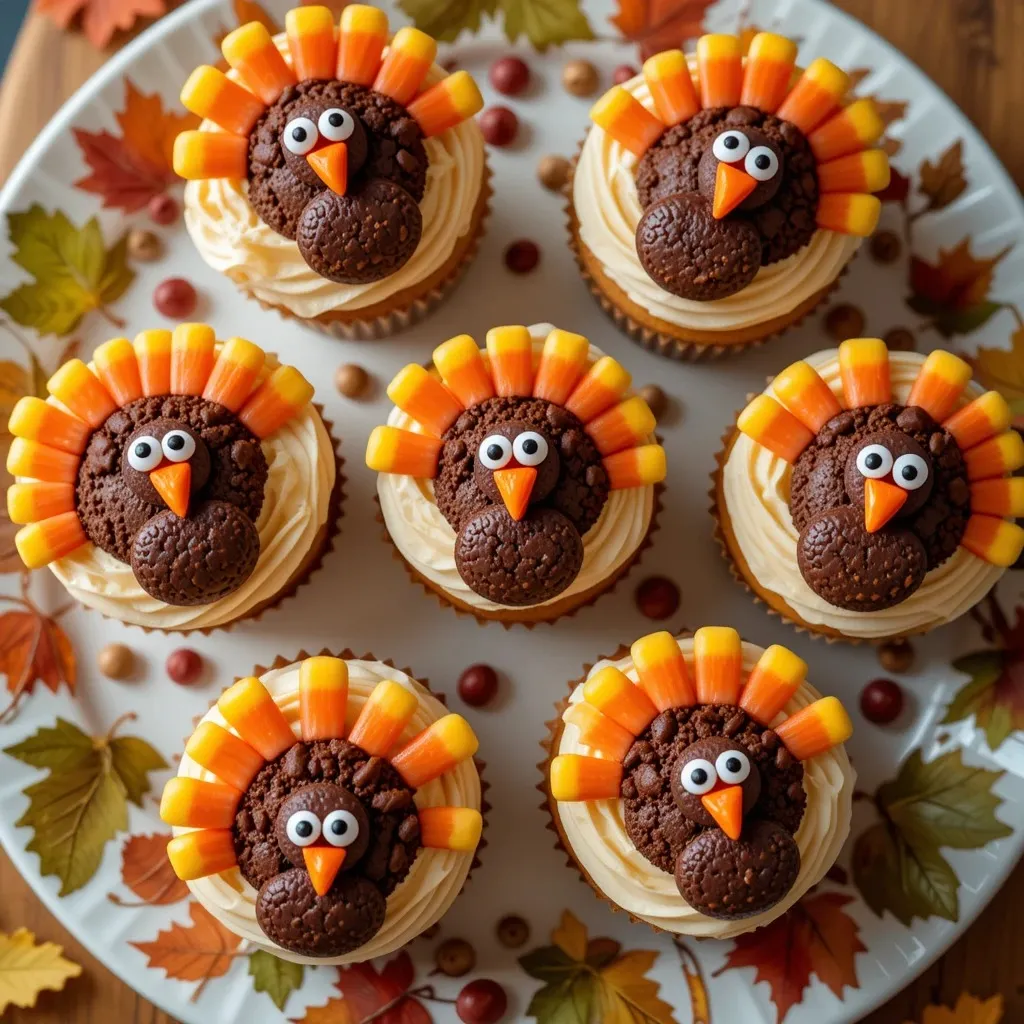
Melt the chocolate chips or candy melts in a microwave-safe bowl in 30-second intervals, stirring between each interval, until completely smooth. Be careful not to overheat the chocolate. Dip the top of each chocolate sandwich cookie into the melted chocolate, allowing excess to drip off. Place the cookies on a parchment-lined baking sheet and let the chocolate set for about 10 minutes at room temperature or 5 minutes in the refrigerator.
Step 10: Frost the Cupcakes
Once the cupcakes are completely cool, frost them generously using a piping bag, offset spatula, or butter knife. I like to create a slightly domed frosting layer that gives the turkey body something to lean against. Spread the frosting all the way to the edges so the candy corn feathers have a good base to stick to.
Step 11: Create the Turkey Feathers
Working with one cupcake at a time, insert 5-6 pieces of candy corn into the back edge of the frosting, pointed end down, to create the turkey’s tail feathers. Fan them out in a semi-circle pattern. The frosting acts as glue, holding everything in place. I usually use a variety of candy corn colors to make the feathers more vibrant and eye-catching.
Step 12: Attach the Turkey Body
Gently press one chocolate-covered cookie at an angle into the center of the frosting, leaning it slightly back against the candy corn feathers. The cookie should be positioned so it looks like the turkey is sitting upright. Press it firmly enough to secure it but not so hard that you crack the cookie.
Step 13: Add the Face Details
Use a tiny dab of frosting or melted chocolate to attach two candy eyes to the cookie. Position them near the top third of the cookie. For the beak, press one piece of candy corn (pointed end out) into the center between the eyes. For the wattle, attach a small orange or red candy-coated chocolate piece just below the beak using a tiny bit of frosting.
Step 14: Finishing Touches
Step back and admire your adorable turkey cupcakes! If any decorations seem loose, add tiny dots of frosting to secure them. Repeat the decorating process with all remaining cupcakes. The best part? No two turkeys will look exactly alike, and that’s what makes them so charming!
What to Serve Turkey Cupcakes With
Turkey cupcakes are incredibly versatile and work beautifully as part of your Thanksgiving dessert spread or as a standalone treat. Here are my favorite pairings:
Hot Beverages: Serve these cupcakes alongside spiced apple cider, pumpkin spice lattes, or hot chocolate with whipped cream. The warmth of the drinks complements the sweetness of the cupcakes perfectly, especially on chilly autumn afternoons.
Fresh Fruit: Balance the richness of the cupcakes with a fresh fruit platter featuring apple slices, pear wedges, and red grapes. The crisp, juicy fruit provides a refreshing contrast to the sweet frosting and chocolate.
Ice Cream: For an extra-indulgent dessert, serve turkey cupcakes with a scoop of vanilla bean or butter pecan ice cream on the side. The cold, creamy ice cream against the soft cupcake creates an amazing texture combination.
Coffee Bar: Set up a coffee station with various roasts and creamers so guests can customize their perfect pairing. The slightly bitter notes of coffee cut through the sweetness beautifully.
Cheese Board: This might sound unusual, but a small cheese board with mild cheeses like brie or cream cheese with crackers and honey provides a savory contrast that makes the sweet cupcakes even more enjoyable.
Top Tips for Perfecting Turkey Cupcakes
Use Room Temperature Ingredients
Always bring your eggs, butter, and milk to room temperature before baking. Cold ingredients don’t blend as smoothly and can create a dense, uneven texture. I set my ingredients out on the counter about an hour before I start baking.
Don’t Overmix the Batter
Once you start adding flour to your wet ingredients, mix only until you no longer see white streaks. Overmixing develops gluten strands that make cupcakes tough and chewy instead of tender and fluffy. It’s okay if the batter looks slightly lumpy.
Use an Ice Cream Scoop
For perfectly even cupcakes that bake uniformly, use a cookie scoop or ice cream scoop to portion the batter. This ensures every cupcake is the same size and will finish baking at the same time.
Test for Doneness Properly
Insert a toothpick into the center of a cupcake—it should come out clean or with just a few moist crumbs, not wet batter. Start checking at 18 minutes to avoid overbaking, which dries out cupcakes.
Stabilize Your Decorations
If your candy corn feathers or cookie bodies won’t stay in place, pop the decorated cupcakes in the refrigerator for 15-20 minutes. The cold firms up the frosting, creating a stronger hold. Just remember to bring them back to room temperature before serving for the best flavor.
Make Ahead Friendly
You can bake the cupcakes a day in advance and store them unfrosted in an airtight container. Frost and decorate them the day you plan to serve them for the freshest presentation.
Chocolate Work Temperature
When melting chocolate for the cookie bodies, make sure it’s warm but not hot. If the chocolate is too hot, it will take forever to set. If it’s too cool, it will be thick and difficult to work with. Aim for a smooth, flowing consistency.
Frosting Consistency Matters
Your frosting should hold its shape but still be spreadable. If it’s too stiff, decorations won’t stick well. If it’s too soft, everything will slide off. Add liquid or powdered sugar gradually to adjust the consistency.
Storing and Reheating Tips
Room Temperature Storage: Store decorated turkey cupcakes in an airtight container at room temperature for up to 2 days. Place them in a single layer to prevent the decorations from getting damaged. If you need to stack them, place parchment paper between layers.
Refrigerator Storage: Turkey cupcakes can be refrigerated in an airtight container for up to 5 days. The buttercream frosting holds up well in cold storage. However, bring them to room temperature about 30 minutes before serving—cold cupcakes don’t have the same soft, fluffy texture and the flavors are muted.
Freezing Instructions: You can freeze unfrosted cupcakes for up to 3 months. Wrap each cooled cupcake individually in plastic wrap, then place them all in a freezer-safe bag or container. Thaw overnight in the refrigerator or for 2-3 hours at room temperature before frosting and decorating. I don’t recommend freezing decorated cupcakes because the candy decorations can become sticky or lose their crunch.
Decorations Longevity: The candy corn and chocolate decorations remain fresh as long as the cupcakes do, but candy eyes can sometimes weep or get sticky in humid conditions. If you’re making these more than a day in advance, consider adding the candy eyes the day of serving.
Reheating: These cupcakes are best enjoyed at room temperature or slightly cool, so reheating isn’t necessary. If you prefer a warm cupcake, remove all decorations first, then microwave an unfrosted cupcake for 10-15 seconds. The frosting will melt if heated, so enjoy them as-is!
Common Baking Mistakes to Avoid
Mistake #1: Opening the Oven Door Too Early
Every time you open the oven door, the temperature drops significantly, which can cause cupcakes to sink in the middle. Wait until the minimum baking time (18 minutes) before checking them. Use your oven light to peek at them without opening the door.
Mistake #2: Using Old Baking Powder
Baking powder loses its potency over time. If your baking powder is more than 6 months old, test it by mixing a teaspoon with hot water—it should bubble vigorously. Old baking powder results in flat, dense cupcakes that don’t rise properly.
Mistake #3: Overfilling the Cupcake Liners
Filling liners more than two-thirds full causes cupcakes to overflow and create mushroom tops that break off easily. They also may have a dense, gummy texture in the center. Stick to the two-thirds rule for perfect domed tops.
Mistake #4: Decorating Hot Cupcakes
I can’t stress this enough—wait until your cupcakes are completely cool! Even slightly warm cupcakes will melt your frosting, and all your decorations will slide right off. Patience pays off here.
Mistake #5: Using Low-Quality Chocolate
Cheap chocolate chips or candy melts can seize up when melted or have a waxy, unpleasant taste. Invest in good-quality chocolate for the cookie coating—it makes a noticeable difference in both appearance and flavor.
Mistake #6: Skipping the Cookie Coating
Some people try to skip the chocolate coating on the cookies to save time, but this step is crucial. The chocolate layer gives the cookies a smooth surface for attaching eyes and beaks, plus it adds an extra layer of delicious chocolate flavor.
Mistake #7: Forcing Decorations
If candy corn or cookies won’t stay in place, don’t force them deeper into the frosting—you’ll just mess up your work. Instead, add more frosting as “glue” or refrigerate the cupcakes to firm up the base.
Frequently Asked Questions
Can I use chocolate cupcakes instead of vanilla?
Absolutely! Chocolate cupcakes work wonderfully for turkey cupcakes. Simply substitute your favorite chocolate cupcake recipe for the vanilla base. The rich chocolate pairs beautifully with the sweet candy decorations. I actually prefer chocolate cupcakes when I’m using caramel frosting—the combination is divine.
What’s the best frosting for turkey cupcakes?
Buttercream frosting is the best choice because it holds decorations securely and tastes delicious. Chocolate buttercream is classic, but caramel, vanilla, or even cream cheese frosting work great too. Avoid whipped cream frosting or thin glazes since they won’t hold the decorations properly.
Can I make these cupcakes dairy-free or gluten-free?
Yes! For dairy-free cupcakes, substitute the butter with vegan butter, use almond milk instead of regular milk, and make a dairy-free frosting using vegan butter and coconut cream. For gluten-free, use a 1:1 gluten-free flour blend designed for baking. The decorations are already gluten-free if you choose gluten-free cookies.
How far in advance can I decorate turkey cupcakes?
You can fully decorate turkey cupcakes up to 24 hours before serving. Store them in an airtight container at room temperature. For best results, I recommend baking the cupcakes and making frosting the day before, then decorating them the morning of your event.
Why are my cupcakes sinking in the middle?
Cupcakes sink for several reasons: opening the oven door too early, using expired baking powder, overmixing the batter, or having the oven temperature too high. Make sure your oven temperature is accurate—an oven thermometer is a great investment. Also, avoid opening the door during baking.
Can kids help make turkey cupcakes?
Absolutely—this is one of the best kid-friendly baking projects! Kids can help measure ingredients, mix the batter, fill cupcake liners, and especially love decorating the turkeys. The decorating process is forgiving and fun, making it perfect for little hands. Just supervise the oven work and hot chocolate melting.
What can I substitute for candy corn?
If you can’t find candy corn or want to try something different, use small triangular-shaped candies, cut fruit leather into triangle shapes, or even use Reese’s Pieces or M&M’s arranged in a fan pattern. Chocolate chips can also work for a monochromatic look.
My frosting is too soft and decorations won’t stick. What do I do?
Add more powdered sugar, one-quarter cup at a time, until the frosting stiffens up. Alternatively, refrigerate the frosting for 15-20 minutes to firm it up, then re-whip it before using. The frosting should hold stiff peaks but still be spreadable.
Can I use store-bought frosting?
Yes, store-bought frosting works in a pinch! Choose a high-quality brand and whip it with an electric mixer for 2-3 minutes to incorporate air and improve the texture. This makes it fluffier and easier to work with for decorating.
How do I transport turkey cupcakes without ruining them?
Use a cupcake carrier with individual compartments to prevent movement. If you don’t have a carrier, place them in a single layer in a shallow box and secure the box so it doesn’t slide around in your car. Drive carefully around turns! You can also transport unfrosted cupcakes and decorate them at your destination.
Nutrition Information
| Nutrient | Per Cupcake |
|---|---|
| Calories | 385 |
| Total Fat | 18g |
| Saturated Fat | 11g |
| Cholesterol | 55mg |
| Sodium | 125mg |
| Total Carbohydrates | 54g |
| Dietary Fiber | 1g |
| Sugars | 42g |
| Protein | 3g |
Note: Nutrition information is approximate and based on one decorated cupcake with buttercream frosting and standard candy decorations.
Final Thoughts
Turkey cupcakes have become a cherished tradition in my home, and I hope they become one in yours too. There’s something incredibly special about creating edible art that brings joy to both the baker and everyone who sees them on the dessert table. These cupcakes represent everything I love about holiday baking—they’re fun, delicious, forgiving for beginners, and create opportunities to spend quality time with the people you love.
The beauty of this recipe is its flexibility. You can make it exactly as written, or get creative with different frosting flavors, cupcake bases, and decoration styles. Every year, my family tries a new twist—last year we did maple frosting with chocolate cupcakes, and it was phenomenal.
Whether you’re making these for a classroom party, Thanksgiving dinner, or just because you want to spread some autumn cheer, turkey cupcakes deliver on all fronts. They taste amazing, look adorable, and create memories that last far longer than the time it takes to eat them.
So grab your ingredients, gather your little helpers, and get ready to make some turkey cupcakes that’ll have everyone gobbling them up faster than you can say “Happy Thanksgiving!” Trust me, these sweet little turkeys are about to become your new favorite holiday tradition.